|
1.
|
|
3.
|
Select File > New > Application.
|
|
4.
|
Select Blank Application.
|
|
6.
|
|
7.
|
Select Edit > Select All.
|
|
8.
|
Select Format > Add Container > H List Box to align the reports horizontally.
|
|
9.
|
|
10.
|
From the Application red triangle menu, select Run Application.
|
|
11.
|
|
12.
|
Click OK.
|

Tip: The absolute path to the data table is inserted automatically in the application’s Table property. If the data is sample data, the $SAMPLE_DATA path variable is automatically used in the path. You can also enter an absolute or relative path. Remember that the user must have access to this path.
|
2.
|
In the Application Builder window, right-click the primary report and select Use as Selection Filter.
|
|
3.
|
Select Run Application from the Application Builder red triangle menu.
|
|
3.
|
|
6.
|
Select Run Application from the Application Builder red triangle menu.
|

The date selector enables you to select the month and year as well as the date and time for the box.
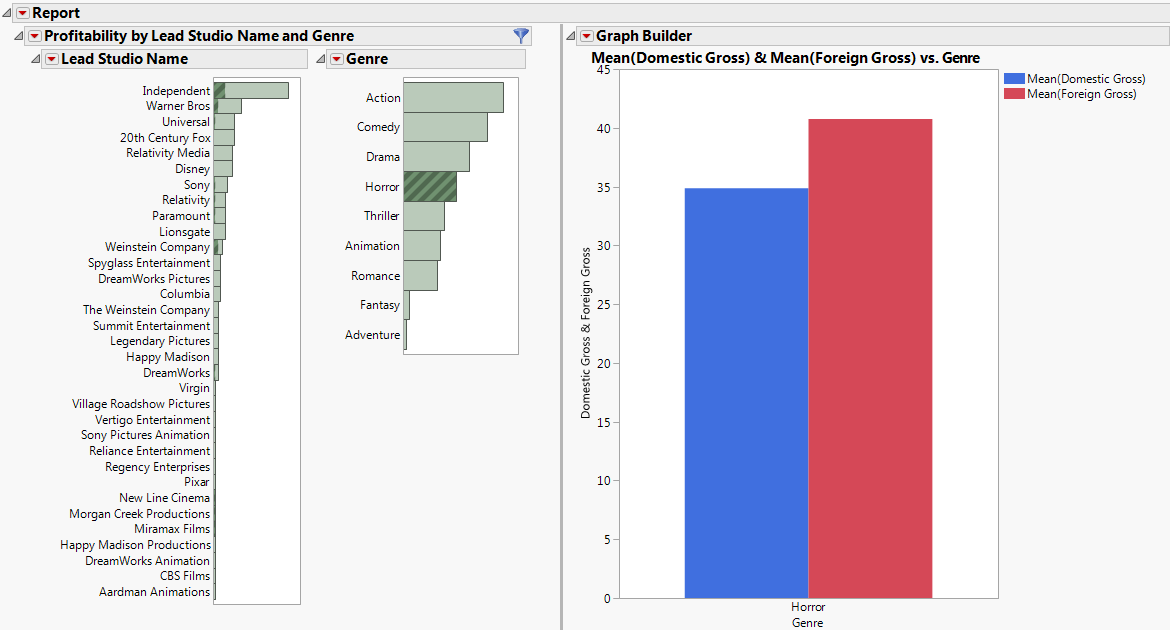
The Launcher with Report sample application combines a platform launch window with the resulting report. The sample application is displayed when you select File > New > Application.
|
1.
|
You will copy and paste JSL from this sample into your copy. Notice that the Iris.jmp sample data table opens when you open the application.
|
2.
|
|
3.
|
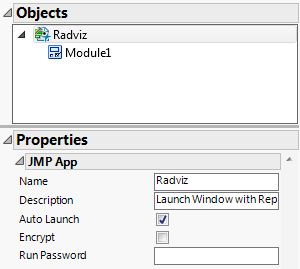
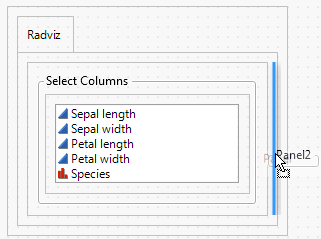
Click the Scripts tab and select Radviz from the Namespace list.
|
dt = Current Data Table();
One of the scripts that you add to this application refers to dt to identify the data table.
|
5.
|
In the Objects pane, select Module1.
|
|
–
|

|
7.
|
Click the LaunchModule tab and drag a V List Box (under Containers) onto the workspace.
|
|
10.
|

|
11.
|
Because you have made many changes, select File > Save and rename the file. Make sure that .jmpappsource is selected as the file type.
|
|
5.
|
Select DataTable1 in the Objects pane.
|
The current data table, Iris.jmp, appears in the Path box.
|
1.
|
|
3.
|

|
1.
|


|
11.
|
Right-click and select Move to Corner.
|
|
12.
|
|
5.
|
|
6.
|
|
11.
|
|
5.
|
|
6.
|
|
1.
|
|
2.
|

|
3.
|
On Windows, select File > Save As, select JMP Application File from the Save as type list, and then click Save.
|
|
4.
|
Distribute the .jmpapp file to users. This file cannot be modified.
|
|
5.
|
Save the .jmpappsource file so you can edit the application and resave it as a JMP application.
|

Selecting a script from the Scripts menu adds a placeholder script to the Scripts tab for the selected module. For example, the Press script shown in Adding a Script Interactively adds the following script to the Scripts tab:
Button5Press=Function({this},
// This function is called when the button is pressed
name = this << Get Button Name;
);
Fill in the placeholder script with your own JSL. In the application that you previously created, you named two variables SetY and ColumnList. Rewrite the preceding placeholder script as follows:
SetY = Function({},
// This function will be called when the Y button is
// pressed
items = ColumnList << Get Selected;
YList << Append(items);
);
Get Selected is passed to the ColumnList because you gave the Col List Box this variable name (ColumnList) in the object properties. Get Selected returns a list of the selected columns. Append(items) appends the selected columns to YList, the variable assigned to the Col List Box in the Cast Selected Columns into Roles window.