|
‒
|
Underline Headings shows the preference setting for Underline Table Headings.
|
|
‒
|
Shade Headings shows the preference setting for Shade Table Headings.
|
|
‒
|
Column Borders contains borders outside columns and divider lines between columns.
|
|
‒
|
Row Borders contains borders outside rows and divider lines between columns.
|
|
‒
|
Shade Alternate Rows shades alternate rows.
|
|
‒
|
Shade Cells shades the body of the table. When used with Shade Alternate Rows, a darker shade is used on alternate rows.
|
Note: Change the format of all report tables by selecting the preceding options in the JMP preferences. On Windows, the Report Tables options are in File > Preferences > Styles. On Macintosh, select the Report Tables options in JMP > Preferences > Styles.
Note: Columns whose names begin with a tilde (~), such as ~Bias, are not applicable to the analysis that you ran and do not appear in the table, even if you place checks next to their names.
approximates the sampling distribution of a statistic. For more information, see the Basic Analysis book.
|
1.
|
Right-click the disclosure icon next to the report and select Edit > Show Properties.
|
|
•
|
|
2.
|
Select Make into Matrix.
|
Note: You must enable Show conditional formatting in Reports preferences for your conditional formatting to appear in JMP reports.
To configure reports to use conditional formatting, you must first set your report preferences to enable showing conditional formatting. See Reports in JMP Preferences for details.
|
3.
|
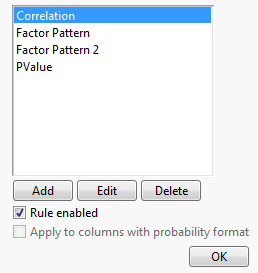
Click Manage Rules.
|
|
3.
|
Click Manage Rules.
|
|
5.
|
If Rule enabled is selected, select to disable.
|
|
6.
|
If Rule enabled is not selected, select to enable.
|
|
3.
|
Click Manage Rules.
|
|
4.
|
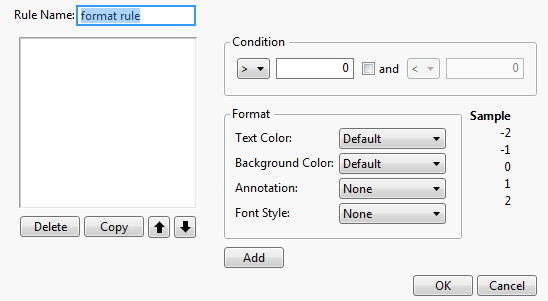
Click Add.
|
|
6.
|
Click OK to save the new rule and return to the previous Conditional Format Rule window.
|
|
7.
|
Select Rule enabled to enable the rule.
|
|
2.
|
Click Edit.
|
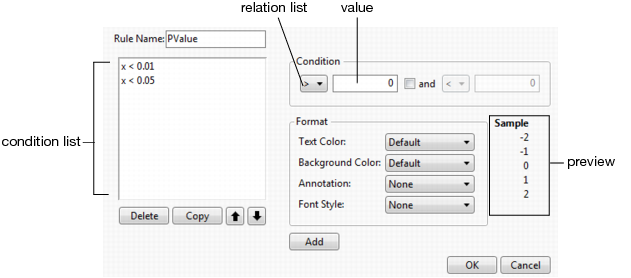
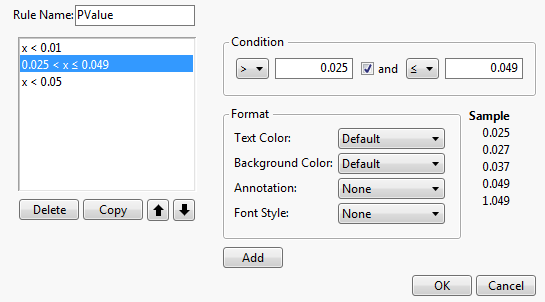
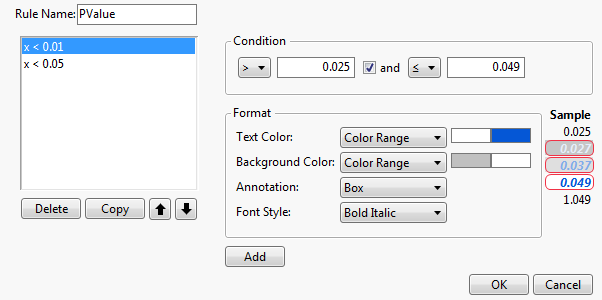
The default rule for PValue includes two conditions. The order of the list indicates the order that the rules are applied. For example, a p-value of 0.04 would not invoke the first rule (x < 0.01) but would invoke the second rule (x < 0.05).
Note: You cannot edit an existing condition within a rule. To edit an existing condition, you must delete the condition and then add it. See Edit an Existing Condition for details.
|
‒
|
Select > or ≥ from the relation drop list and enter the value in the text box.
|
|
‒
|
Select the check box, select the < or ≤ relation, and enter the value.
|
Tip: When you click Add, the condition and its format settings are immediately added to the bottom of the condition list and the Condition and Format areas return to their default settings. Verify your settings before you click Add.
|
4.
|
After verifying your settings, click Add to add the condition to the rule.
|
|
6.
|
Click OK to save your changes and return to the previous Conditional Format Rule window.
|
|
2.
|
Click OK to save your changes and return to the previous Conditional Format Rule window.
|
|
3.
|
Click OK to return to the Preferences window.
|
|
1.
|
|
‒
|
Default - The value appears without color.
|
|
‒
|
Solid - The value appears in the specified color.
|
|
‒
|
Dimmed - The value appears dimmed by the specified transparency.
|
|
‒
|
Color Range - For ranged conditions, the values appear in color gradients within the specified color range.
|
|
‒
|
Dimmed Range - For ranged conditions, values appear in dimmed gradients by the specified transparency range.
|
|
4.
|
Select a Background Color from the drop list:
|
|
‒
|
Default - The value appears without a color background.
|
|
‒
|
Solid - The value appears with the specified color background.
|
|
‒
|
Color Range - For ranged conditions, the values appear with background color gradients within the specified color range.
|
|
6.
|
To have condition values noted, select an Annotation from the drop list:
|
|
‒
|
None - No notation is used on the value.
|
|
‒
|
Box - The value appears in the table with a box around it.
|
|
‒
|
Circle - The value appears in the table with an ellipse around it.
|
|
‒
|
* (asterisk) - An asterisk (*) appears to the right of values in the table.
|
|
7.
|
To style the value text, select the Font Style from the drop list:
|
|
‒
|
None - No style is used to format the value.
|
|
‒
|
Plain - No style is used to format the value.
|
|
‒
|
Bold - The value appears bolded in the table.
|
|
‒
|
Italic - The value appears italicized in the table.
|
|
‒
|
Bold Italic - The value appears bolded and italicized in the table.
|
Tip: When you click Add, the condition and its format settings are immediately added to the bottom of the condition list and the Condition and Format areas return to their default settings. Verify your settings before you click Add.
|
4.
|
After verifying your settings, click Add to add the condition to the rule.
|
|
6.
|
Click OK to save your changes and return to the previous Conditional Format Rule window.
|