A JMP add-in is a JSL script that you can run anytime from the JMP Add-Ins menu. You can create submenus to group your JMP add-ins and have many levels of menus, if desired.
|
•
|
On Windows, select File > New > Add-In.
|
|
•
|
On Macintosh, select File > New > New Add-In.
|
First, in the General Info tab, add the general information that identifies and sets up your add-in.
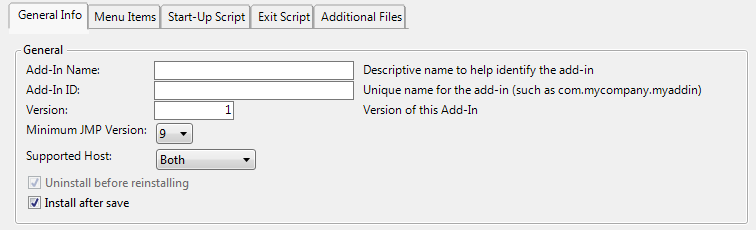
This is the name of the registered add-in, which appears in the View > Add-Ins window.
Unique ID strings are case-insensitive. To ensure uniqueness, it is strongly recommended to use reverse-DNS names (for example, com.mycompany.myaddin). The ID string must meet the following requirements:
|
6.
|
(Optional) Select the check box next to Install after save if you want to install the add-in after saving it.
|
|
1.
|
Click the Menu Items tab.
|
|
2.
|
|
3.
|
If you add a submenu, next to Menu item name, type the name of the submenu.
|
This name appears in the Add-Ins menu.
|
4.
|
Click Add Command.
|
|
5.
|
Next to Menu item name, type the name of the add-in command.
|
|
6.
|
(Optional) Next to Tooltip for menu item, enter the content that appears as a tooltip when the users place their cursor over the menu item.
|
|
7.
|
Add the script. Select either Run this JSL and copy and paste in your script, or select Run JSL in this file and click Browse to find the file containing your script.
|
|
8.
|
(Optional) Select Use the “Here” namespace for unqualified JSL variable names to ensure that all unqualified JSL variables are in the Here namespace, and local only to the script.
|
|
‒
|
If your script creates a custom menu or toolbar, the variables are in the Here namespace by default.
|
|
‒
|
For more information about the Here namespace, see Advanced Scoping and Namespaces in Programming Methods.
|
|
12.
|
Click Save and save the add-in to the desired directory.
|
|
13.
|
Click Close.
|
Click the Start-Up Script tab to add a script that runs when JMP starts up (and the add-in starts). You can select an existing script (Run JSL in this file) or copy and paste in a script (Run this JSL). For example, you could provide a message telling the user that the add-in is installed upon start-up.
Click the Exit Script tab to add a script that runs when JMP exits or when you disable the add-in. You can select an existing script (Run JSL in this file) or copy and paste in a script (Run this JSL). For example, you could provide a prompt for the user to export a JMP data table upon exiting or disabling the add-in.
Save the add-in by clicking the Save button on any tab. This effectively creates the add-in.
|
•
|
If you selected the Install after save option in the General Info tab, then the add-in menu item appears in the Add-Ins menu immediately.
|
|
•
|
If you did not select the Install after save option, when you open the saved add-in file, you are prompted to install the add-in.
|
|
1.
|
Select View > Add-Ins.
|
|
2.
|
Select your add-in and click Unregister.
|
|
3.
|
Reinstall your add-in by either selecting File > Open in JMP, or by double-clicking your .jmpaddin file.
|
|
1.
|
Select File > Open.
|
|
‒
|
|
‒
|
On Macintosh, select the Edit after opening option.
|
|
4.
|
Click Open.
|
To remove an add-in from the Add-Ins menu:
|
1.
|
Select View > Add-Ins.
|
|
3.
|
Deselect the Enabled check box.
|
|
1.
|
Select View > Add-Ins.
|
|
3.
|
Click Unregister.
|
Once you have a .jmpaddin file, you can share that with other users. E-mail the file or you place it in a shared location, such as a network folder, or on the JMP File Exchange (located online in the JMP User Community).
|
‒
|
%ALLUSERSPROFILE%\SAS\JMP\AddIns (any user on this machine can access the add-in)
|
|
‒
|
%LOCALAPPDATA%\SAS\JMP\AddIns (only the current user on this machine can access the add-in)
|
|
‒
|
/Library/Application Support/JMP/AddIns (any user on this machine can access the add-in)
|
|
‒
|
~/Library/Application Support/JMP/AddIns (only the current user on this machine can access the add-in)
|
When JMP starts, the addinRegistry.xml file is read, which contains information about previously registered JMP add-ins. Then JMP looks in the add-in folders for any other add-ins and installs them automatically.
|
•
|
The Home Folder for discovered add-ins does not have to be the AddIns subfolder in which the addin.def file was found. The addin.def file can be the only file in that subfolder and have a Home setting that points to some other location where the add-in files actually reside.
|
If your add-in files are not contained within a .jmpaddin file, you can use the Register Addin() JSL function to manually register the addin.def file. This installs and registers the add-in.
|
•
|
For information about the JSL functions, see the Register Addin and Unregister Addin sections of the JSL Syntax Reference for details.
|
|
•
|
|
•
|
JMP might find a file named addin.def in the specified home folder. If so, values from that file are used for any optional arguments that are not included in the Register Addin() function.
|
|
•
|
The addin.def file is used only for values that are not provided in the Register Addin() function. This function is useful while developing, but not necessary, since the addin.def file is enough to register an add-in.
|
The addin.def file is a simple text file containing name-value pairs that provide registration information about a JMP add-in. Here are the name-value pairs to include in the addin.def file:
Optional. Allows the user-friendly name to be localized for different languages, where xx is the two-letter ISO 639-1 code for the language. If you include localized names, you should still include a language-neutral name in case JMP is running under regional settings for which you do not have a localized name.
Optional. The path to the add-in files. The Home Folder for the add-in is assumed to be the folder where addin.def is located. You need to include a setting for home only if the Home Folder is somewhere else (for example, a network shared folder).
Optional. Valid values are integers corresponding to the JMP major version that is the maximum version that the add-in supports. Use this setting only if there is a known incompatibility between your add-in and a specific version of JMP. You should provide a new version of the add-in for later versions of JMP.
A sample add-in named Simple Calculator.jmpaddin is located in one of the following folders:
|
•
|
On Windows: C:\Program Files\SAS\JMP\<version number>\Samples\Scripts
|
|
•
|
On Macintosh: \Library\Application Support\JMP\<version number>\Sample\Scripts
|
Note: On Windows, in JMP Pro, the “JMP” folder is named “JMPPro”. In JMP Shrinkwrap, the “JMP” folder is named “JMPSW”.
To see what the add-in contains, change the extension to .zip and unzip it into a new folder. To see how it works, change the extension back to .jmpaddin and install.