Toolbars consist of buttons that execute commands and dividers that help you organize the buttons. In Windows, there are many ways to personalize toolbars. For example, you can create, rename, hide, and modify toolbars or buttons. You can also rearrange or delete toolbars and buttons that you create.
Menus consist of commands, submenus, and separators. As with toolbars and buttons, you can create, rename, hide, and modify menus. You can also rearrange or delete menus and menu items that you create.
You personalize toolbars and menus in the Menu Editor. The names of modified items are formatted to indicate which items were created, modified, or hidden, and which items are unsaved, as shown in Menu Editor Options.
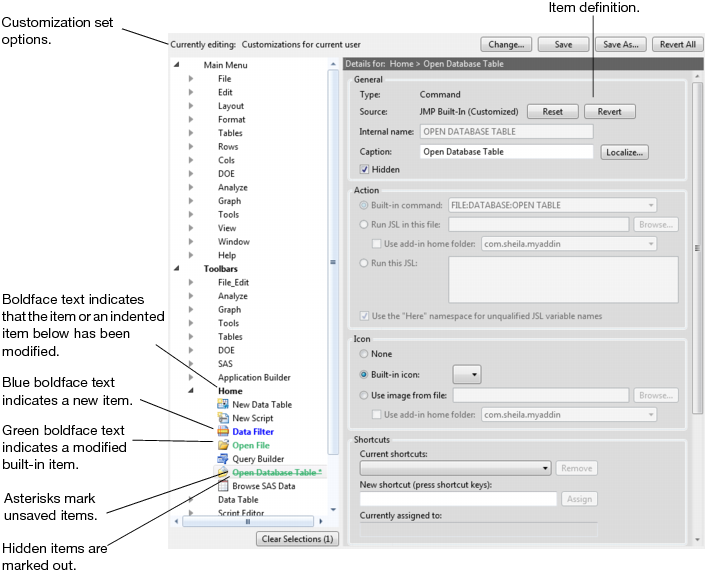
JMP gives you the flexibility to specify which users see your customized toolbars and buttons. Your changes are saved in a text file with the .jmpcust extension called a customization set. By default, your customizations are shown only to the current user; other users who log on to the computer and open JMP do not see your personal toolbars and menus.
When you modify the Current user customization set, JMP creates a backup file of the set. The file is located in your Windows Users folder within the JMP, JMPPro, or JMPSW folder.
When you modify the All users customization set, JMP creates a backup file of the set. The file is located in the Windows All Users folder within the JMP, JMPPro, or JMPSW folder.
The All Users folder does not appear when you try to browse for it, so you must type the path into the Windows Explorer address field.
|
1.
|
Select View > Customize > Menus and Toolbars.
|
|
2.
|
Click Change.
|
|
3.
|
Select the customization set in the Customization Set to Modify area. (By default, changes apply only to the Current user customization set.) Customization Set Options describes the options.
|
|
4.
|
(Optional) To change the set on which the selected customization set is based, select the set in the Starting Set area. (Not available for the All users customization set.) Customization Set Options describes the options.
|
|
5.
|
Click OK.
|
|
Only you see the changes. The customization file is called usercust.jmpcust. Modifying this file manually might cause unexpected results.
|
|
|
Those who use the selected JMP Add-in, and select JMP Add-In customizations as the Starting Set, see the changes. When you modify the customization set for a disabled add-in, those changes do not appear until you enable the add-in.
|
|
|
Changes appear when the selected .jmpcust file is chosen as the customization set. You create this file in a text editor.
|
|
|
Changes appear when this new customization is selected. (After you make your changes, click Save to name the new file in the selected folder.)
|
|
|
The selected customization set is based on the All users customization set. (Available for the Other file or New customization sets. Cannot be deselected from the Current user customization set.)
|
|
|
The selected customization set is based on the Current user customization set. (Available only for Other file and New customization sets.)
|
|
JMP includes toolbars that you can add new buttons to, or you can create your own toolbars. By default, the JMP window type determines which bars appear. For example, the File_Edit toolbar is in all windows. In data tables, the Data Tables toolbar also appears. JMP Toolbars describes the toolbars.
|
|
|
 |
|
|
|
|
|
|
|
|
|
|
|
|
|
|
|
|
|
|
|
|
|
|
 |
|
|
|
|
|
|
|
|
|
When you want to create a toolbar based on an existing toolbar, make a copy of the existing toolbar and then change settings as necessary. See Copy and Paste Menus, Menu Items, Toolbars, and Buttons for details.
|
1.
|
Select View > Customize > Menus and Toolbars.
|
|
2.
|
|
4.
|
Select New Toolbar.
|
|
•
|
The caption appears in the View > Toolbars list, which lets you show or hide the toolbar. Give each toolbar a unique name. JMP merges toolbars with the same name after you close and reopen the Menu Editor.
|
|
2.
|
Enter the internal name next to Internal name.
|
|
3.
|
Enter a unique name for the toolbar or button in the Caption box.
|
|
‒
|
Click the Localize button for the item that you want to customize.
|
|
‒
|
|
‒
|
Click OK.
|
|
5.
|
(Optional) Click Hidden to keep the toolbar hidden after creation.
|
|
7.
|
Click Save to save your changes.
|
Add your own menu items to the main menu bar in JMP. These menus appear before or after menus such as File, Edit, and Tables. An untitled command is inserted automatically in the menu, because all menus must have at least one command.
When you want to create a main menu based on an existing menu, make a copy of the existing menu and then change settings as necessary. See Copy and Paste Menus, Menu Items, Toolbars, and Buttons for details.
|
1.
|
Select View > Customize > Menus and Toolbars.
|
|
2.
|
|
4.
|
|
5.
|
Complete Step 2: Specify the Caption and Internal Name to rename the main menu.
|
|
7.
|
Click Save to save your changes.
|
|
•
|
|
•
|
Submenus are menu items that you click to reveal more menu options. An example of submenu is New inside the top-level File menu. New is also a submenu because it contains commands (such as Data Table and Script).
|
When you want to create a menu item or button based on an existing item, make a copy of the existing item and then change settings as necessary. See Copy and Paste Menus, Menu Items, Toolbars, and Buttons for details.
|
1.
|
Select View > Customize > Menus and Toolbars.
|
|
2.
|
|
4.
|
|
‒
|
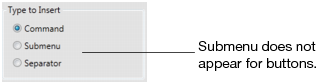
To create a button, select Command.
|
|
‒
|
To create a menu within a menu, select Submenu. (Not available for buttons.)
|
|
6.
|
Click OK.
|
|
•
|
The caption appears in the View > Toolbars list, which lets you show or hide the toolbar. Give each toolbar a unique name. JMP merges toolbars with the same name after you close and reopen the Menu Editor.
|
|
2.
|
Enter the internal name next to Internal name.
|
|
3.
|
|
4.
|
|
‒
|
Click the Localize button for the item that you want to customize.
|
|
‒
|
|
‒
|
Click OK.
|
Clicking a menu item or button either executes a predefined command or runs a JSL script. The script can be stored in a separate file, or you can enter the JSL in the Run this JSL area of the Menu Editor. If users have access to a central location, such as a network, you typically want to run the script from that location. This also simplifies giving users access to updated scripts. Otherwise, store the JSL in the menu item or button definition.
|
•
|
Select Run JSL in this file, and then browse to find the external file.
|
|
•
|
Type the relative path to the JSL script, and select the add-in from the Use add-in home folder list. For example, the following command runs the mds_application.jsl script from the selected add-in:
|
In addition, you can select Use the “Here” namespace for unqualified JSL variable names if you include namespaces in the internal or external JSL script. See the Scripting Guide book for details about namespaces.
|
3.
|
To run an internal JSL script, delete the placeholder text print(“Not implemented.”); in the Run this JSL area and enter the JSL.
|
|
4.
|
(Optional) If your internal or external JSL script includes namespaces, click Use the “Here” namespace for unqualified JSL variable names.
|
|
5.
|
Click Save to save your changes.
|
New menu items have no icon next to the item. New buttons show up as blue squares on the toolbars. You can assign a descriptive icon to the menu item or button. The graphic can reside on your computer or in an add-in folder. .ico, .png, .jpg, and .bmp graphics are supported.
Select this option to show an image that you created. Click Browse, select the graphic, and then click OK. You can also use an icon defined in an add-in. Select Use add-in home folder, and then select the add-in.
|
3.
|
Click Save to save your changes.
|
Shortcuts begin with CTRL, CTRL+SHIFT, CTRL+ALT and end with a number, letter, or symbol that appears on the keyboard. The Function keys (such as F1) are also supported. Many CTRL + letter and Function shortcuts are already assigned in JMP, but you can reassign them to your buttons if you want.
|
‒
|
To assign a new shortcut, click in the New shortcut area and press the shortcut keys. If the keystrokes then appear in the Currently assign to box, press another combination of shortcut keys. (You do not have to delete the keystrokes before pressing the shortcut keys.)
|
|
‒
|
To change a shortcut that you previously specified, click Remove, click in the New shortcut area and press the shortcut keys.
|
|
3.
|
Click Assign.
|
The shortcut appears in the Current shortcuts list.
|
4.
|
Click Save to save your changes.
|
|
•
|
To specify the new location rather than drag the toolbar, right-click the toolbar and select a position from the Location menu. This method lets you move toolbars to the top or bottom of the window. You can also position the toolbars vertically on the left or right side of the window.
|
In some windows, the toolbar is hidden by default. Specifying a new location shows the toolbar in all windows of that type. On Windows, you can change the toolbar preferences to always show toolbars. See Windows Specific in JMP Preferences
|
2.
|
|
2.
|
Select Location, and then select the new position.
|
Note: After you move a toolbar to the left, right, or bottom positions, you can add other toolbars to the same position. For example, you might relocate the File_Edit toolbar to the right side of the JMP window. To add other toolbars on the right side, right-click the bar and select the toolbar that you want to add.
|
1.
|
Select View > Customize > Menus and Toolbars.
|
|
2.
|
|
4.
|
|
‒
|
|
‒
|
|
‒
|
To paste the menu inside the selected menu, select Paste into. (Only available when you select a menu as the new location.)
|
|
‒
|
To cancel the action, select Cancel.
|
|
7.
|
Click Save to save your changes.
|
See Create Main Menus and Create Menu Items and Toolbar Buttons for details about modifying the items.
|
1.
|
Select View > Customize > Menus and Toolbars.
|
|
2.
|
|
‒
|
To paste a toolbar, right-click Toolbar and select Paste. The toolbar appears at the end of the list of toolbars.
|
|
‒
|
To paste a button, right-click the button before or after which you want the new button, and select Paste. If you selected the first button on the toolbar, select the location of the button. Otherwise, the button is pasted below the selected button.
|
|
6.
|
Click Save to save your changes.
|
See Create Toolbars and Create Menu Items and Toolbar Buttons for details about modifying the items.
On Windows, you can rearrange the order of menus, menu items, and buttons that you create. For example, under the File > New menu, you could move your custom menu before the Data Table command.
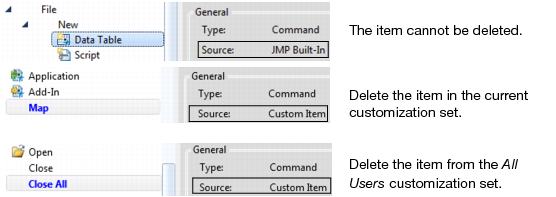
In the item’s General properties, the Source determines whether you can move the item. You can move items if the Source is Custom Item. Built-in items cannot be moved. Items that are defined in other customization sets can be moved only in that customization set. See Change Customization Sets for details.
|
1.
|
Select View > Customize > Menus and Toolbars.
|
|
‒
|
Verify that the Source is Custom Item.
|
|
‒
|
If the Source is All Users or JMP Add-In, select the specified customization set and verify that the Source is Custom Item.
|
|
‒
|
A list appears with the possible locations of the cut item. This occurs when you select a menu (such as File or New) or the first item in a menu (such as Data Table in the File > New menu).
|
|
‒
|
|
‒
|
|
‒
|
To paste the cut item inside the selected menu, select Paste into. (Only available when you select a menu as the new location.)
|
|
‒
|
To cancel the move, select Cancel.
|
|
6.
|
Click Save to save your changes.
|
|
1.
|
Select View > Customize > Menus and Toolbars.
|
|
‒
|
Verify that the Source is Custom Item.
|
|
‒
|
If the Source is All Users or JMP Add-In, select the specified customization set and verify that the Source is Custom Item.
|
|
‒
|
A list appears with the possible locations of the cut button. This occurs when you select the first button on the toolbar (such as New Data Table in the File_Edit toolbar).
|
|
‒
|
The button is pasted at the end of the toolbar. This occurs when you select the name of the toolbar. For example, when you select File_Edit and paste, the button appears after the last button, Run Script. Skip to step 6.
|
|
‒
|
|
‒
|
|
6.
|
Click Save to save your changes.
|
Rather than temporarily showing or hiding toolbars, buttons, menus, and menu items, you can delete items that you created to remove them permanently from JMP. The Source determines whether you can delete the item and which customization set contains the item. Examples of Customization Sources shows examples of customization Source types.
|
1.
|
Select View > Customize > Menus and Toolbars.
|
|
4.
|
|
5.
|
Click Save.
|
|
•
|
When the Source is All Users, change the customization set to All users to hide the item from all users.
|
|
•
|
When the Source is JMP Add-In, change the customization set to JMP Add-In followed by the name of the add-in. The item is shown or hidden in all sets that include the selected JMP add-in.
|
If you do not change the customization set, the item is shown or hidden only in the currently selected set. See Change Customization Sets for details about customization sets.
Note: To quickly hide or show toolbars for the current user, select or deselect them from the View > Toolbars list.
|
1.
|
Select View > Customize > Menus and Toolbars.
|
|
4.
|
Select or deselect Hidden in the General properties. See Step 2: Specify the Caption and Internal Name for details about the General properties.
|
|
5.
|
Click Save to save your changes.
|
Changes to toolbars and menus are stored in customization sets, or plain text files. You open a customization set in JMP to import your modified toolbars and menus. The customizations are then shown in the Menu Editor. See Change Customization Sets for details about the menu customization files.
|
1.
|
Select File > Open.
|
|
2.
|
In the File name list, select All JMP Files (or JMP Menu Files) and then select the customization set.
|
|
3.
|
Click Open.
|
|
4.
|
As you modify items, you discard unsaved changes by clicking the Menu Editor’s Cancel button and clicking Yes to confirm. After saving customizations, you can also remove all customizations and revert to the original menus and toolbars.
|
1.
|
Select View > Customize > Revert to Factory Defaults.
|
|
2.
|
Click Yes to remove the current user’s customizations.
|
|
‒
|
Select No to avoid adding those customizations to the current installation of JMP.
|
|
‒
|
Select Yes to add those customizations to the current installation of JMP.
|
Note: Select Do not ask me again about merging my old menus for JMP to ignore customizations found in a previous JMP version every time you open JMP. However, when you revert toolbars and menus to the factory defaults, you always have the opportunity to merge old menus, whether you previously checked the merging old menus option.
|
1.
|
Select View > Customize > Menus and Toolbars.
|
|
2.
|
Click Change.
|
|
4.
|
Click Revert All.
|
|
5.
|
Click Yes to remove your customizations.
|
|
1.
|
Select View > Customize > Menus and Toolbars.
|
|
‒
|
|
‒
|
To restore the original properties of a built-in item, click Revert All, and then click Yes to confirm.
|
|
5.
|
Click Save to save your changes.
|