|
•
|
On Windows, select File > Save As to save in multiple formats.
|
|
•
|
On Macintosh, select File > Save As to save as a JMP file (.jmp). Select File > Export to save in Text (.dat), Microsoft Excel (.xls or .xlsx), SAS Transport (.xpt), and SAS Data Sets (.sas7bdat) formats.
|
Note: To save a data table as a journal or layout, select Edit > Journal or Edit > Layout and then File > Save As.
|
Note: JMP can save column properties and table properties as extended attributes in a SAS 9.4 .sas7bxat file. Select File > Save As, select the SAS Data Set file type, and then select the check box for saving extended attributes. JMP names the file with the .sas7bxat extension. The SAS Integration preferences also include this option, which is off by default.
|
||
You can also save files for types that have a corresponding ODBC driver. See Save Data Tables to a Database, for details.
You can save a JMP data table in Microsoft Excel format (.xls or .xlsx). Data is saved in one worksheet named after the data table. On Windows, data is split among several in worksheets when the number of columns or rows exceeds the number that Microsoft Excel supports.
Data table cell colors are maintained when you export a data table as a Microsoft Excel .xlsx file. Hidden data and excluded data are also included. Most formatting and formulas are not exported to Excel format.
|
1.
|
Select File > Save As.
|
|
2.
|
Select Excel Workbook (*.xlsx, *.xls).
|
|
3.
|
Enter a name for your file in the File Name box.
|
|
4.
|
Click Save.
|
|
1.
|
Select File > Export.
|
|
2.
|
Select Excel and select the format.
|
|
3.
|
Click Next.
|
|
4.
|
Enter a name for the file in the Save As box.
|
|
5.
|
Click Export.
|
|
1.
|
With the specific data table open in JMP, select File > Save As.
|
|
2.
|
|
3.
|
Enter the File name.
|
|
5.
|
Click Save.
|
Note: When importing text data, columns that contain image data must be converted to Expression column property in order to reveal the image. SeeColumn Properties, for details.
|
•
|
Export Column Names to Text File To save column headings in the first line of text, and to save labels or header information with the data, select Export Table Headers.
|
|
•
|
End of Field Select the radio button next to the character that marks the end of a field (or cell). Select Other and enter a character if the appropriate character is not listed.
|
|
•
|
End of Line Select the radio button next to the character that marks the end of a line (or row). Select Other and enter a character if the appropriate character is not listed.
|
|
1.
|
Select File > Save As.
|
|
2.
|
|
3.
|
Click the Options button and specify end-of-line and end-of-field characters, and choose whether to export column headings as text.
|
|
4.
|
Click OK.
|
|
5.
|
Click Save.
|
|
6.
|
Click Yes.
|
|
1.
|
Select File > Export.
|
|
2.
|
|
3.
|
|
5.
|
Click Export.
|
|
1.
|
Select File > Save As.
|
|
2.
|
|
3.
|
(Optional) Append the data table to an existing SAS transport file. Select the file to which you want to append the data table, and then click the Save arrow. Select Append To, and then click Yes to replace the selected data table.
|
|
4.
|
Click Yes.
|
|
5.
|
Click OK on each alert.
|
|
1.
|
Select File > Export.
|
|
2.
|
Select SAS Transport.
|
|
3.
|
|
4.
|
Click Next.
|
|
‒
|
|
6.
|
Click OK on each alert.
|
On Windows, JMP can save column properties and table properties as extended attributes in a SAS 9.4 .sas7bxat file. The option is available in the Save JMP As window and in the SAS Integration preferences.
|
1.
|
Select File > Save As.
|
|
2.
|
Enter a name for your file in the File Name box. The maximum length for the filename is 32 characters. JMP warns that characters beyond that limit are omitted.
|
|
3.
|
|
4.
|
(Optional) To save SAS variable names or SAS formats, select the Preserve SAS column names or Preserve SAS formats check boxes.
|
|
5.
|
(Optional) To store JMP metadata as extended attributes for SAS 9.4, select Store table and column properties in SAS 9.4 extended attributes. JMP automatically assigns the .sas7bxat file extension.
|
|
6.
|
Click Save.
|
|
7.
|
Click Yes.
|
|
8.
|
If other alerts appear, click OK on each alert.
|
|
1.
|
Select File > Export.
|
|
2.
|
|
‒
|
To avoid exporting rows that have the Excluded row state, select Honor Excluded Rows. The other options are described in the preceding section.
|
|
2.
|
Select File > Database > Save Table.
|
|
3.
|
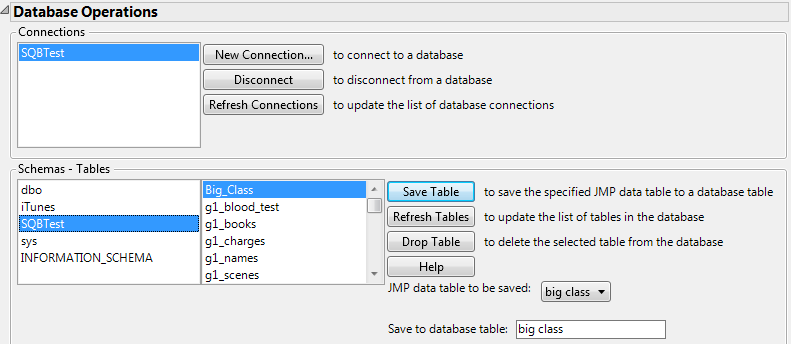
In the Connections box, highlight the name of the database to which you want to save the file (shown in The Database Save Table Window). The Connections box contains a list of databases to which your system is connected.
|
|
4.
|
From the JMP data table to be saved menu, select the open JMP data table that you want to save to the database.
|
|
5.
|
In the Save to database table box, enter the name that you want the table to have when you save it in the database.
|
|
6.
|
Click Save Table.
|
|
1.
|
Click Connect.
|
|
2.
|
Select the data source that you want and click OK. Or, to create a new source, click the New button (Windows) or Add button (Macintosh).
|
|
2.
|
Select File > Database > Save Table.
|
|
5.
|
Click Drop Table.
|
|
6.
|
From the JMP data table to be saved list, select the JMP data table that you want to save to the database.
|
|
7.
|
In the Save to database table box, type the name for the deleted database table.
|
|
8.
|
Click Save Table.
|
|
9.
|
Click Disconnect.
|
On Windows, you can e-mail a JMP data table by selecting File > Send. Your default e-mail application opens with the data table file attached to a new e-mail.