A
study
is a collection of input data folders, settings, and an output folder. Specifically, a study consists of a
Study Name
associated with
one or more
data set folders (at least one
SDTM or SEND Folder
or
ADaM Folder
must be specified) and
zero or more
settings, along with a unique
Output Folder
.
Most JMP Clinical reports
require
that you specify a
study
before execution. The chosen study is
automatically updated
with the output data sets created and the setting that is run. A
metadata
folder for each study provides a central location for tracking all the reports that have been run, in both the
_processinfo.sas7bdat
data set and the
StudyLog.txt
file. A
notes folder
similarly contains study comment files.
Note
: Metadata, notes, and other saved settings are stored in your user home folder. In Windows 7, this is typically
C:\Users\
<your user name>
\AppData\Local\SAS\JMPClinical\12\JMPC\.
See
Adding and Manipulating Studies
for more information.
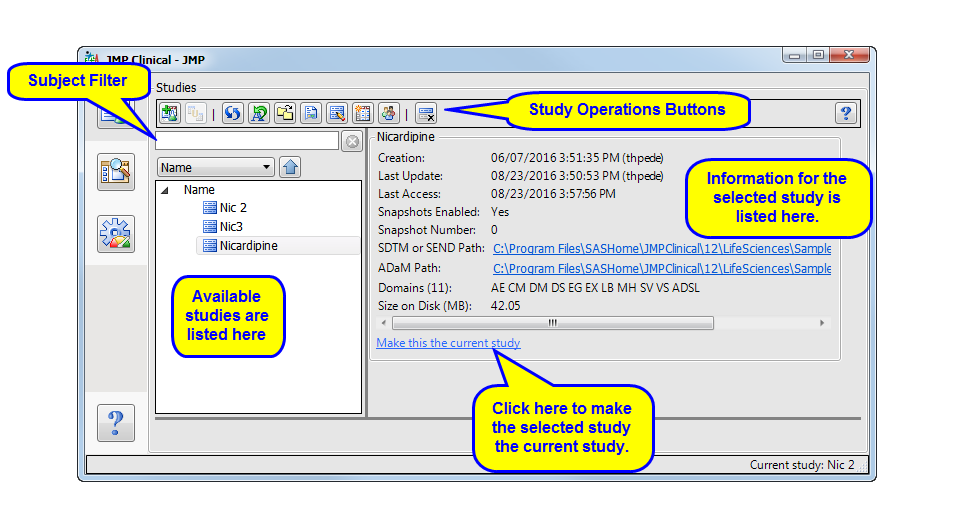
All study additions and manipulations are done on the
Studies
tab shown below:
|
|
Click to select a study. Use
-click to select multiple studies.
|
Add Study
: Click
 to use
Add Study...
To Add a Study from Folders:
or
To Add a Study from a SAS Drug Development (SDD) Server:
.
to use
Add Study...
To Add a Study from Folders:
or
To Add a Study from a SAS Drug Development (SDD) Server:
.
Combine Studies:
Click
 to combine two studies using
Combine Studies
.
Note
: This option remains unavailable unless two studies are selected.
to combine two studies using
Combine Studies
.
Note
: This option remains unavailable unless two studies are selected.
Refresh Study Metadata
: Click
 to update the metadata file for the selected study.
Rename a Study
: Click
 to rename a study.
Change Study Folder Locations
: Click
 to direct the study to a new folder containing the domain data sets.
Note
: You must manually move the study and data files to the new folders before using this option.
to direct the study to a new folder containing the domain data sets.
Note
: You must manually move the study and data files to the new folders before using this option.
Snapshot History
: Click
 to use
Snapshot History
to generate a summary report of the snapshot history for the currently selected study
to use
Snapshot History
to generate a summary report of the snapshot history for the currently selected study
Update Study with New Snapshot
: Click
 to update the selected study with a new snapshot.
Update Study Risk Data Set
: Click
 to use
Update Study Risk Data Set
to manually enter site-specific descriptive information as well as risk indicator information
to use
Update Study Risk Data Set
to manually enter site-specific descriptive information as well as risk indicator information
Explore subjects for this study
: Click
 to use the
Subject Explorer
to generate and filter profiles for selected subjects.
to use the
Subject Explorer
to generate and filter profiles for selected subjects.
Delete Studies
: Click
 to delete the selected study. After a study is deleted, its notes and reviews folders are copied to
\DeletedStudies\study\
directory. The log and result files are moved to
\ProcessResults\
directory and the study folder under studies is deleted.
to delete the selected study. After a study is deleted, its notes and reviews folders are copied to
\DeletedStudies\study\
directory. The log and result files are moved to
\ProcessResults\
directory and the study folder under studies is deleted.
Filter
: Use this text box to selectively filter the studies shown in the Available Studies window.