Open( "$SAMPLE_IMPORT_DATA/Bigclass.xlsx" ); // Microsoft Excel file
Open( "$SAMPLE_IMPORT_DATA/Bigclass.txt" ); // text file
Open( "$SAMPLE_IMPORT_DATA/Carpoll.xpt" ); // SAS transport file
Open( "$SAMPLE_IMPORT_DATA/Bigclass.txt", text );
For more detailed information about import options, refer to File Functions in the JSL Syntax Reference.
The Import Settings in the Text Data Files preferences determine how text files are imported. For example, column names begin on line one and data begin on line two by default. To use different settings, specify the import settings as Open() options in your script.
The following Open() options are available:
CharSet("option")
// "Best Guess", "utf-8", "utf-16", "us-ascii", "windows-1252", "x-max-roman", "x-mac-japanese", "shift-jis", "euc-jp", "utf-16be", "gb2312"
Number of Columns(Number)
Columns(colName=colType(colWidth),... )
// colType is Character|Numeric
// colWidth is an integer specifying the width of the column
Treat Empty Columns as Numeric(Boolean)
Scan Whole File(Boolean)
End Of Field(Tab|Space|Comma|Semicolon|Other|None)
EOF Other("char")
End Of Line(CRLF|CR|LF|Semicolon|Other)
EOL Other("Char")
Strip Quotes|Strip Enclosing Quotes(Boolean)
Labels | Table Contains Column Headers(Boolean)
Year Rule | Two digit year rule ("Decade Start")
Column Names Start | Column Names are on line(Number)
Data Starts | Data Starts on Line(Number)
Lines to Read(Number)
Use Apostrophe as Quotation Mark
CompressNumericColumns(Boolean)
CompressCharacterColumns(Boolean)
CompressAllowListCheck(Boolean)
Open(
"$SAMPLE_IMPORT_DATA/EOF_comma.txt",
End of Field( comma ),
Labels( 0 ),
Columns(
name = Character( 12 ),
age = Numeric( 5 ),
sex = Character( 5 ),
height = Numeric( 3 ),
weight = Numeric( 3 )
)
);
Open(
"$SAMPLE_IMPORT_DATA/EOF_space.txt",
Labels( 0 ),
End of Field( Space )
);
Open(
"$SAMPLE_IMPORT_DATA/EOF_space.txt",
Import Settings( Guess File Format() )
);
To set the import options interactively, include the Text Wizard argument. A preview of the text file opens in the text import window.
Open( "$SAMPLE_IMPORT_DATA/EOF_space.txt", "Text Wizard" );
The following sections describe each argument in more detail. For more detailed information about import options, refer to File Functions in the JSL Syntax Reference.
Identifies column names, column types, and column widths with a Columns argument as shown in the preceding examples.
If you specify settings for a column other than the first column in the file, you must also specify settings for all the columns that precede it. Suppose that you want to open a text file that has four columns (name, sex, and age, and ID, in that order). age is a numeric column, and the width should be 5. You must also set the name and sex column types and widths, and list them in the same order:
Columns(
name = Character( 15 ),
sex = Character( 5 ),
age = Numeric( 5 )
);
After the data is imported, you use the modeling type for a column. See Set or Get Data and Modeling Types.
|
•
|
|
•
|
"John Doe" is interpreted as a single string. Most programs (including JMP) read a quotation mark and ignore other field delimiters until the second quotation occurs.
|
|
•
|
If you include Strip Quotes(1), "John Doe" is interpreted as John Doe (one string without quotation marks).
|
Use the Other option to use an additional character for the row separator, which you must specify in the EOLOther argument. JMP interprets either this character or the default character as a row separator.
|
•
|
Use the Other option to use a different character for the field separator, which you must specify in the EOFOther argument.
|
|
•
|
The Space option uses a single space as a delimiter.
|
|
•
|
The Spaces option uses two or more spaces.
|
Specifies the character or characters used to separate fields or rows. For example, EOLOther("*") indicates that an asterisk separates rows in the text file.
Open(
"$SAMPLE_IMPORT_DATA/Animals_line3.txt",
Columns(
Column( "species", Character, "Nominal" ),
Column( "subject", Numeric, "Continuous", Format( "Best", 10 ) ),
Column( "miles", Numeric, "Continuous", Format( "Best", 10 ) ),
Column( "season", Character, "Nominal" )
),
Column Names Start( 3 )
);
Open(
"$SAMPLE_IMPORT_DATA/Bigclass_L.txt",
Columns(
Column( "name", Character, "Nominal" ),
Column( "age", Numeric, "Continuous", Format( "Best", 10 ) ),
Column( "sex", Character, "Nominal" ),
Column( "height", Numeric, "Continuous", Format( "Best", 10 ) ),
Column( "weight", Numeric, "Continuous", Format( "Best", 10 ) )
),
Data Starts( 5 )
);
Open(
"$SAMPLE_IMPORT_DATA/Bigclass_L.txt",
Columns(
Column( "name", Character, "Nominal"),
Column( "age", Numeric, "Continuous", Format( "Best", 10 ) ),
Column( "sex", Character, "Nominal" ),
Column( "height", Numeric, "Continuous", Format( "Best", 10 ) ),
Column( "weight", Numeric, "Continuous", Format( "Best", 10 ) )
),
Lines To Read( 10 )
);
If you want to set preferences for importing text, it can be helpful to first see a list of all preferences. To do so, use the Show Preferences (All) function.
Preferences(
Import Settings(
End Of Field( Tab, Spaces, Comma )
)
);
When you open a Microsoft Excel workbook in JMP, the file is converted to a data table. JMP supports .xls, .xlsm, and .xlsx formats. See Import Microsoft Excel Files in the Using JMP book for details about Microsoft Excel support.
|
•
|
Excel Open Method specifies how a Microsoft Excel file should be opened by default, when using a non-specific open statement.
|
|
–
|
Use Excel Wizard opens the Excel Import Wizard to import the file. This is the default setting.
|
|
–
|
Open All Sheets opens all worksheets in the Microsoft Excel file.
|
|
–
|
Select Individual Worksheets prompts users to select one or more worksheets when they open the file.
|
|
•
|
Use Excel Labels as Headings determines whether text in the first row of the worksheet is converted to column headings in the data table.
|
By default, JMP takes the best guess. If names have been defined for all cells in the first row, the text in those cells is converted to column heading. Otherwise, columns are named Column 1, Column 2, and so on.
Using the Open() function without additional arguments to open an Excel file has different behaviors depending on the context:
|
•
|
If the Open() function is a direct part of the script, the Excel files open into data tables using your Excel preferences. The following example opens both worksheets into data tables without using the wizard:
|
Path = Convert File Path( "$SAMPLE_IMPORT_DATA/Team Results.xlsx", absolute );
dt = Open( Path );
Note: To use the Excel Wizard, you must specify the Excel Wizard option in the argument as in Open( "$SAMPLE_IMPORT_DATA/Team Results.xlsx", "Excel Wizard" );.
|
•
|
However, if the Open() function is part of a script that is run from clicking a button, the Preview window opens and requires the user to interact with it. Run the following example and click the button to see the Excel Import Wizard:
|
Path = Convert File Path( "$SAMPLE_IMPORT_DATA/Team Results.xlsx", absolute );
New Window( "button", Button Box( "Open", dt = Open( Path ) ) );
|
•
|
To prevent the button script from opening the Preview window and importing the Excel file directly, provide additional arguments to the Open() function. Run the example and click the button. Both worksheets are opened into data tables without using the Excel Import Wizard.
|
Path = Convert File Path( "$SAMPLE_IMPORT_DATA/Team Results.xlsx", absolute );
New Window( "button", Button Box( "Open", dt = Open( Path, Use for all sheets(1) ) ) );
Preference(Excel Open Method( "Open All Sheets" ));
Path = Convert File Path( "$SAMPLE_IMPORT_DATA/Team Results.xlsx", absolute );
New Window( "button", Button Box( "Open", dt = Open( Path ) ) );
The Excel Import Wizard shows a preview of the data and lets you modify the settings before importing the data. Specify "Excel Wizard" as the argument.
dt = Open( "$SAMPLE_IMPORT_DATA/Team Results.xlsx", "Excel Wizard" );
dt = Open(
"$SAMPLE_IMPORT_DATA/Bigclass.xls",
Worksheets( "Bigclass" ),
Use for all sheets( 1 ),
Concatenate Worksheets( 0 ),
Create Concatenation Column( 0 ),
Worksheet Settings(
1,
Has Column Headers( 1 ),
Number of Rows in Headers( 1 ),
Headers Start on Row( 1 ),
Data Starts on Row( 2 ),
Data Starts on Column( 1 ),
Data Ends on Row( 0 ),
Data Ends on Column( 0 ),
Replicated Spanned Rows( 1 ),
Replicated Spanned Headers( 0 ),
Suppress Hidden Rows( 1 ),
Suppress Hidden Columns( 1 ),
Suppress Empty Columns( 1 ),
Treat as Hierarchy( 0 ),
Multiple Series Stack( 0 ),
Import Cell Colors( 0 ),
Limit Column Detect( 0 ),
Column Separator String( "-" )
), "Excel Wizard"
);
Preference( Excel Open Method( "Open All Sheets" ) );
Suppose that you want to import data from specific worksheets in your workbook. Specify those worksheets using the Worksheets argument. In the following example, the worksheet named small is imported into JMP.
Open( "C:\My Data\cars.xlsx", Worksheets( "small" ) );
Open( "C:\My Data\cars.xlsx", Worksheets( "3" ) );
Open( "C:\My Data\cars.xlsx", Worksheets( {"small", "medium", "large"} ) );
Open(
"C:/Data/MultipleWorksheets.xlsx", Excel Wizard,
Worksheets( "Planets" ) // highlighted worksheet
);
sasxpt = Open( "$SAMPLE_IMPORT_DATA/carpoll.xpt" );
To convert the labels to column headings, include the Use Labels for Var Names argument.
sasdbf = Open( "$SAMPLE_IMPORT_DATA/Bigclass.sas7bdat", Use Labels for Var Names( 1 ));
.xpt and .stx file formats are also supported.
On Windows, you can also open SAS data sets from a SAS server. See Connect to a SAS Metadata Server in Extending JMP for details.
In the Open() command, specify the quoted URL to open a file from a website. You can open JMP data tables or other supported file types this way.
Open( "http://company1.com/Repairs.jmp" );
Open( "http://company1.com/My Data.txt", text); // specify text on Macintosh
Open( "http://company1.com", HTML Table( n ) );
n identifies which table you want to import. For example, to import the fourth table on the page, specify HTML Table(4). If you omit the value, only the first table on the page is imported.
JMP attempts to preserve the table header defined in a <th> HTML tag. The table header is converted to column headings in the data table. If the <th> tag is wrong or missing, use ColumnNames(n) to specify the nth row. By default, DataStarts(n) will be the next row, or you can specify the DataStarts row.
You can use Multiple File Import() and an Event Handler script to create a data table of thumbnail images that link to a directory of full-size pictures. This example sets the cell height so that it fits the height of the tallest thumbnail.
path = "$SAMPLE_IMAGES/"; // images are in this directory
{dtx} = Multiple File Import(
<<Set Folder( path ),
<<Set Name Filter( "*.jpg; " ),
<<Set Name Enable( 1 ), // enable the ability to filter by name,
// in this example, files with the .jpg extension
<<Set Add File Name Column( 1 ), // must be included but can be hidden
<<Set Add File Size Column( 1 ) // for Show Sizes at end
) << Import Data;
dtx:FileName << Hide; // hide the column that contains the image file name.
// The column is required for the image links to work, but you don’t need
// to see it.
maxheight = 0;
For Each Row( // recreate each image to minimize size of data table
x = Eval( dtx:Picture );
x << Scale( .1 ); // scale the image by 10%
m = x << Get Pixels; // compress the image by recreating it
dtx:Picture = New Image( m );
maxheight = Max( maxheight, (dtx:Picture[] << Get Size)[2] );
// width x height is returned, [2] gets the height
);
Eval( /* insert the value in the path variable into the Click handler. The path variable won’t be available later, but the path value is needed to concatenate with the file name column’s value to build a link to the image on the computer. */
Eval Expr(
dtx:picture << Set Property(
"Event Handler",
Event Handler( // Event Handler column property
Click( JSL Quote( Function( {thisTable, thisColumn, iRow},
Open( Expr( path )||Char( thisTable:FileName[ iRow ] ) ); ); ) ),
// insert links to images
Tip( JSL Quote( Function( {thisTable, thisColumn, iRow},"Open " || Char( thisTable:FileName[ iRow ] ) || " in your viewer."; ); ) ),
// tooltip for the Tip event handler is shorter than the the tooltip
// inserted for the Click event handler
Color( JSL Quote( Function( {thisTable, thisColumn, iRow}, 5; );) )
) // color of the link -- blue
)
)
);
dtx << Set Cell Height( maxheight + 2 );
// add two pixels to the maximum height
dtx << Save( "$TEMP/Sample Images.jmp" );
Show( File Size( "$TEMP/Sample Images.jmp" ), Col Sum( dtx:FileSize ) );
// save the file to show that the data table is much smaller than the
// original file
JMP can import files stored on a shared computer, such as another computer or a network drive. The file path can be absolute or relative. The following examples show how to open files from a shared computer named Data. If you plan to share the script, it’s safer to use a relative path to the computer, not a path to the mapped drive.
Open( "\\Data\Repairs.jmp" );
Open( "\\Data\My Data.txt" );
"[ { \!"key1\!": \!"a\!", \!"key2\!": \!"b\!"}, {\!"key1\!": \!"c\!", \!"key2\!": \!"d\!" }, {\!"key2\!": \!"f\!", \!"key1\!":\!"e\!", \!"key3\!": \!"g\!"}]";
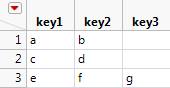
Use JSON To Data Table() to convert the JSON into a data table.
js = "[ { \!"key1\!": \!"a\!", \!"key2\!": \!"b\!"}, {\!"key1\!": \!"c\!", \!"key2\!": \!"d\!" }, {\!"key2\!": \!"f\!", \!"key1\!":\!"e\!", \!"key3\!": \!"g\!"}]";
d = JSON To Data Table( js ); // convert JSON to a data table
d << New Data View; // make a view of the data table
Figure 8.1 Imported JSON Data
You can also use JSON To List() to convert a string containing JSON into a list.
list = JSON To List(
"[ { \!"name\!": \!"KATIE\!", \!"age\!": 12, \!"sex\!": \!"F\!", \!"height\!": 59, \!"weight\!": 95 }, { \!"name\!": \!"LOUISE\!", \!"age\!": 12, \!"sex\!": \!"F\!", \!"height\!": 61, \!"weight\!": 123 }, { \!"name\!": \!"JANE\!", \!"age\!": 12, \!"sex\!": \!"F\!", \!"height\!": 55, \!"weight\!": 74 } ]"
);
Show( list );
// returns list = {{{"name", "KATIE"}, {"age", 12}, {"sex", "F"}, {"height", 59}, {"weight", 95}}, ...}}};
As JSON Expr() converts an associative array to a JSON string. You can then export the data into a JSON document.
list_of_associative_arrays = {["key1" => "a", "key2" => "b"], ["key1" => "c",
"key2" => "d"], ["key2" => "f", "key1" => "e", "key3" => "g"]};
jx = As JSON Expr( list_of_associative_arrays );
/* returns
"[{\!"key1\!":\!"a\!",\!"key2\!":\!"b\!"}..."[{\!"key1\!":\!"a\!",\!"key2\!":
\!"b\!"}
*/
Note: To import the data table as invisible, include the argument Invisible(1) in JSON To Data Table() and omit New Data View.
Open( "filename.h5", {"list_of", "dataset_names"});
An ESRI shapefile is a geospatial vector data format used to create maps. JMP imports shapefiles as data tables. A .shp shapefile consists of coordinates for each shape. A .dbf shapefile includes values that refer to regions. To create maps in JMP, you modify the structure of the data and save the files with specific suffixes.
dt = Open( "$SAMPLE_IMPORT_DATA/Parishes.shp",
:X << Format( "Longitude DDD", 14, 4 );
:Y << Format( "Latitude DDD", 14, 4 ) );
dt << Save( "c:/Parishes-XY.jmp" );
dt = Open( "$SAMPLE_IMPORT_DATA/Parishes.dbf" );
dt << Save( "c:/Parishes-Name.jmp" );
Restructuring the data requires several steps, including adding a Map Role column property to names in the -Name.jmp file. For details, see Map Role in the Essential Graphing book.
Open Database() opens a database using Open Database Connectivity (ODBC) and extracts data into a JMP data table. See the Database Access in Extending JMP for more information.
JMP also converts DataBase Files (.dbf) files to data table format.
sasdbf = Open( "$SAMPLE_IMPORT_DATA/Bigclass.dbf",
Use Labels for Var Names( 1 )
);