|
•
|
Run the Save to DB script to save the data table to the database. The existing data in the database is replaced. This script might contain the user name and password. There is a JSL-only preference called ODBC Hide Connection String that can be set to prevent including this possibly sensitive information. See Database Access in the Scripting Guide for more details.
|
|
1.
|
Select File > Database > Open Table.
|
|
2.
|
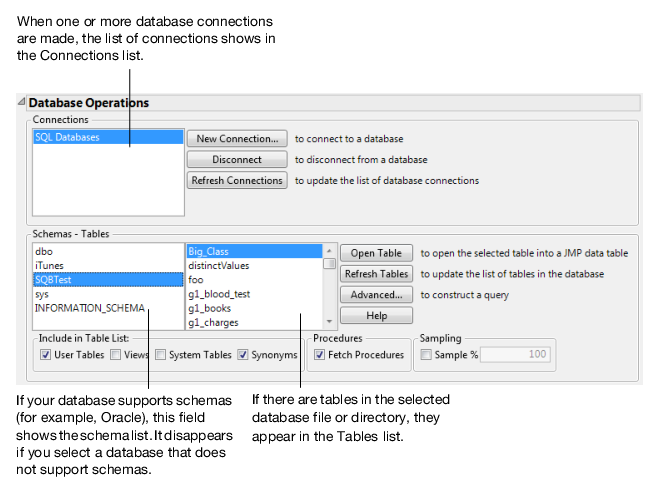
Figure 2.45 Database Open Table Window
Note: The Fetch Procedures check box is disabled if the ODBC driver does not support fetching procedures.
|
3.
|
If the desired data source is not listed in the Connections box, click Connect to choose a data source. The method of choosing a data source depends on your operating system. Select a data source and click OK.
|
|
5.
|
Control which tables are listed by choosing the options in the Include in Table List group of check boxes. Different drivers interpret these labels differently. Your options are as follows:
|
User Tables When clicked, displays all available user tables in the Tables list. User tables are specific to which user is logged on to the computer.
Views When clicked, displays “views” in the Tables list along with all other file types that can be opened. “Views” are virtual tables that are query result sets updated each time you open them. They are used to extract and combine information from one or more tables.
System Tables When clicked, displays all available system tables in the Tables list. System tables are tables that can be used by all users or by a system-wide service.
Synonyms When clicked, displays all available ORACLE synonyms in the Tables list.
Sampling Enter the percentage of rows that you want to appear in the list of tables. Selecting this option speeds up queries in large databases. JMP uses the sampling method supported by the database. The check box is unavailable when the database does not support sampling.
Note: If you are connected to a dBase database, select the database folder to which you would like to connect. Individual files are grayed out and cannot be selected.
|
7.
|
Click Open Table to import all the data in the selected table, or click Advanced to specify a subset of the table to be imported. Some databases require that you enter the user ID and password to access the data.
|
You might see a short delay when opening large tables. To see the status of all active ODBC queries, select View > Running Queries.
Note: If the data were previously exported to a database in JMP and contained an Expression column, the column will be imported as a Character column. Select Cols > Column Info and change the Data Type to Expression.