JMP Public Help
Create visualizations with your data in JMP and share your analyses with others using JMP Public. Anyone viewing these posts has the interactive capabilities of JMP to explore your data.
Here is what you can do in JMP Public:
|
Publish JMP reports as posts in JMP Public.
|
See Publish JMP Reports.
|
|
See all your posts and posts for anyone you’re following.
|
Click Home > My Dashboard.
|
|
See all JMP Public posts.
|
Click Home > All Posts.
|
|
Interact with JMP Public posts.
|
See Interact with Posts.
|
|
Find or follow people or find posts.
|
See Find People or Posts.
|
|
See posts that highlight interesting analyses that have broad appeal.
|
Click Featured.
|
|
Edit your profile.
|
See Edit Your Profile.
|
|
Change the layout of posts.
|
Under Home, click Block or List.
|
Register for JMP Public
If you are not signed in to JMP Public, you see only featured posts. If you want to publish or share posts, or follow people, you need to sign in.
|
1.
|
In a Chrome browser, go to https://public.jmp.com.
|
|
2.
|
At the top right, click Sign in.
|
|
3.
|
If you already have a SAS profile, log on using those credentials, then click Submit.
|
|
4.
|
If you do not have a SAS profile:
|
|
a.
|
Click Register. Complete the form and click Create profile.
|
|
b.
|
Follow the instructions in the email to set your password and activate your profile.
|
|
5.
|
(Optional) To change your profile name or picture, once you are signed in to JMP Public, click your name and select My Profile > Edit.
|
Publish JMP Reports
Once you register, you can publish JMP 14.2 reports as posts in JMP Public. Create your reports in JMP and then click File > Publish. For more details, see Using JMP.
Note: If you choose to make your reports private (shared with Only Me), an orange lock icon appears on the report in JMP Public.
Interact with Posts
From Home > My Dashboard or All Posts, click a post to open it. If there is only one post, it opens directly. If there are several posts, click the one you want to see.
From a desktop or a mobile device, use a cursor or your finger to find out more about data points, table cells, and more:
|
•
|
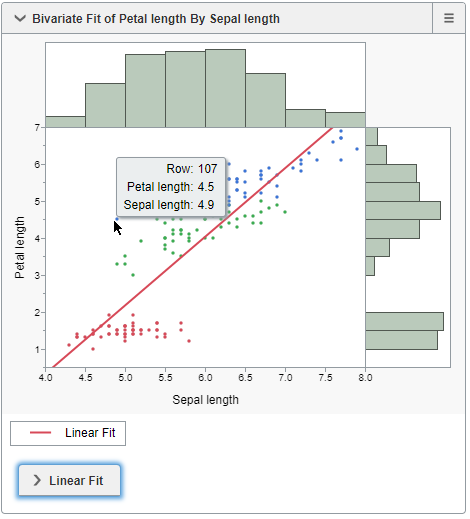
To see values for a data point in a graph, place your cursor over or tap a point.
|
|
•
|
To see a description of values in a report, place your cursor over or tap a value.
|
|
•
|
To open or close a report in a post, click or tap a report title.
|
|
•
|
To change the marker size in a graph, from the menu at top right, choose an option.
|
Figure 1.1 View a Data Point
Select Objects in Graphs
Before you can see linked data or exclude and hide data, you need to select it. To select objects in a graph, choose an option at the top of the post:
 |
Select a single object, such as a data point or a histogram bar.
|
 |
Select multiple objects, such as several data points or several histogram bars.
|
 |
See details for a data point without selecting it.
|
 |
Select objects by dragging a rectangle around them.
|
See Linked Data
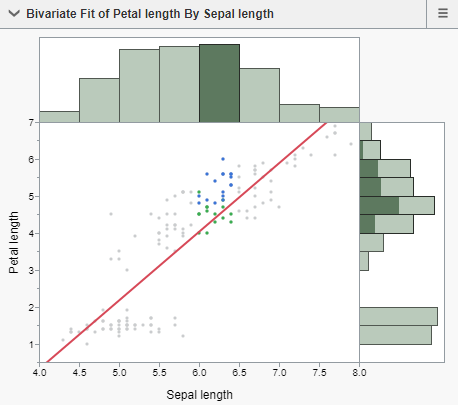
In all graphs, selected rows are linked. To select rows, click or tap any data in a graph (such as a marker or histogram bar).
In this example, a histogram bar is selected, and the corresponding rows are highlighted in all three graphs.
Figure 1.2 Select a Histogram Bar
Exclude and Hide Data
Once you have selected data, you can exclude it from report calculations and hide it in graphs. Reports and graphs automatically update.
Figure 1.3 Post Menu Options
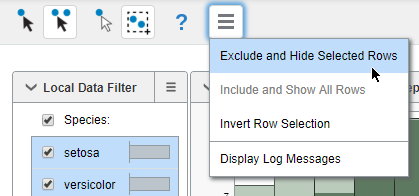
To exclude and hide data, use the options in the post menu:
|
•
|
Exclude and Hide Selected Rows: Excludes and hides selected data.
|
|
•
|
Include and Show All Rows: Includes and shows any excluded or hidden data.
|
|
•
|
Invert Row Selection: Changes the current selection to the deselected data.
|
|
•
|
Display Log Messages: Shows messages from the server and any unexpected conditions from the client.
|
Use a Local Data Filter
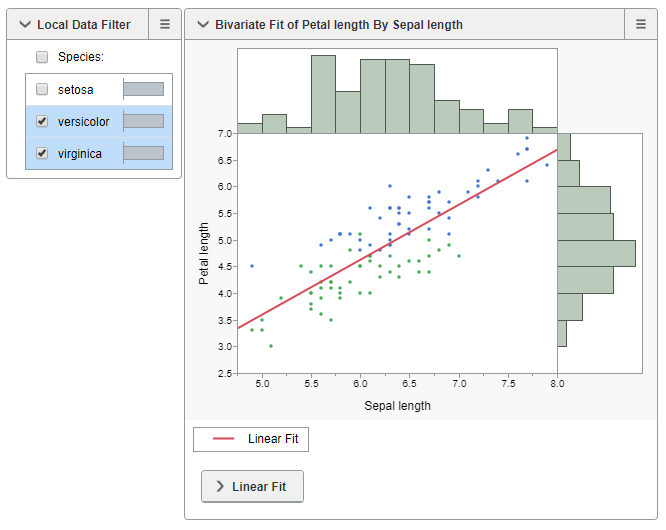
If the original JMP report included a Local Data Filter, it appears in the JMP Public post. Use Local Data Filters to filter and focus on specific data in a report. You can change filter settings to see the impact on reports and graphs.
Figure 1.4 Example of a Local Data Filter
You can choose from these options in the menu:
|
•
|
Invert filter: Inverts the currently selected filters.
|
|
•
|
Select filtered rows in graphs: Selects all filtered rows in graphs.
|
|
•
|
Show filtered rows in graphs: Includes all filtered rows in graphs.
|
|
•
|
Include filtered rows in calculations: Adds any excluded rows back into the report calculations.
|
Get Post Information
To get more information about a post, at the top right, click  .
.
.
Figure 1.5 View Details
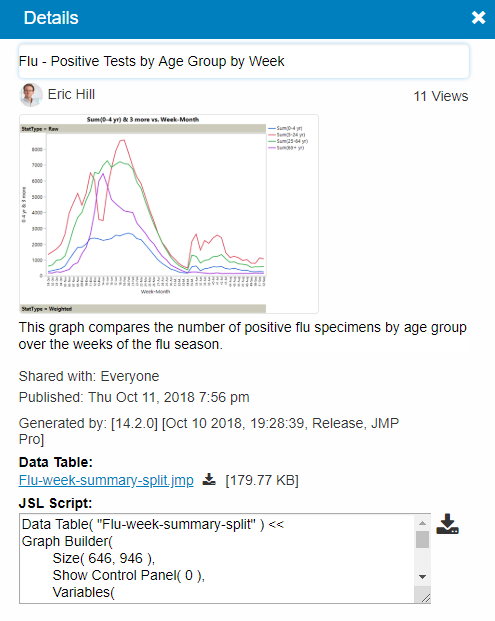
Here are some of the things that you can see and do:
|
•
|
You can see who created the post, how many people have viewed it, and what version of JMP created it.
|
|
•
|
You can download the associated data table(s) and the JSL script that re-creates the post.
|
Update a Post
To change a post that you created, at the top right, click  .
.
.
Figure 1.6 Edit Details
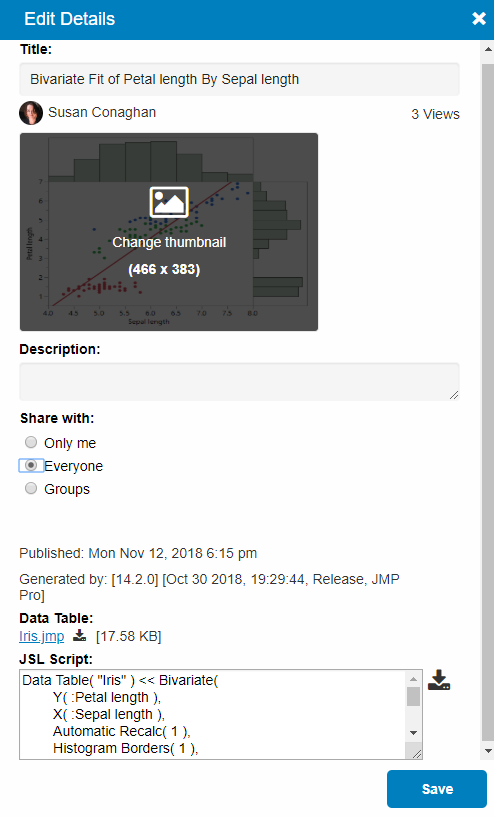
You can change:
|
•
|
The post title
|
|
•
|
The thumbnail image that appears on the post cover
|
|
•
|
The post description
|
|
•
|
Who can see the post
|
Delete a Post
To delete a post that you created, at the top right, click  > Delete. Click OK in the confirmation window.
> Delete. Click OK in the confirmation window.Share a Post
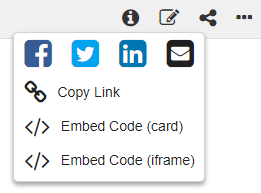
Before you can share a post using email or social media, you must select Everyone for the Shared with option in JMP during publishing.
To share a post, at the top right, click  .
.
.You can share a post in any of these ways:
|
•
|
Social media: Facebook, Twitter, LinkedIn
|
|
•
|
Email a link
|
|
•
|
Copy a link
|
|
•
|
Copy embedded HTML code (for a web page)
|
Figure 1.7 Sharing Options
Flag a Post or User as Inappropriate
To flag a post or user profile that you believe contains inappropriate content, click  > Flag as inappropriate or Report user.
> Flag as inappropriate or Report user.Here is what happens when a post or user profile is flagged:
|
1.
|
JMP administrators determine whether the post or user profile should be hidden or removed.
|
|
2.
|
The owner of a flagged post or the flagged user is notified via email.
|
|
3.
|
If the JMP administrator decides to hide the flagged post or user profile from JMP Public, they are informed and can attempt to fix the problem.
|
Find People or Posts
You can search for people or posts in JMP Public or follow people:
|
•
|
To search all of JMP Public, enter a user name or keyword in the search box at top right.
|
|
•
|
To search using filters, go to Home > My Dashboard or All Posts and enter text in the Find user and Find boxes. See Use Filters.
|
|
•
|
To follow someone, click their name and then click Follow. Their posts now appear under My Dashboard.
|
Use Filters
|
1.
|
Depending on where you want to search, go to Home > My Dashboard or All Posts.
|
|
2.
|
To find a person and all their posts, enter part or all their user name in the Find user box. Suggestions appear as you type.
|
|
3.
|
To search by a keyword in a post title, enter a word into the Find box.
|
|
4.
|
(Optional) You can refine your search by restricting the date or by limiting it to a certain group.
|
|
5.
|
(Optional) To clear your search, click the x next to a user name, or clear other fields by clicking Clear All.
|
Edit Your Profile
|
1.
|
At the top right, click your name > My Profile.
|
|
2.
|
Next to your name, click Edit.
|
|
3.
|
Change your picture, display name, or password.
|
|
4.
|
Click Save.
|