You can combine static and dynamic presentations. See Example of Making a Journal for a Presentation for details.
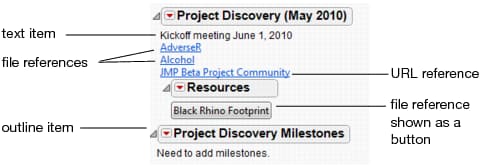
Example of a Journal shows some of the items that you can add to a journal.
|
‒
|
To create an empty journal, select File > New > Journal. Or, from the JMP Starter window, select New Journal.
|
|
‒
|
To create a journal from an entire report or data table, select Edit > Journal.
|
|
‒
|
|
‒
|
To create a journal from most graphs, right-click on the graphic, and then select Edit > Journal. (Not available for surface plots and 3-D scatterplots.)
|
|
‒
|
Write a JSL script to create a new journal. See the Scripting Guide for more information.
|
|
2.
|
To prevent modifications to a journal, right-click the blank area at the bottom of the journal and select Lock. Additional reports are not added to the journal (as described in the following section). JMP instead finds an open unlocked journal or creates a new journal when you select the Edit > Journal command again.
Alternatively, place separate reports in separate layout windows by using the Layout command, as described in Save Using the Layout Command.
To append other reports to a report that you already journaled, select Edit > Journal again. If an area of an analysis window is selected, Edit > Journal saves only the selected area instead of the entire window.
Note: Links to files have absolute paths. If you move the journal to another location on your computer, the links continue to work. When adding links to files in the JMP sample data folder, use the pathname $SAMPLE_DATA/xx. xx is the absolute path from the sample data directory. (Right-click the link, select Edit > Set Script, and then edit the path.)
|
•
|
To add an outline level, right-click in the journal, and then select Append Item > Add Outline Item. You can also add nested outline levels to outline levels that you have created. (When you click the red triangle menu of a graph that you have journaled, the Add Outline Item option is unavailable.) Click the outline level’s red triangle menu and select Add Outline Item.
|
|
•
|
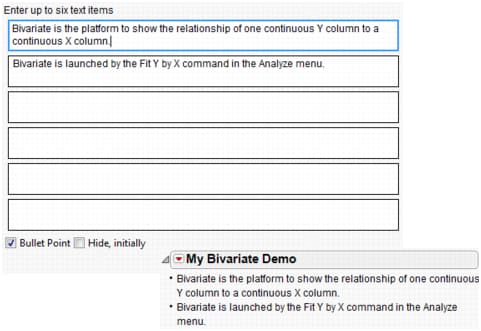
To add text or links within an outline level, click the outline level’s red triangle menu and select an option described in Journal Item Options. Note that these options are not available when you click a scripted item’s red triangle menu.
|
|
•
|
|
•
|
|
•
|
To edit the name of the link displayed in the journal, right-click the link, select Set Button Name, enter the new name, and then click OK.
|
|
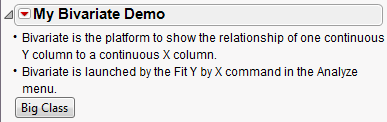
Creates outline levels and links to open files in JMP (except for the log). For example, a link to the open Big Class.jmp data table and chart is displayed below a collapsible heading named Big Class. Files such as journals, scripts, and tutorials are grouped below a collapsible heading called Other Files.
|
|
You can instantly control which outline levels are displayed (for example, closing all sublevels below the selected level). Click the red triangle menu for that level, select OutlineBox, and then select one of the Open or Close commands. For details about the Open and Close commands, see Access Report Display Options in JMP Platforms.
|
•
|
Copy a graph from within JMP or a graphic from another application and then select Edit > Paste. JMP places the graphic at the end of the journal.
|
|
•
|
Drag and drop the graph or graphic from another window to the journal. (See Add Graphics in JMP Platforms.) A blue line indicates where you can drop the graphic.
|
|
•
|
To adjust text wrapping, right-click the text and select Set Wrap. Enter the number of desired pixels per line and click OK. To apply the wrap to all text items, select Set Wrap, select Extend this to other text boxes, and then click OK.
|
|
•
|
|
•
|
|
‒
|
Right-click the plot or graph, and then select Size/Scale > Frame Size. See Resize Plots and Graphs in JMP Platforms.
|
Note: The header and footer defined in your printer setup appears in the PDF file. However, you can set the left, center, and right header and footer in a JSL script. For more information, search for the Set Print Footers message in the JMP Scripting Index. (Select Help > Scripting Index in JMP.)
|
1.
|
Select File > Save As.
|
|
3.
|
Click OK.
|
|
1.
|
Select File > Export.
|
|
3.
|
Click Next.
|
|
4.
|
Enter a name for the file in the Save As box.
|
|
5.
|
Click Export.
|
Select File > Print.
|
1.
|
Select File > New > Journal.
|
|
2.
|
Right-click in the journal. Start your outline by selecting Add Outline Item.
|
|
4.
|
|
6.
|
|
7.
|
Open the Big Class.jmp sample data table.
|
|
8.
|
Click the red triangle in the My Bivariate Demo title bar and select Add Window Reference.
|
|
9.
|

|
11.
|