Example of Virtually Joining Columns and Showing Row States
When row states change in one data table that has a virtually joined column, those row states can automatically show up in virtually joined columns in other linked data tables. Suppose that the main and auxiliary data tables have a subject ID column. The row states are changed in the data table that contains a Link ID property on the subject ID column. Then the row states are updated in the data table that contains virtually joined Link Reference columns. You can specify whether the Link Reference columns send (dispatch) row states to the other data tables or receive (accept) row states.
1. Select Help > Sample Data Library and open Nic Demographics.jmp, Nic Labs.jmp, and Nic Adverse Events.jmp.
2. View Nic Labs.jmp.
Notice that, in the Columns list, the blue Virtual Join icon  appears next to Unique Subject Identifier. The blue color indicates that the column has a Link Reference column property and the referenced data table (Nic Demographics.jmp) is open. The Link Reference column property links the Unique Subject Identifier column in the current data table to the Unique Subject Identifier column in the referenced data table. If the icon is gray
  , the referenced data table is not open, or the columns could be linked incorrectly.
Nic Adverse Events.jmp is set up the same way.
Figure 6.39 Link Reference Column Property on Unique Subject Identifier
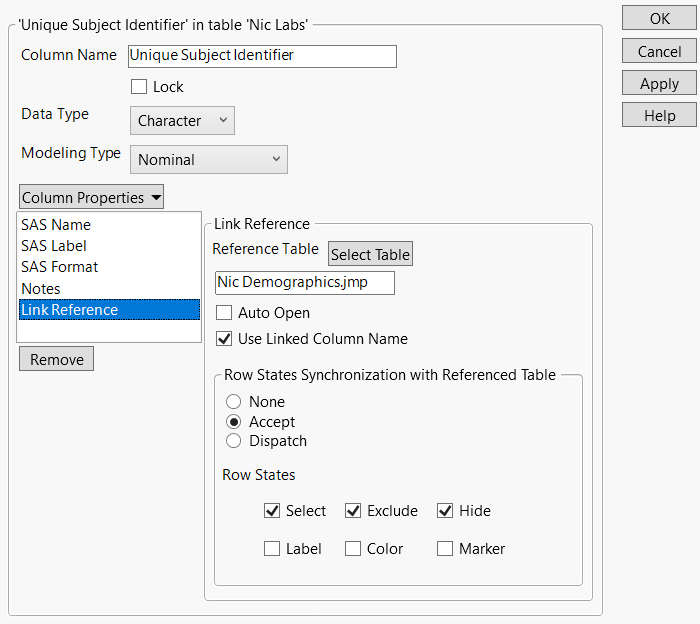
3. In Nic Labs.jmp, select the Unique Subject Identifier column and select Cols > Column Info.
4. Select the Link Reference column property.
Notice that Accept is selected. This means that when rows in the referenced data table (Nic Demographics.jmp) contain a row state, the row state automatically appears in the current data table.
Also notice that the Select, Exclude, and Hide row states are selected. When these row states are selected in Nic Demographics.jmp, the row states will appear in Nic Lib.jmp and Nic Adverse Events.jmp.
5. In Nic Demographics.jmp, right-click the first row and select Hide and Exclude.
The first row contains data for Unique Subject Identifier 101001.
6. View Nic Labs.jmp to see the hidden and excluded rows for Unique Subject Identifier 101001.
Cautions:
• Dispatching row states in multiple tables with multiple columns can be complex and should be done with caution.
• Dispatching row states is best used when no multiple row states are assigned to the same ID value. If a Link Reference column dispatches the color row state, ambiguity quickly develops when there are multiple rows with the same ID value but different color row states. For example, the data table has two rows with an ID value of 001. You color one row red and the other row green, There is no way for JMP to know how to set the row state in the linked data table.
Notes:
• Multiple columns in table A can link to table B. And Table B can itself have multiple columns that link to table C. The row states of all of the rows appear in the data tables that contain linked columns. For example, if row 1 is excluded in table A and row 1 is hidden in table B, the main data table shows that the row as excluded and hidden.
• If a data table is accepting a specific row state, avoid manually applying that row state in the data table. Let the dispatching column control that row state.