Example of Fitting a Custom Model
To fit a custom model, you must first create a model column with initial parameter estimates. This method does require a few more steps than fitting a built-in model, but it does allow any nonlinear model to be fit. Also, you can provide a custom loss function, and specify several other options for the fitting process.
This section provides an example of creating the formula column for a model, and fitting the model in the Nonlinear platform. The data is in the US Population.jmp data table. The response variable is the population (in millions) of the Unites States and the predictor is the year.
1. Select Help > Sample Data Library and open Nonlinear Examples/US Population.jmp.
2. Create a new column called Model.
3. Right-click the Model column and select Column Properties > Formula.
The Formula Editor appears.
4. Select Parameters from the list below the list of columns.
5. Select New Parameter.
6. Type B0 for Name.
7. Type 3.9 for Value. This is the initial estimate of the parameter.
8. Click OK.
9. Select New Parameter.
10. Type B1 for Name and enter 0.022 for Value.
11. Click OK.
12. Enter the model formula using the Formula Editor functions, the column year, and the parameters.
Figure 14.2 Completed Model Formula
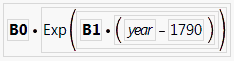
Tip: Click the gray triangle next to Transcendental to find the Exp command.
13. Click OK.
14. Select Analyze > Specialized Modeling > Nonlinear.
15. Assign Model to the X, Predictor Formula role.
16. Assign pop to the Y, Response role.
17. Click OK.
18. Click Go on the Control Panel to fit the model.
Figure 14.3 Plot and Solution Report
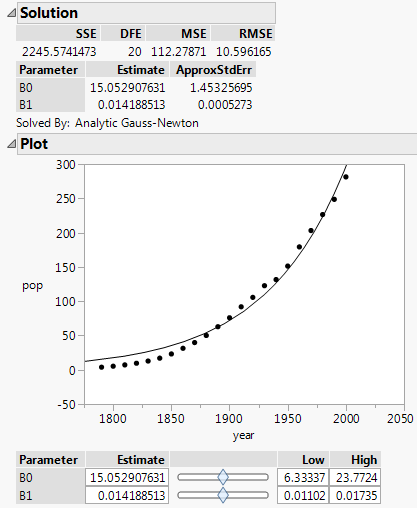
The final parameter estimates are shown in the Solution report, along with other fit statistics. The fitted model is shown on the plot.
Parameters for Models with a Grouping Variable
In the formula editor, when you add a parameter, note the check box for Expand Into Categories, selecting column. This option is used to add several parameters (one for each level of a categorical variable for example) at once. When you select this option, a dialog appears that enables you to select a column. After selection, a new parameter appears in the Parameters list with the name D_column, where D is the name that you gave the parameter. When you use this parameter in the formula, a Match expression is inserted, containing a separate parameter for each level of the grouping variable.