Add Columns
There are several ways to add new columns:
• Double-click the empty space to the right of the last data table column to add one column. See About the Column Info Window for more information about changing attributes after you add the column.
• Select Cols > New Columns. Use this option to add one or more columns and change their attributes.
• Double-click the upper triangle in the data grid above the row numbers. The Add Multiple Columns window appears.
Notes:
• When you initially create a column, you can choose to fill it with initial data values. See Initialize Data in the The Column Info Window section. However, after you modify the cells, this option no longer appears.
• If any rows are selected in the data table, double-clicking to create a new column will deselect the rows. Using Cols > New Columns to create a new column will not change the row selection.
• You cannot edit the data in the columns of a By group or a linked subset.
To add one or more columns using New Columns
1. (Optional) Select the column before or after which the new column or columns will be added.
2. Select Cols > New Columns.
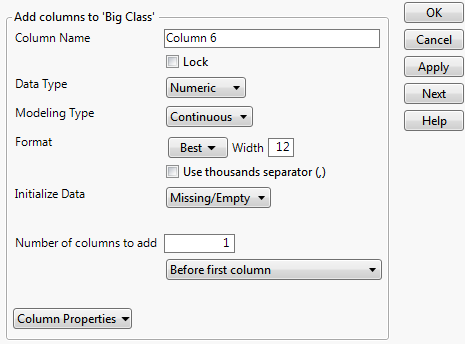
3. Change the column name.
By default, the new column names are Column 1, Column 2, and so on.
4. Select the data type, modeling type, and format for all of the columns. See About the Column Info Window.
5. (Optional) Select initial data values for all of the columns. See Initialize Data in the The Column Info Window section.
6. Specify where you want to put the new columns. If you do not select an option, the column is added after the last column.
7. (Optional) For multiple columns, specify whether the columns should be grouped. See Group Columns.
8. To add more columns, follow these steps:
a. Click Apply to add the new column.
b. Click Next, change the column properties, and then click Apply.
c. Click Next to add another column.
9. Click OK to save your changes.
Figure 4.2 The New Column Window
Tip: To change the modeling type after the columns are created, click the modeling type icon in the Columns panel and select a different type.
To add one or more columns using Add Multiple Columns
1. Double-click the upper triangular area in the data grid. The Add Multiple Columns window appears.
Figure 4.3 Adding Multiple Columns
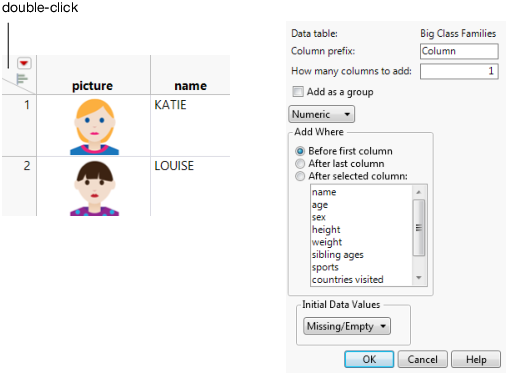
2. Change the prefix for each column.
By default, the new column names are Column 1, Column 2, and so on.
3. Enter the number of columns to add.
4. Specify whether the columns should be grouped. See Group Columns.
5. Select the data type for all of the columns. See About the Column Info Window.
6. Specify where you want to put the new columns.
7. (Optional) Select initial data values for all of the columns. See Initialize Data in the The Column Info Window section.
8. Click OK to save your changes.