JMP Public Help
Create visualizations with your data in JMP and share your analyses or data as posts in JMP Public. Anyone viewing these posts can use the interactive features of JMP to explore your data.
Find out more about JMP Public topics.
Publish JMP Content
Create your reports in JMP and publish them as posts in a JMP Public space.
|
1.
|
(JMP Live only, one time setup) Add a server connection from JMP to JMP Live. Select File > Publish > Manage Connections to get started.
|
|
2.
|
Create your report in JMP, or open a data table.
|
|
3.
|
Select File > Publish and choose an option to get started.
|
For details, see “Publish Reports to JMP Live” in the JMP Online Help.
Space and folder access determine how people can interact with your content.
About JMP Public
In JMP Public, all content is contained in a space.
You can open content from any of these locations:
|
•
|
Home contains all posts in spaces and folders that you have permission to access. You can narrow your focus to see only:
|
|
–
|
Posts that you have recently viewed or bookmarked
|
|
–
|
Posts that contain control chart warnings assigned to you (if any)
|
|
–
|
Posts that have recently been updated
|
|
•
|
Spaces contains the spaces that you are a member of.
|
Figure 1.1 Post Summary in a Space and Folder (Grid Format)
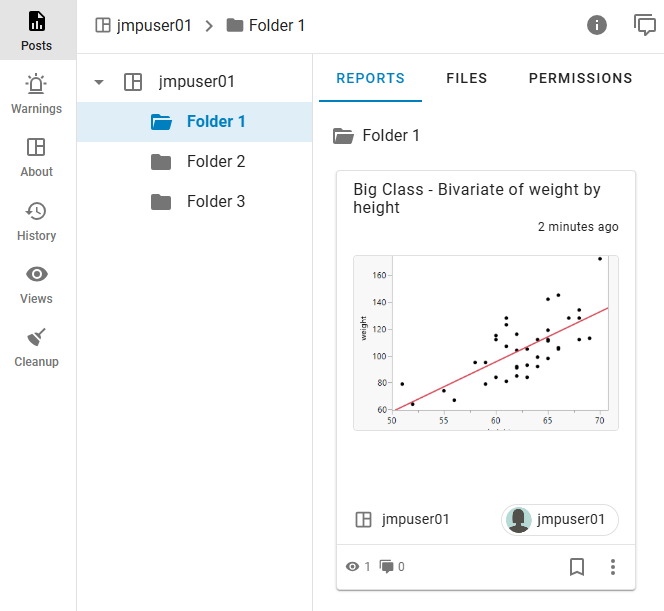
Note: You can show post summaries as a grid or a list. See Change the Summary Format.
On the post summary, you see the title, when the post was last updated, the space the post is in, the user who published the post, how many views or comments the post has, and more.
Click a post summary to open it.
JMP Public Spaces
In JMP Public, all posts and folders are contained in a space.
|
•
|
When you first sign in to JMP Public, you have a personal space that you can publish to.
|
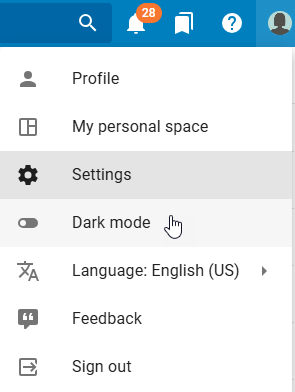
Tip: To quickly access your personal space, click your user icon > My personal space.
|
•
|
The posts and folders that you see depend on which spaces you have permission to access, either individually or indirectly through a group membership (which is controlled by JMP Public administrators).
|
|
•
|
A JMP Public administrator creates the spaces.
|
|
•
|
The permissions that you have in the space or folder control what you can do in the space or folder. See Types of Space Permissions.
|
|
•
|
A JMP Public administrator controls the space permissions. See Update Users or Permissions.
|
Find out what you can do in JMP Public spaces.
Update Users or Permissions
In spaces where you have administrative access, you can update users or their permissions to access content.
Access permissions, add, or delete users
|
1.
|
Click Spaces and then click a space on the Space Directory page.
|
The Posts  page opens.
page opens.|
2.
|
Click the space name or a folder in a space.
|
Permissions on folders are inherited from the parent item (folder or space) unless you set custom permissions. See Set Custom Permissions on a Folder.
|
3.
|
Click the Permissions tab.
|
Tip: If you do not see Permissions, you do not have administrative access to the space or folder. To request administrative access, contact an administrator listed on the About  page for the space.
page for the space.|
4.
|
(Optional) To add users or groups to a space, enter the new group or user and click Add.
|
|
5.
|
(Optional) To change permissions, select or deselect permissions. Or click Select All or Deselect All.
|
Note: View permission is a minimum requirement for any user or group and is not removable.
|
6.
|
(Optional) To remove a user or group from a space, click Remove
 . . |
Note: Removing a user or group removes their permission to the space and its folders. However, if a user or group is part of another group that has permission to access folders in the space, they retain that permission.
Types of Space Permissions
View
User can view posts in the space or folder.
Download
User can download data tables and scripts or can download posts or entire folders as JMP Projects in the space. User can also download information about control chart warnings in posts.
Contribute
User can publish new posts and edit, replace, or delete posts in the space or folder. User can also create folders.
Space Admin
User has administrative permission to the space. User can manage members or groups in the space by adding or removing them or changing their permissions. User can also view activity in the space.
Folder Admin
User can add or remove members or groups and change their permissions in the folder.
Open Content in a Space
You can open folders or posts in spaces where you have View permission.
In a space, click Posts , and then:
, and then:|
•
|
Click a folder to open it.
|
|
•
|
Click the Reports tab to see all reports in the folder or space. Click a post to open it.
|
|
•
|
Click the Files tab to see all posts and any subfolders in the folder or space. Click a post or folder to open it.
|
For more details, see Open a Post.
Add Folders to a Space
You can add any number and level of folders to spaces where you have Contribute permission.
|
1.
|
In a space, click Posts
. |
|
2.
|
Create a folder in either of these ways:
|
|
–
|
Right-click on the space or a folder and then select Create folder.
|
|
–
|
At the top, click
 > Folder. > Folder. |
|
3.
|
Add a title.
|
|
4.
|
(Optional) Add a description.
|
|
5.
|
Click Create.
|
|
•
|
Folder permissions are inherited from the space unless you set custom permissions on the folder. See Set Custom Permissions on a Folder.
|
|
•
|
Folders in spaces are sorted alphabetically ascending by title.
|
Update Details for a Folder
You can update the title, description, or image thumbnail for folders where you have Contribute permission.
|
1.
|
In a space, click Posts
. |
|
2.
|
See a folder’s details in either of these ways:
|
|
–
|
Right-click on the space or a folder and then select Details.
|
|
–
|
Click a folder. At the upper right, click
 . . |
|
3.
|
To change the title or description:
|
|
a.
|
Click
 to edit the folder details. to edit the folder details. |
|
b.
|
Enter your text.
|
|
c.
|
Click Save.
|
|
4.
|
To change the image thumbnail:
|
|
a.
|
Hover over the thumbnail and click Change Thumbnail.
|
|
b.
|
Select an image on your computer and click Open.
|
Move a Folder
You can move any folder for which you have Contribute permission. You can move folders within spaces, but not between spaces.
|
1.
|
In a space, click Posts
. |
|
2.
|
Move a folder in either of these ways:
|
|
–
|
Right-click on the space or a folder and then select Move folder.
|
|
–
|
Click a folder. At the top, click
 > Move folder. > Move folder. |
|
3.
|
Choose the space that you want to move the folder to.
|
Tip: You can choose a folder in the destination space to nest the folder under or create a new folder by clicking the Create folder  icon.
icon.
icon.|
4.
|
Click Move.
|
Change the Owner of a Folder
Changing a folder’s owner requires Contribute or Space Admin permission to the folder or space the folder is in.
|
1.
|
From a folder, click
> Change owner. Or, from the Details panel, click  . . |
|
2.
|
Click New owner and then select the new owner.
|
|
3.
|
Click Reassign.
|
Set Custom Permissions on a Folder
You can set custom permissions on folders where you have Folder Admin permission.
|
1.
|
From a space, click Posts
. |
|
2.
|
Click a folder.
|
|
3.
|
Click Permissions.
|
Tip: If you do not see Permissions, you do not have Folder Admin permission. To request permission, contact an administrator on the About page for the space.
page for the space.|
4.
|
Click Apply Custom Permissions.
|
You can do any of the following:
Remove access
Next to a user or group, click Remove .
.
Note: Removing a user or group removes their permission to the folder and any subfolders. However, if a user or group is part of another group that has permission to access the folder, they retain that permission.
Change access
Next to a user or group, update the access permissions.
You can change access permissions for a member of a group that has access to the folder. For example, you might have a group that has permission to view the folder, but you want to give an individual group member permission to contribute to the folder. In the Add users and groups field, enter the member’s user name and click Add, and then update their individual permissions.
Note: You cannot grant permission to a subfolder unless the user or group has at least View permission to the parent folder.
|
5.
|
(Optional) To remove custom permissions and revert to the parent folder or space permissions, click Remove Custom Permissions.
|
Delete Folders
|
1.
|
From a space, click Posts
. |
|
2.
|
Delete folders in either of these ways:
|
|
–
|
Right-click a folder and then select Delete.
|
|
–
|
Click Files. Select the folders that you want to delete and then click
 . . |
|
3.
|
Click Confirm.
|
See Details About a Space
For spaces that you have access to, you see details, such as a description of the space, the space key (for scripting), the space administrators, and attributes.
In a space, click About .
.
Figure 1.2 Details About a Space
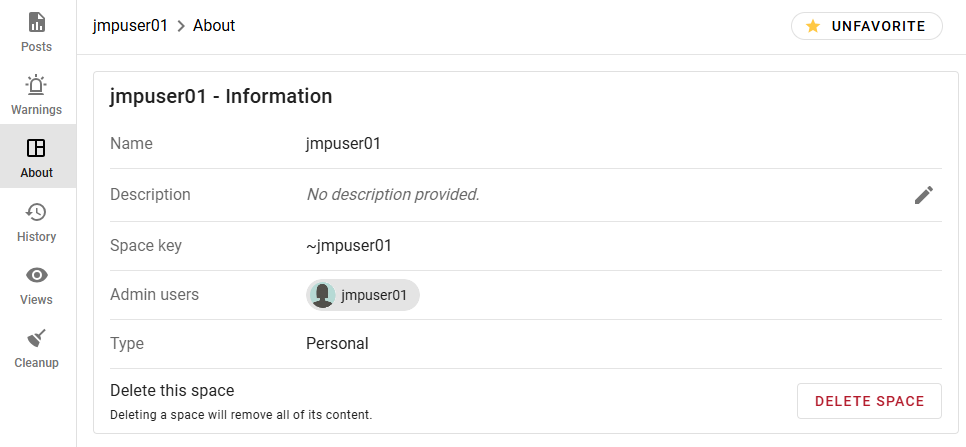
Note: Only space administrators can edit details or delete spaces.
Change the Owner of a Space
You can change the owner of the root folder of a space. No folders or posts within the space are changed.
Changing the owner of the root folder of a space requires Contribute or Space Admin permission to the folder or space the folder is in.
|
1.
|
From a space, click
> Change owner. Or, from the Details panel, click . |
|
2.
|
Click New owner and then select the new owner.
|
|
3.
|
Click Reassign.
|
See Control Chart Warnings in a Space
You can see posts with active control chart warnings in a space:
|
•
|
In a space, click Warnings
 from the left panel. If there is no warning circle next to the icon, there are no active warnings in the space. from the left panel. If there is no warning circle next to the icon, there are no active warnings in the space. |
|
•
|
In the Active Warnings window, click
a post summary to open details. |
For more details, see Control Chart Warnings in Graphs.
See the History of a Space
For spaces where you have administrative access, you can see the history of the space and any folders in the space, which includes access changes and changes to posts.
|
1.
|
Click History
 in a space or a post. in a space or a post. |
|
2.
|
You can browse all history or limit your search using the filters.
|
Figure 1.3 Filter Options in History

|
3.
|
In the filters, enter any combination of dates, actions, users, and whether the action succeeded or failed.
|
|
4.
|
(Optional) To access log details:
|
|
–
|
Next to an action, click
 to see log information or updated attributes. to see log information or updated attributes. |
|
–
|
In the upper right, click
 to download the audit log. to download the audit log. |
See Activity in a Space
For spaces where you have administrative access, you can see who has viewed and downloaded posts in the space.
|
1.
|
In a space, click Views
 . . |
|
2.
|
You can browse all history or limit your search using filters.
|
|
3.
|
In the filters, enter any combination of users, access types, and dates.
|
|
4.
|
(Optional) To download the activity records for the space, click
|
Favorite a Space
To quickly find spaces that you have access to, you can favorite them:
|
•
|
From the Home page or Space Directory, hover over a space and click
 . . |
|
•
|
In a space, click About, and then click Favorite.
|
Tip: You can unfavorite a space in the same way.
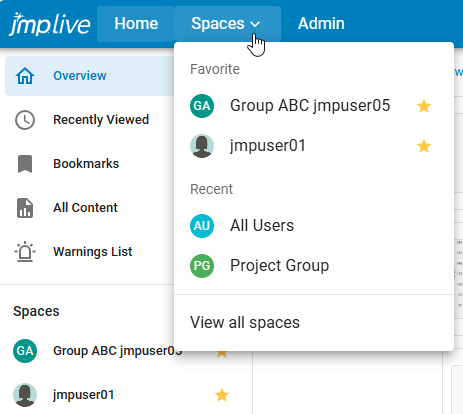
Once you favorite a space, it appears at the top of the list in these areas:
|
•
|
Under Spaces at left on the Home page
|
|
•
|
Under the Spaces menu in the title bar
|
Figure 1.4 Favorites in the Home Page and Spaces menu
Clean Up Spaces
For spaces where you have administrative access, click Cleanup  or click Admin > Cleanup to do any of the following actions:
or click Admin > Cleanup to do any of the following actions:Clean Up Empty Spaces
|
1.
|
Use filters to narrow your search.
|
Figure 1.5 Filters to Find Empty Spaces
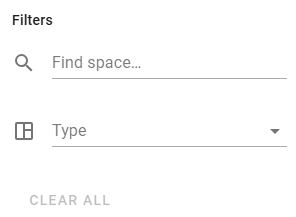
Narrow results by using any combination of keywords in space titles and the space type (normal or personal).
|
2.
|
To delete spaces:
|
|
1.
|
Select the spaces that you want to delete.
|
To select all, check the box next to Title.
|
2.
|
At the upper right, click
. |
|
3.
|
Click Confirm.
|
Clean Up Empty Folders
|
1.
|
Use filters to narrow your search.
|
Figure 1.6 Filters to Find Empty Folders
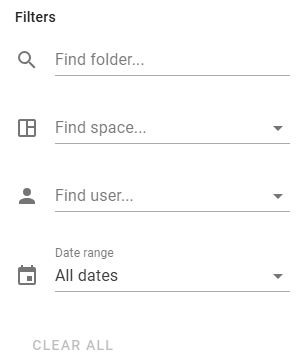
Narrow results by using any combination of keywords in folder titles, spaces, users, and date ranges for when the folder was emptied.
|
2.
|
(Optional) To see folder details and other options, click
and choose an option. |
|
3.
|
To delete folders:
|
|
1.
|
Select the folders that you want to delete.
|
To select all, check the box next to Title.
|
2.
|
At the upper right, click
. |
|
3.
|
Click Confirm.
|
Clean Up Outdated Report Posts
|
1.
|
Use filters to narrow your search.
|
Figure 1.7 Filters to Find Outdated Report Posts

Narrow results by using any combination of keywords in report titles, spaces, users, and cutoff dates for reports last modified or accessed before that date.
Tip: By default, report posts last accessed more than 30 days ago are included.
|
2.
|
(Optional) To see report post details and other options, next to a report post, click
and choose an option. |
|
3.
|
To delete report posts:
|
|
1.
|
Select the report posts that you want to delete.
|
To select all, check the box next to Title.
|
2.
|
At the upper right, click
. |
|
3.
|
Click Confirm.
|
Clean Up Unused Data Posts
|
1.
|
Use filters to narrow your search.
|
Figure 1.8 Filters to Find Unused Data Posts
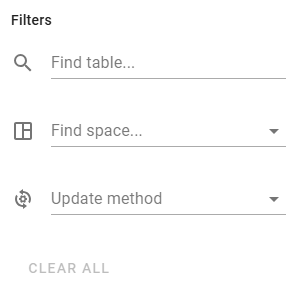
Narrow results by using any combination of keywords in data table titles, spaces, and update methods (if applicable).
|
2.
|
(Optional) To see details about a data post or copy the ID or path to the data post, click
and choose an option. |
|
3.
|
To delete data posts:
|
|
1.
|
Select the data posts that you want to delete.
|
To select all, check the box next to Title.
|
2.
|
At the upper right, click
. |
|
3.
|
Click Confirm.
|
JMP Public Posts
Find out what you can do with JMP Public posts.
Tip: See also JMP Public Data.
Open a Post
You can open posts in places where you have View permission.
|
•
|
To open a post from the Home page, click it.
|
|
•
|
To open a report or a data post from a space:
|
|
1.
|
Click Posts
from the left panel. |
|
2.
|
Click a folder.
|
|
3.
|
Click a post in the Reports tab. To open a data post, click the Files tab and click a data post.
|
Figure 1.9 Post in a Space and Folder
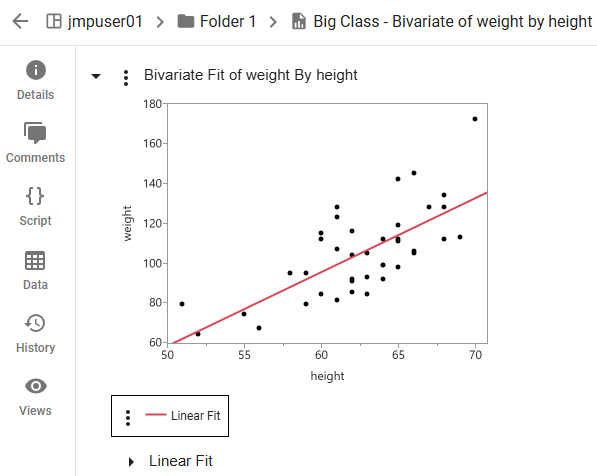
Depending on your permissions, in addition to seeing details, adding comments, viewing the history, and seeing who has viewed the data, you can:
|
•
|
View, edit, copy, or download the JSL script that creates the post.
|
|
•
|
Access or change the data associated with the post.
|
|
•
|
Assign add-ins to a post.
|
Open a Post in JMP
You must have Download permission to the post and a JMP Public connection set up in JMP.
From a post, click  to open the content in JMP. The content is downloaded to your machine and opens in JMP as a JMP Project. See Download Posts as JMP Projects.
to open the content in JMP. The content is downloaded to your machine and opens in JMP as a JMP Project. See Download Posts as JMP Projects.See All of Your Posts
|
•
|
To see all of your reports, click your user icon > Profile > Reports
. |
|
•
|
To see all of your data posts, click your user icon > Profile > Data
 . . |
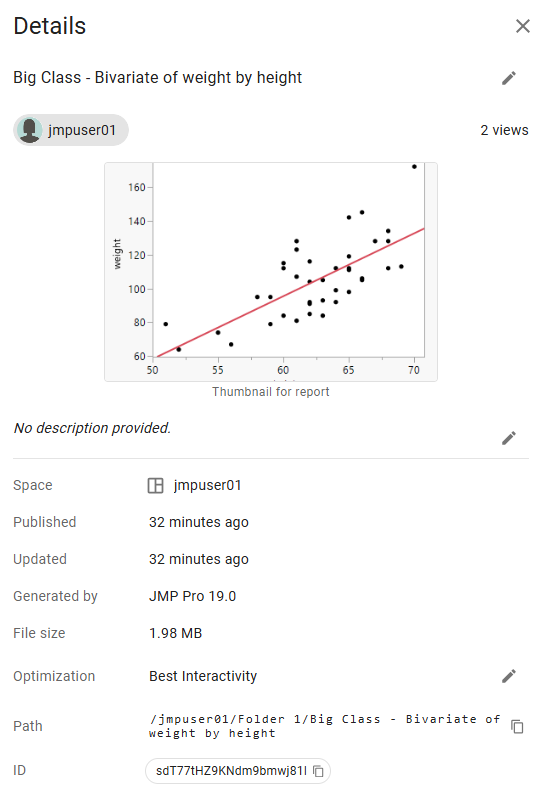
Update Post Details
You can update the title, thumbnail image, description, or settings for JMP Public posts. Updating a post’s details requires Contribute permission.
|
1.
|
From a post, click
. From a post summary, click > Details. |
|
2.
|
Next to the section that you want to update, click
. |
Tip: In the post description, you can use these HTML tags: <a href= "target">, <b>, <em>, <i>, <strong>, and <u>.
|
3.
|
To change the thumbnail image, hover over the thumbnail and click Change Thumbnail.
|
Figure 1.10 Update a Post’s Details
Tip: See also Update Details for a Folder.
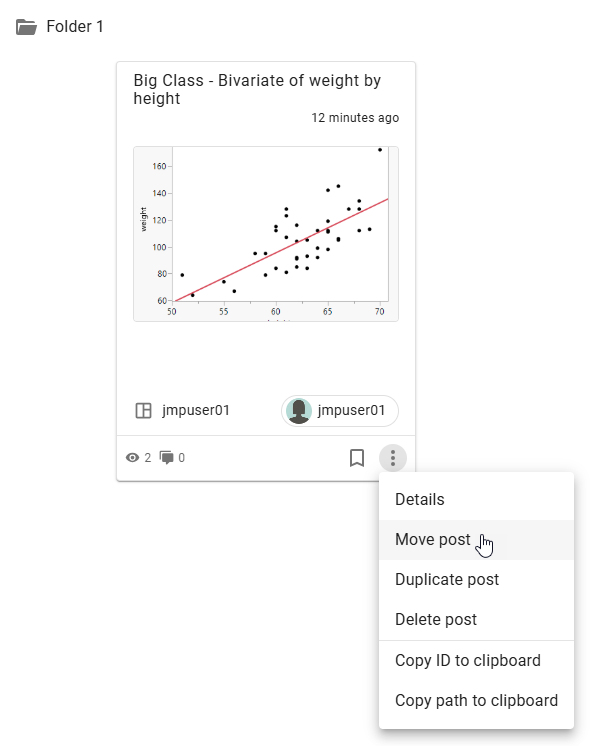
Move a Post
You can move a post to a different folder in the same space or to a folder in a different space. Moving posts requires Contribute permission in both the original location and the new location.
Tip: For help with permissions, contact the space administrator. To find out who the space administrator is, click About in a space.
in a space.To move a single post in a space, click > Move post. However, if you want to also move the data associated with the post, see Move multiple posts at once.
> Move post. However, if you want to also move the data associated with the post, see Move multiple posts at once.
Figure 1.11 Move a Post
Move multiple posts at once
|
1.
|
In a space, click Posts
. |
|
2.
|
Go to the folder that contains the posts that you want to move.
|
|
3.
|
Click the Files tab.
|
|
4.
|
Select the posts that you want to move.
|
|
5.
|
Click
 to move the selected items. to move the selected items. |
|
6.
|
Choose the space (and folder, if applicable) to move the posts to. You can also create a new folder
in the destination space. |
|
7.
|
Click Move.
|
Tip: See also Move a Folder.
Comment on a Post
You can see or add comments to JMP Public posts or folders. Viewing and adding comments requires View permission.
|
1.
|
In a post or folder, click
 . . |
|
2.
|
Enter a comment or reply to an existing comment.
|
|
3.
|
(Optional) Type @ and choose a user’s name to mention them.
|
|
4.
|
Click Submit.
|
|
•
|
To edit or delete your comments, click
> Edit or Delete. |
|
•
|
To delete all comments on a post that you own, next to the number of comments, click
> Delete all. |
|
•
|
To format text, you can use keyboard shortcuts (such as Ctrl+B for bold or Ctrl+I for italics) or you can use markdown syntax.
|
|
•
|
To add a link to a comment, copy and paste the link or enter the URL in the comment box.
|
|
•
|
To see how many user comments are on a post, in a post summary, a number appears beside the Comments icon
 . . |
By default, you get a notification in the following situations:
|
•
|
If someone adds or replies to a comment on a post that you own
|
|
•
|
If someone @ mentions you in a comment
|
|
•
|
If someone replies to a comment that you made
|
|
•
|
If someone deletes a comment that you made
|
Share a Post
In a post, click > Share to share the post by copying a link. For report posts, you can also copy the embedded HTML code. The post is shared as it was published or regenerated and does not include any changes made while viewing it.
> Share to share the post by copying a link. For report posts, you can also copy the embedded HTML code. The post is shared as it was published or regenerated and does not include any changes made while viewing it.Bookmark a Post or Folder
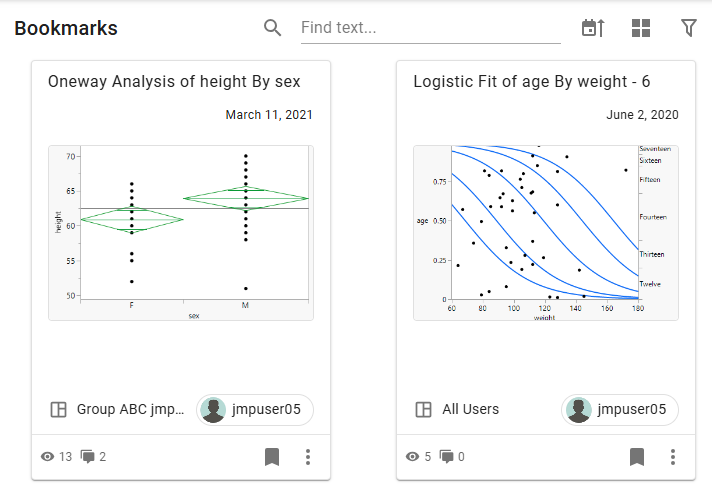
|
•
|
In a post or folder, click
 to bookmark the post or folder. to bookmark the post or folder. |
|
•
|
To see all of your bookmarked posts and folders, at the upper right, click the Bookmarks
 icon. icon. |
|
•
|
To remove a bookmark, click
 to unbookmark a post or folder. to unbookmark a post or folder. |
Figure 1.12 Example of the Bookmarks Page
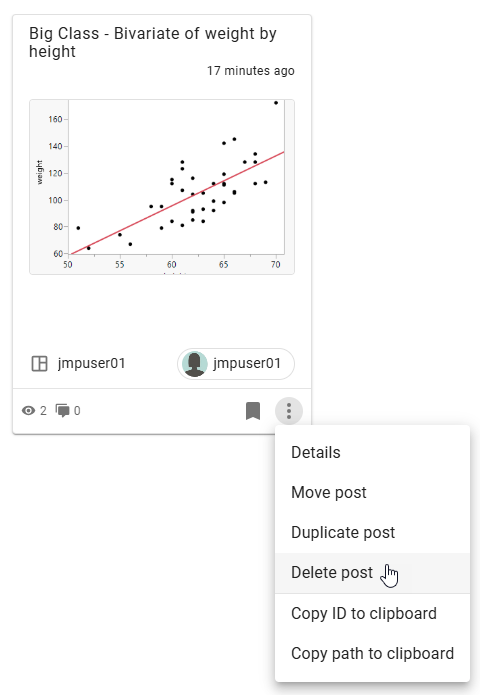
Delete a Post
You can delete posts or folders where you have Contribute permission.
Note: You cannot delete a data post if a JMP Public post is using the data.
To delete a single JMP Public post or a folder from a post, space, or post summary, click > Delete post.
> Delete post.If the data associated with a report post is no longer used by any reports, you are prompted to delete the data.
Figure 1.13 Delete a Post
Delete several posts or folders
|
1.
|
In a space, click Posts
. |
|
2.
|
Go to the folder that contains the posts or folders that you want to delete.
|
|
3.
|
Click the Files tab.
|
|
4.
|
Select the posts that you want to delete.
|
|
5.
|
Click
to delete the selected posts. |
|
6.
|
Click Confirm.
|
Duplicate a Post
You can duplicate one or more data or report posts on JMP Public.
To duplicate a post, you need View and Download permission to the source folder and Contribute permission to the destination folder.
Duplicate a single post
|
1.
|
From a post or a post thumbnail, click
and then select Duplicate post. |
|
2.
|
Select the destination space and folder.
|
|
3.
|
(Optional) If the report post contains control chart warnings, you can copy them to the duplicate post.
|
|
4.
|
Click Duplicate.
|
Duplicate multiple posts
|
1.
|
In a space, click the Reports tab (to duplicate only report posts) or the Files tab (to duplicate data posts and report posts).
|
|
2.
|
Select the posts that you want to duplicate.
|
|
3.
|
At the top, click
 . . |
|
4.
|
Select the destination space and folder.
|
|
5.
|
(Optional) If the report post contains control chart warnings, you can copy them to the duplicate post.
|
|
6.
|
Click Duplicate.
|
|
•
|
When duplicating a report post to the same space, the copied report is connected to the original data post.
|
|
•
|
When duplicating a report post to a different space, the data post is copied to the destination space.
|
|
•
|
Whoever duplicates the post becomes the owner of the duplicated post. For example, if the original post is created by User X, and User Y duplicates it, User Y becomes the owner of the duplicated post.
|
|
•
|
Add-ins and credentials assigned to the original post remain in the duplicate post as long as the credentials have been shared with the new owner.
|
Download Posts as JMP Projects
If you want to open several files from JMP Public in JMP, download the post and any related content (such as data) as a JMP project file. A project file keeps all of the post’s content in one tabbed window in JMP. Content that is associated with a post can include data tables, scripts, maps, or images.
You can download posts or folders that you published or where you have Download permission.
Download a folder or post as a JMP project file
From a folder or a post, click > Download as JMP project.
> Download as JMP project.Download several posts as a JMP project file
|
1.
|
From a space or a folder, click the Files tab.
|
|
2.
|
Select the posts that you want to include in the project.
|
|
3.
|
Click
to download the selected items. |
Note: If you cannot access the download options, your JMP Public administrator might have disabled the downloading feature.
For details about projects, see “Work with Projects” in the JMP Online Help.
See Who Has Viewed a Post
To see who has viewed a JMP Public post that you created:
|
•
|
From a post, click Views
. |
|
•
|
From a folder, at the upper right, click
> Advanced > View accesses. |
You can see who accessed each post, when they accessed it, and the type of access (View or Download).
Present a Report or Image Post
To enter presenter mode from a JMP Public report or image post that you created, click > Presenter mode at the upper right.
> Presenter mode at the upper right.Presenter mode shows the currently selected JMP Live report in full-screen mode. Web browser menus and tools are removed so that the viewer can focus on the report.
In presenter mode, you can do any of the following tasks:
|
•
|
Move through report or image posts in a folder by using the navigation arrows
|
Tip: You can also use the left and right arrow keys to move between report or image posts. To jump to the first or last post, press Shift and then select the left or right arrow key.
|
•
|
Reposition the floating controls
|
|
•
|
Exit presenter mode
|
See the History of a Post
You can see the history of posts that you have access to, which includes data source changes and updates to the post.
|
1.
|
Click History
in a space or a post. |
|
2.
|
You can browse all history or limit your search using the filters.
|
Figure 1.14 Filter Options in History
|
3.
|
In the filters, enter any combination of dates, actions, users, and whether the action succeeded or failed.
|
|
4.
|
(Optional) To access log details:
|
|
–
|
Next to an action, click
to see log information or updated attributes. |
|
–
|
In the upper right, click
to download the audit log. |
Change the Summary Format
On supported areas of the Home page or from the Spaces > Posts page, at the upper right, click an icon to change the format of JMP Public post summaries.
 |
The grid format shows cards with image thumbnails.
|
 |
The list format shows a list with image thumbnails.
|
 |
The compact list format shows a list with no image thumbnails.
|
Sort Posts
You can sort how posts appear in places like the Home page or in a space. Click the Change sort order  icon and choose an option, such as alphabetical or newest.
icon and choose an option, such as alphabetical or newest.Change the Owner of a Post
Changing the owner of a post requires Contribute or Space Admin permission for the folder or space that contains the post.
|
1.
|
From a post, click
> Change owner. Or, from the Details panel, click . |
|
2.
|
Click New owner and then select the new owner.
|
|
3.
|
Click Reassign.
|
Note: If the post contains credentials that are not shared with the new owner, those credentials are removed.
See Performance Metrics on a Report Post
Select a post and click > Advanced > Display performance metrics. You can see how long it took the post to load, copy the metrics, or clear the metrics.
> Advanced > Display performance metrics. You can see how long it took the post to load, copy the metrics, or clear the metrics.Show Log Messages for a Post
In a JMP Public report post, you can click > Display log messages to see any error messages from the server, connection messages, and messages from the client.
> Display log messages to see any error messages from the server, connection messages, and messages from the client.Copy a Post or Folder ID for Scripting
|
1.
|
In a space, click Posts
. |
|
2.
|
To copy a folder ID, in the left navigation, right-click a folder and then select Copy ID to clipboard.
|
|
3.
|
Copy a post ID in either of these ways:
|
|
–
|
Click Files. Next to a post, click
> Copy ID to clipboard. |
|
–
|
Click Reports. On a post, click
> Copy ID to clipboard. |
Edit a Script
In a JMP Public post, you can edit the JSL script that generates the report.
|
1.
|
In a post, click Script.
|
|
2.
|
Under Report script, edit the script using JSL.
|
Tip: To increase the window size, click  .
.
.|
3.
|
Click Save.
|
|
4.
|
Click Regenerate Report.
|
Revert to the original script
|
1.
|
Next to Report script, click
> View original script. |
|
2.
|
Click
 to copy the script. to copy the script. |
|
3.
|
Click Close.
|
|
4.
|
Select the entire JSL script and paste the original script.
|
|
5.
|
Click Save.
|
|
6.
|
Click Regenerate Report.
|
Use a JMP Add-In
|
1.
|
The option that you choose depends on the type of post:
|
|
–
|
In a JMP Public report post, click Script.
|
|
–
|
In a JMP Public data post, click Settings.
|
|
2.
|
Next to Add-ins, click Assign.
|
Note: In a JMP Public data post, this option appears only if you select the Refresh or Import update methods.
|
3.
|
Select an add-in.
|
If you do not see any add-ins, your JMP Public administrator has not added them.
|
4.
|
Click Save.
|
Find out what you can do with JMP Public graphs.
See Data Values in Graphs
In a JMP Public report post, you can see information about data points in graphs or report calculations.
|
1.
|
Click or tap Identify Objects
 . . |
|
2.
|
Hover over or tap a data point or a calculation.
|
Figure 1.15 See a Data Point’s Values
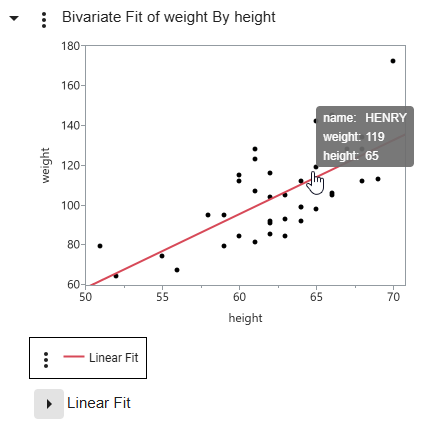
Figure 1.16 See an Explanation of a P-Value Calculation

|
•
|
To hide or show a report or graph, click or tap the arrow next to the title.
|
|
•
|
If your report contains very large tables, use the page controls
 |
Select Data in Graphs
In a JMP Public graph, you can select data or zoom in on data.
How you select data in a JMP graph (points, bars, and so on) depends on whether you are on a computer or a mobile device. The default mode is to select a single data point.
|
Task
|
On a Computer
|
On a Mobile Device
|
|---|---|---|
|
Select or deselect a single data point
|
Click a data point.
|
Tap
 then tap a data point. then tap a data point. |
|
Select or deselect multiple data points
|
Press Ctrl+Shift and click multiple data points.
|
Tap
 and then tap multiple data points. and then tap multiple data points. |
|
Identify a single data point
|
Hover over a single data point.
|
Tap
and then tap a data point. |
|
Select data points by brushing
|
Click and drag a rectangle over data points. Click and drag in the center to move the rectangle or drag the corners to resize it.
|
Tap
and then draw a rectangle over the data points. Drag the center to move the rectangle or drag the corners to resize it. |
|
Zoom
|
Click
 and click a point or drag a rectangle. The center of the rectangle is now the center of the zoom area. and click a point or drag a rectangle. The center of the rectangle is now the center of the zoom area.To zoom out, double-click in the graph or press Shift and click the graph.
You can also use the scroll wheel on your mouse to zoom in and out. If you are not in Zoom mode, press Alt before zooming with the scroll wheel.
Tip: To zoom the entire window, press Ctrl then + or Ctrl then -.
|
Tap
and pinch zoom. |
|
Pan in a graph
|
Click
 and click and drag in the graph. Or press Alt and click and drag in the graph. and click and drag in the graph. Or press Alt and click and drag in the graph. |
Tap
and move the graph with your finger. |
|
Pan axes
|
Click the middle of an axis and drag.
|
Touch the middle of an axis and drag.
|
|
Scale axes
|
Click at either end of an axis and drag.
|
Touch either end of an axis and drag.
|
|
Return axes or graphs to their original state
|
Press Alt and double-click in the graph or click
 or or  > Reset all axes. > Reset all axes. |
Double-tap in the graph or tap
> Reset all axes. |
Note: In interactive HTML, some graphs do not support panning and zooming. Panning and zooming is fully supported in JMP Live and JMP Public.
See Linked Data in Graphs
If your JMP Public post contains multiple JMP graphs, when you select data in one graph, it is highlighted in all graphs.
Figure 1.17 Select Data in Linked Graphs
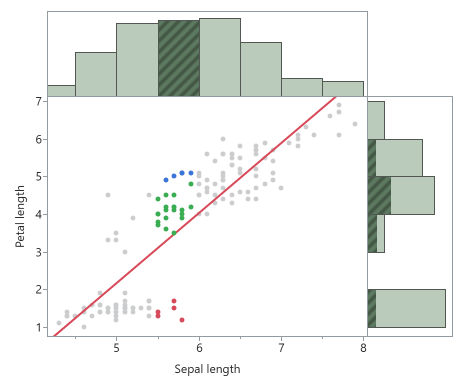
A histogram bar in the top graph is selected. The corresponding rows are highlighted in the scatterplot and in the marginal histogram.
Selecting data in a graph, legend, or report can highlight the corresponding data.
Figure 1.18 Select Data in a Graph to Highlight it in a Report
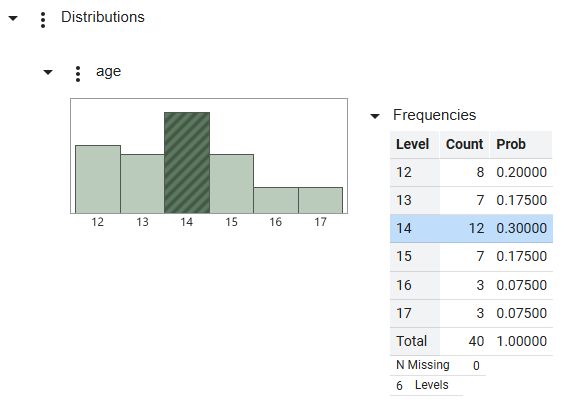
A histogram bar is selected and the corresponding data are highlighted in the Frequencies report. You can also select a row in the report to highlight the corresponding data in the histogram.
Exclude and Hide Data in Graphs
After you select data in a JMP graph, you can exclude it from report calculations and hide it in graphs. Reports and graphs automatically update.
Figure 1.19 Report Menu Options
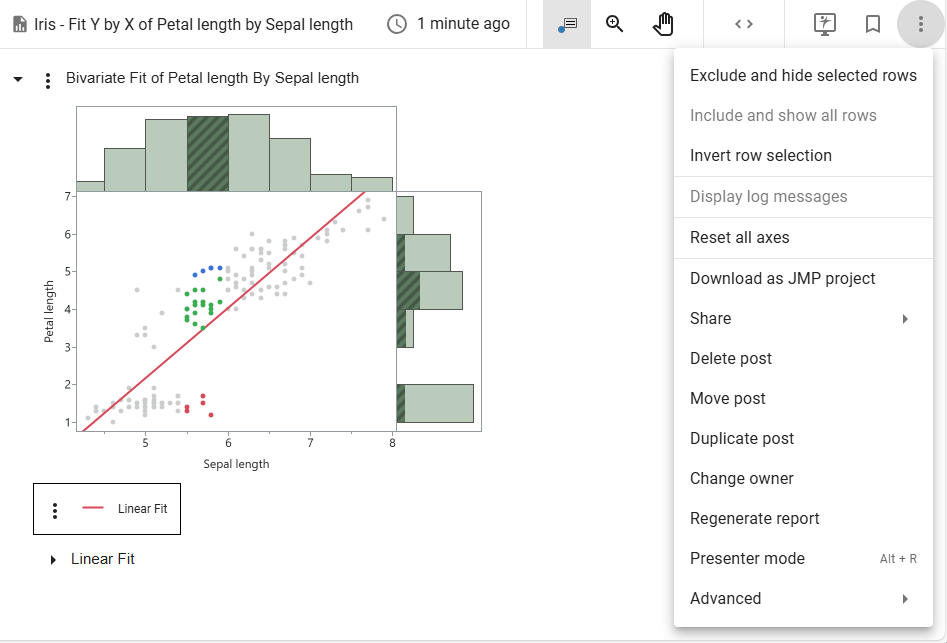
To exclude and hide data, right-click the graph or use these options in the More menu at the upper right:
menu at the upper right:
Note: If the post contains a Local Data Filter, most of these options do not appear because you use the Local Data Filter instead.
Exclude and hide selected rows
Excludes and hides selected data.
Include and show all rows
Includes and shows any excluded or hidden data.
Invert row selection
Changes the current selection to the deselected data.
Filter Data in Graphs
If the original JMP report included a Local Data Filter, you can use the filter to focus on specific data and see the impact on JMP Public graphs.
Figure 1.20 Filter Data in Graphs
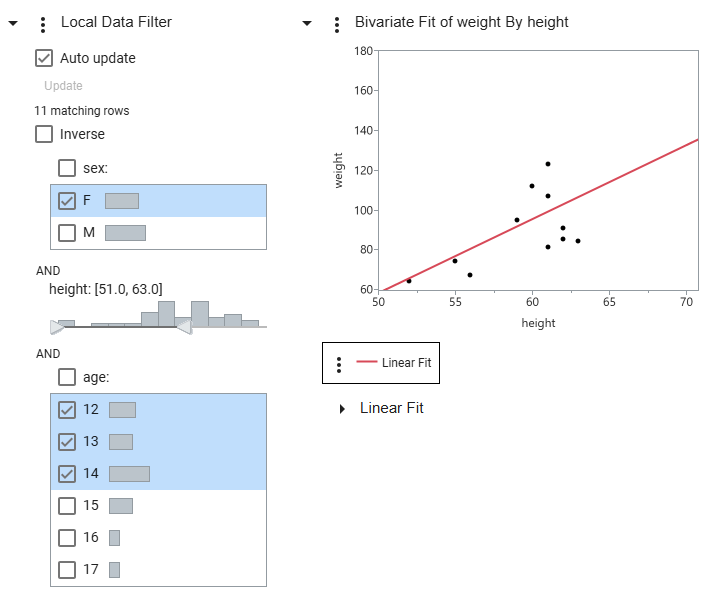
Tip: Selections that you make in the Local Data Filter are captured in the URL. You can copy and paste the URL to share your selections with others.
In the Filter Data in Graphs example, the filter choices are showing only females between 51 and 63 inches tall who are between the ages of 12 and 14.
Tip: If several categories are selected and you want to select a single category, click the category (not the check box).
Local Data Filter Options
Conditional Filtering
Limits the options in the Local Data Filter by condition. For more information about conditional data filters, see “Red Triangle Options for the Data Filter” in the JMP Online Help.
Note: This option does not appear if there is more than one OR group or if the columns are not hierarchical.
Select filtered rows in graphs
Selects all filtered rows in graphs.
Show filtered rows in graphs
Shows all filtered rows in graphs.
Include filtered rows in calculations
(JMP Live and JMP Public only) Includes only filtered rows in report calculations.
Auto update
(JMP Live and JMP Public only) Enables automatic updates to the local data filter.
Inverse
Inverts currently selected filters.
Note: If your chart contains Area or Fill between options segments, you must refresh the post to see changes for the Inverse option.
Manually Update Data Filters
If a post is taking a long time to automatically update, you can manually update the data filter selections instead.
|
1.
|
Click Auto Update to deselect this option.
|
|
2.
|
Make your changes to the local data filter.
|
The graphs do not update as you make your changes.
|
3.
|
Click Update.
|
Switch Data Columns in Graphs
If the original JMP report included a Column Switcher, you can quickly analyze different variables without re-creating the analysis. When you choose a different variable in JMP Public, the analyses automatically recalculate using the new variable.
In the following example, using Fisher’s Iris data, the JMP post includes a Column Switcher and a Local Data Filter.
Figure 1.21 Initial Selections
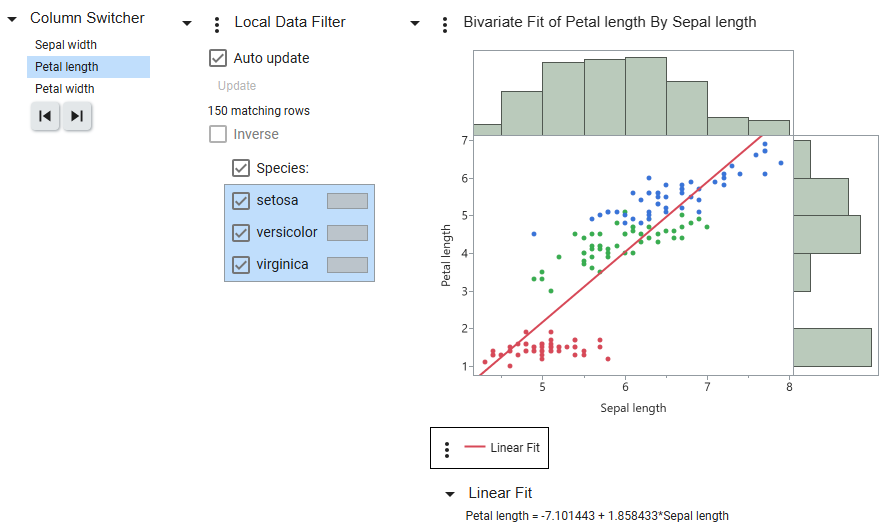
Initially, Petal length (the original column) is selected in the Column Switcher. All species are showing in the Local Data Filter. These selections are reflected in the graph and calculations.
Figure 1.22 Updated Selections
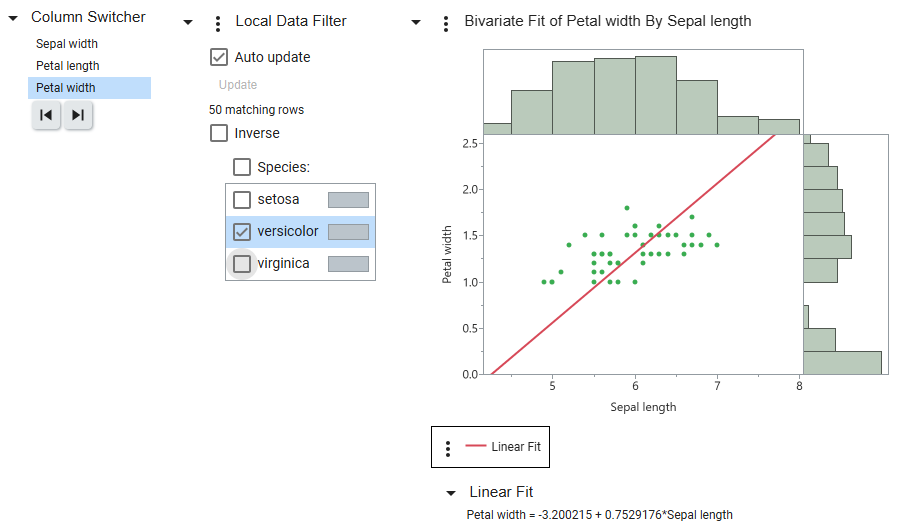
In this example, Petal width is selected in the Column Switcher, and only the species versicolor is selected in the Local Data Filter. The graph and calculations update to reflect these selections.
Tip: Selections that you make in the Local Data Filter and Column Switcher are captured in the URL. You can copy and paste the URL to share your selections with others.
Control Chart Warnings in Graphs
JMP Public posts that contain control charts can generate notifications if there are control chart warnings. When you publish a JMP post that contains a control chart, you can specify whether to enable warnings. You can also enable warnings from a JMP Public post.
These people receive notifications:
|
•
|
The publisher of the post
|
|
•
|
Users who subscribe to warnings for a space, folder, or post
|
|
•
|
Members of groups where warning notifications are enabled and who have permission to view the post
|
Depending on individual settings, notifications appear in JMP Public and via email. Email notifications contain more detail about the warnings. See Manage Notifications.
Subscribe to warnings
|
1.
|
In a space, folder, or post that contains control charts, click
> Subscriptions. |
|
2.
|
Click to subscribe to control chart warnings on all posts in a space, folder, or on an individual post.
|
See and triage warnings
In a post or from a thumbnail, click Warnings  . For details about how to triage warnings, see JMP Live for SPC at https://www.jmp.com/jmplivespc.
. For details about how to triage warnings, see JMP Live for SPC at https://www.jmp.com/jmplivespc.Enable or disable warning notifications
Enabling or disabling warnings on posts requires Contribute permission.
|
1.
|
In a post that contains a control chart, click Warnings
. |
|
2.
|
Next to Notifications, click the switch to turn them on or off.
|
|
3.
|
(Notifications on only) If the post has active warnings, choose whether to notify people about these warnings.
|
Customize Graphs
Note: These customizations are temporary while you are in the JMP Public post.
To resize a graph in JMP Public, click and drag on the graph borders. You can also resize a scrollable post in a JMP Public dashboard.
Use the options in the More menu to customize graph elements.
menu to customize graph elements.
Figure 1.23 Fit a Graph to the Window
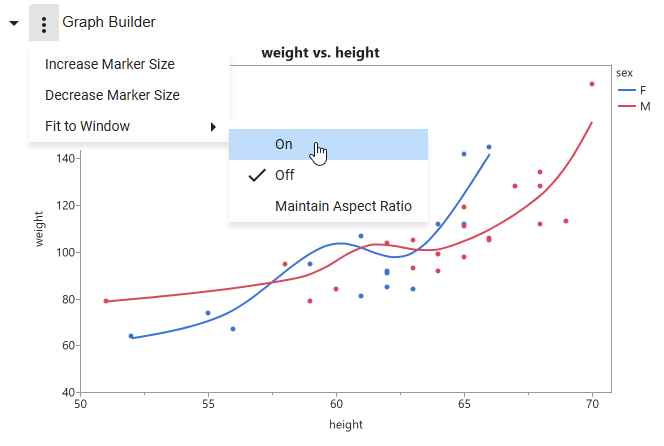
You can increase or decrease the marker size for all graphs that include markers. For Graph Builder and Control Chart graphs, you can automatically size the graph based on your browser window size by turning on Fit to Window.
Note: The options in this menu vary depending on the type of graph or JMP platform.
JMP Public Data
Find out what you can do with data in JMP Public.
|
•
|
Upload a JMP Data Table
|
Open a Data Table
|
1.
|
In a space or folder, click the Files tab.
|
|
2.
|
Click a data post
 . . |
Figure 1.24 Example Data Table
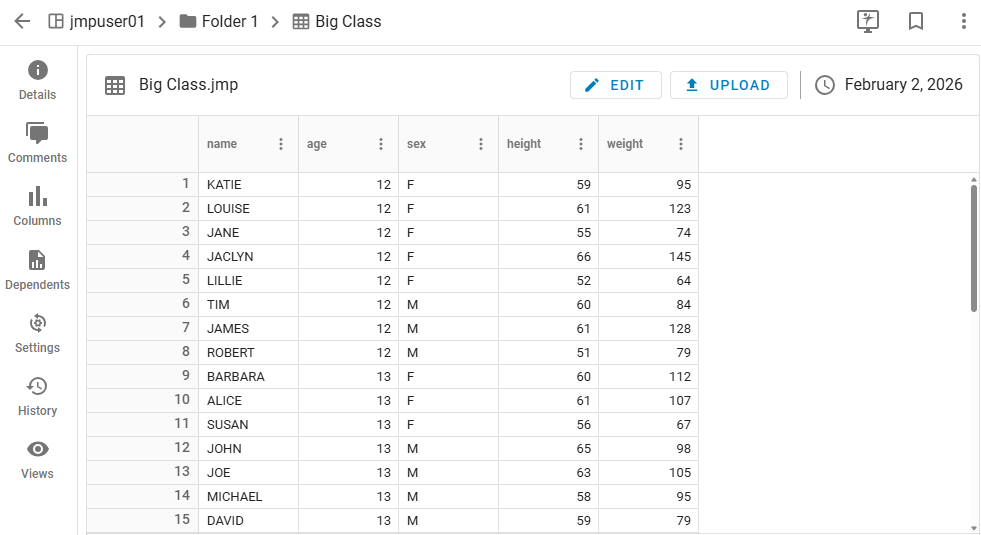
Depending on your permissions, in addition to seeing details, adding comments, viewing the history, and seeing who has viewed the data, you can:
|
•
|
Hide or show columns or see information for a column.
|
|
•
|
Access reports that depend on the data post.
|
|
•
|
Edit the data table. See Edit a Data Table.
|
|
•
|
Change the settings for updating the data post. See Upload a JMP Data Table, Refresh Data, and Import Data.
|
|
•
|
Assign a JMP add-in to the data post. See Use a JMP Add-In.
|
|
•
|
Add a reference to other data. See Reference a Data Table.
|
Tip: See also JMP Public Posts.
Edit a Data Table
Editing a data table post requires Contribute, Data Admin, or Data Entry permission.
|
1.
|
In a report post, click Data
. |
|
2.
|
Under Data, click a data table.
|
|
3.
|
At the top, click Edit.
|
|
•
|
Only one person at a time can edit a data table. If you try to edit data that someone is already working on, a warning message appears.
|
|
•
|
You can use these keyboard shortcuts:
|
|
–
|
Arrow keys move between cells.
|
|
–
|
Enter key saves changes to a cell.
|
|
–
|
Esc key cancels changes to a cell.
|
Add rows to a data table
|
1.
|
At the top, click Edit.
|
|
2.
|
Right-click in a table and select Add rows.
|
|
3.
|
Use the arrows to set how many rows you want to add.
|
|
4.
|
Click OK.
|
Delete rows from a data table
|
1.
|
At the top, click Edit.
|
|
2.
|
Select the rows that you want to delete.
|
|
3.
|
Right-click the rows and select Delete [number] rows.
|
Save your changes to a data table
To save your changes, choose an option:
|
•
|
Click Save to permanently save your changes. Any related reports are automatically regenerated.
|
|
•
|
To temporarily save your changes, click Save draft. The next time that you edit the data, you can restore your draft changes (or start over).
|
Caution: If you save a draft and someone else permanently saves edits to the table, your changes are lost.
|
•
|
You cannot add or rename columns in a data table.
|
|
•
|
To see the properties for a column, click
> Column Info. You can autosize the column or all columns, or see details such as the data type, modeling type, format, and width. |
Download Data or Scripts
Downloading data or scripts requires Download permission.
Download data from a post
|
1.
|
In a report post, click Data
. |
|
2.
|
Next to the data table title, click
> Download . |
Download data from a data table
In a data table, click > Download data table.
> Download data table.Download scripts
|
1.
|
In a report post, click Script
 . . |
|
2.
|
Click
to download the JSL script. |
|
3.
|
(Optional) Click
to copy a script. |
Change the Data Source
You can select another source of data to use in a JMP Public post. You need Contribute permission on the report post and Download permission on the data post that you want to start using.
|
1.
|
From the report post that you want to update, click Data
. |
|
2.
|
Next to the data table title, click
> Change data source. |
|
3.
|
Under New Data, enter the data post name or choose a data post from the list.
|
Reference a Data Table
If you have data that depends on other data, you can add a reference to the original data. If the original data updates, the associated data updates as well. For example, if your data table in JMP Public is a summary table that you created from another data table, you would reference that table.
|
1.
|
In a space or folder, click the Files tab.
|
|
2.
|
Click a data post.
|
|
3.
|
Click Settings
 . . |
|
4.
|
Next to Data tables, click Add.
|
Note: This option appears only if you select the Refresh or Import update methods.
|
5.
|
Select the original data table.
|
|
6.
|
Click Save.
|
Search JMP Public
To find posts, users, or spaces across JMP Public, enter a keyword in the search box. Click Posts, Users, or Spaces to see specific types of results.
Figure 1.25 Example of Searching by Keyword
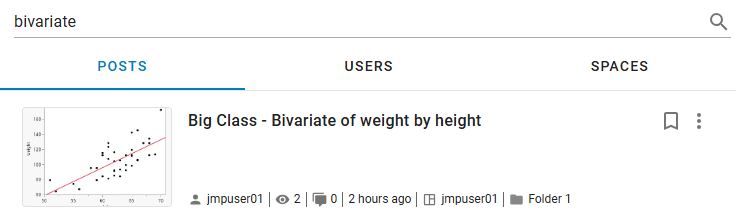
Here are some actions that you can take from the search results:
Posts
|
•
|
To open a post, click the title or image.
|
|
•
|
To open the post author’s profile, click their user name.
|
|
•
|
To open a space or folder, click the space or folder title.
|
|
•
|
To bookmark a post, click
. |
|
•
|
To copy the post ID for scripting, click
> Copy ID to clipboard. |
|
•
|
To move or delete a post that you own, click
> Move post or Delete post. |
Users
|
•
|
To open a user’s profile, click their user name.
|
Spaces
|
•
|
To open a space, click the space.
|
Use Filters in JMP Public Searches
You can use filters to narrow your searches in JMP Public.
|
1.
|
Click
 at the upper right (where applicable). at the upper right (where applicable). |
|
2.
|
Enter any combination of keywords, user or space names, or dates. You can also filter by control chart warnings, and in some cases, by post type.
|
|
3.
|
Click outside of the Filters panel to see the results.
|
|
4.
|
Click Clear All to stop filtering.
|
|
•
|
To filter by your own posts, click your user icon > Profile.
|
|
•
|
To search for a page or a space in JMP Public, use the keyboard shortcut Ctrl + comma and enter the name of the page or space that you are looking for.
|
Update Your JMP Public Settings
You can update the following items in your JMP Public settings:
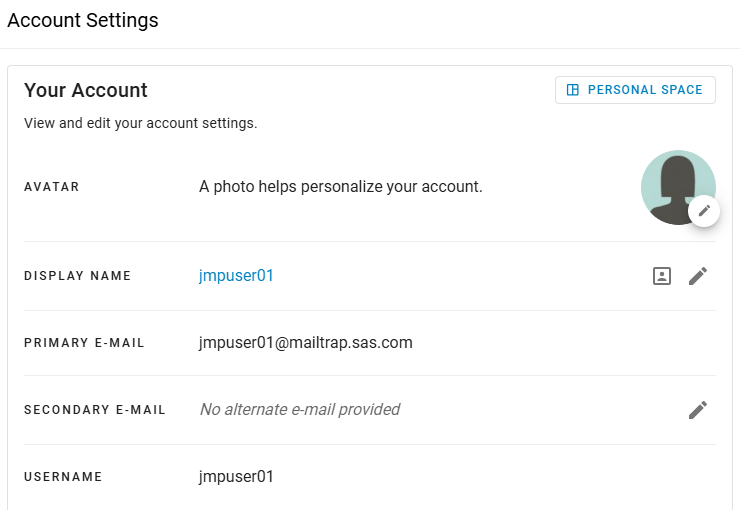
Update Your Settings
At the upper right, click your user icon > Settings.
|
•
|
Change your profile picture: Next to Avatar, click
> Upload new avatar or Reset to default. |
|
•
|
Change your display name: Next to Display Name, click
and enter and save your new name. |
Note: You might not be able to edit your display name because this action depends on your JMP Public server’s authentication settings.
|
•
|
Add a secondary email: Next to Secondary E-mail, click
and enter and save your email address. You can send notifications to primary or secondary emails, or both. |
Figure 1.26 Update Your Settings
Verify your account details
|
1.
|
Click your user icon and then select Settings at the upper right.
|
|
2.
|
Verify your username or the email that is associated with your account.
|
|
3.
|
(Local authentication method only) Verify or change your password.
|
Tip: To view your profile as others see it, click  .
.
.Manage Notifications
As a JMP Public user, you can be notified about comments, changes to posts, changes to your access settings, control chart warnings, and more, depending on your notification settings.
Open or Act on Notifications
To see your notifications, click  . From here, you can perform the following actions:
. From here, you can perform the following actions:|
•
|
To open the source, such as a post, click a notification.
|
|
•
|
To clear a notification, click
 > Clear notification. > Clear notification. |
|
•
|
To stop receiving notifications of a certain type, click
> Stop receiving <type> notifications. |
|
•
|
To mark all notifications as read, click
 . . |
|
•
|
To remove all notifications, click
 . . |
|
•
|
To change your notification settings, click
 . See Change Notification Settings. . See Change Notification Settings. |
|
•
|
To see all notifications in a larger window, click See All.
|
Change Notification Settings
Access your notification settings in either of these ways:
|
•
|
At the upper right, click your user icon > Settings. On the left side, click Notifications
 . . |
|
•
|
Click Notifications
> . |
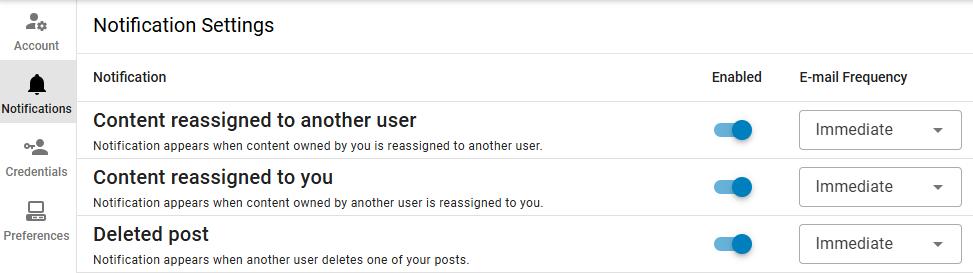
On the Notification Settings page, you can enable or disable notifications. If you enable a notification, choose how often you want to receive email notifications.
Figure 1.27 Notification Settings
|
•
|
If a secondary email address is set up, you can choose which account to send notifications to (primary, secondary, or both).
|
|
•
|
To sort notifications by ascending or descending order, click the arrow next to the Notification column.
|
Change Your Language
At the upper right, click your user icon > Language, and then select a language.
Change the Theme to Dark or Light Mode
To change the theme from light mode to dark mode, at the upper right, click your profile picture > Dark mode.
Figure 1.28 Change the Theme