This example uses the Crime.jmp sample data table, which contains data on crime rates for each US state.
|
1.
|
|
2.
|
Select Graph > Graph Builder.
|
|
3.
|
|
4.
|

|
•
|
The legend shows the colors that correspond to the burglary rates. Since Burglary is a continuous variable, the colors are on a gradient.
|
Open a data table that contains geographic data. Launch Graph Builder by selecting Graph > Graph Builder. The primary element in the Graph Builder window is the graph area. The graph area contains drop zones (Map Shape, Color and Size), and you can drag and drop variables into the zones. From here you can map shapes for data tables that include place names.

When a column contains the names of geographical regions (such as countries, regions, states, provinces, counties), you can assign the column to the Map Shape zone. When a variable is dropped in Map Shape, Graph Builder looks for map shapes that correspond to the values of the variable and draws the corresponding map. The variable can have a column property that tells JMP where to find the map data. If not, JMP looks through all known map files. If you have a variable in the Map Shape zone, the X and Y zones disappear. The Map Shape zone is positional and influences the types of graph elements that are available.
Example of Cities.jmp After Dragging State to Map Shape

For each map there are two .jmp files; one for the name data (one row per entity) and one for coordinate data (many rows per entity). They are paired via a naming convention; xxx-Name.jmp and xxx-XY.jmp, where "xxx" is some common prefix. Some examples of sample files that are shipped with the product are:
Each xxx-Name.jmp can contain any number of shape name columns, which are identified with a column property. Multiple name columns support localizations and alternate names styles (such as abbreviations), but a given graph usage uses only one column of names. The first column of the Name file must contain unique Shape ID numbers in ascending order.
Example of US-State-Name.jmp

Each xxx-XY.jmp file has four columns. Each row is a coordinate in some shape. Each part is made of one or more shapes. Each shape is a closed polygon. The first column is the same Shape ID as in the xxx-Name file. The second column is the Part ID. The next two columns are X and Y.
Example of US-State-XY.jmp

Drag a column containing geographic place-names, like countries, regions, states, or provinces, into the Map Shape zone and create a map. Then drag a column to the Color zone to color the map by that column. The categorical or continuous color theme selected in your Preferences is applied to each shape.
Example of SAT.jmp After Dragging 2004 Verbal to Color

Use the Size element to scale map shapes according to the size variable, minimizing distortion.
Example of SAT.jmp After Dragging Population to Size

|
1.
|
|
3.
|
Click OK.
|
You can also change the transparency of images (for example, Simple Earth and Detailed Earth). To set the transparency, right-click over the graph and select Customize.... This brings up the Customize Graph window, where you can select the Background Map and assign a value for transparency. A valid value for transparency goes from 0.0 (completely transparent) to 1.0 (completely opaque). Within Graph Builder, you can also right-click over the graph and select Graph > Transparency.
|
1.
|
Right-click on the color bar and select Gradient.
|
|
2.
|
In the Gradient Settings window, select a different Color Theme.
|
Graphs consist of markers, lines, text, and other graphical elements that you can customize. If you right-click an image, there are several options for working with the graph. The options differ based on what you clicked. For more information, see the Graph Builder section and Using JMP. Below are a few options.

|
‒
|
|
•
|
Customize - You can change the properties of the graph such as contents, grid lines, or reference lines. The graphical elements that you can customize differ for each graph. Select Background Map to change the transparency of a background map or Map Shape to change the line color, line style and width, fill color, missing shape fill or missing value fill. Click Help in the Customize Graph window for a more detailed explanation of the customize options.
|
|
•
|
On Windows: C:/Program Files/SAS/JMP/<version>/Maps
|
|
•
|
On Mac: /Users/<user name>/Library/Application Support/JMP/Maps
|
Note: On Windows, in JMP Pro, the “JMP” folder is named “JMPPro”. In JMP Shrinkwrap, the “JMP” folder is named “JMPSW”.
Or, you can link the map files to your data files explicitly with the Map Role column property.
|
•
|
|
•
|
The first column in both files must be the ascending, numeric Shape ID variable. The -Name file can contain any other columns. The shapes are built by rows. The XY coordinates have to go around the shape rather than just define the convex hull of the shape.
|
|
•
|
For the Map Role column property, columns that are marked with the Shape Name Definition are searched for shape identification and must contain unique values.
|
|
•
|
If you import an Esri SHP file, it is opened in the correct format. -Name files commonly have a .dbf extension. For more information, see Esri® Shapefiles.
|
|
•
|
You might want to create choropleth maps of other non-geographic regions (for example, a floor of an office building). Simply, add the two shape files for your non-geographic space. If you do not have XY coordinates, but you do have a graphic image of the space, you can use the Custom Map Creator add-in for JMP. With this add-in, you can trace the outlines of the space and JMP creates the -XY and -Name files for you. You can download this add-in from the JMP File Exchange page.
You can specify the attributes and properties of a column in a data table within the Column Info window in Column Properties. The Map Role property is set for a column like other column properties in the Column Info window.
If you have created your own data table that contains boundary data (such as countries, regions, states, provinces, or counties) and you want to see a corresponding map in Graph Builder, use the Map Role property within Column Properties. Each pair of map files that you create must contain a -Name file and a -XY file.
|
•
|
If the custom boundary files reside in the default custom maps directory, then you need to specify only the Map Role property in the -Name file.
|
|
•
|
If the custom boundary files reside in an alternate location, specify the Map Role property in the -Name file and in the data table that you are analyzing.
|
|
•
|
The columns that contain the Map Role property must contain the same boundary names, but the column names can be different.
|
|
1.
|
Right-click on the column containing the boundaries and select Column Properties > Map Role.
|
|
2.
|
|
3.
|
Click OK.
|

|
1.
|
Right-click on the column containing the boundaries and select Column Properties > Map Role.
|
|
2.
|
|
3.
|
Next to Map name data table, click
|
|
4.
|
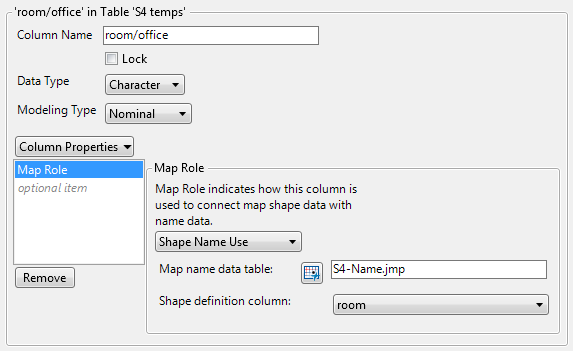
From the Shape definition column list, select the column in the map data table whose values match those in the selected column.
|
Shape Definition Column Example shows an example of the room/office column in the S4 Temps.jmp sample data table.
|
5.
|
Click OK.
|
When you generate a graph in Graph Builder and assign the modified column to the Map Shape zone, your boundaries appear on the graph.
For numeric columns, the Format Menu appears in the Column Info window. Specify the format to tell JMP how to display numbers in the column. Latitude and Longitude for geographic maps are located under Format > Geographic when customizing axes and axes labels.
In each format, the last field can have a fraction part. You can specify the direction with either a signed degree field or a direction suffix. To show a signed degree field, such as -59°00'00", deselect Direction Indicator. To show the direction suffix, such as 59°00'00" S, select Direction Indicator.
To use spaces as field separators, deselect Field Punctuation. To use degrees, minutes, and seconds symbols, select Field Punctuation.
Esri® Shapefiles
main file (.shp)
The .shp file contains sequences of points that make up polygons. When opened with JMP, a .shp file is imported as a JMP table.
|
•
|
The Shape column is added during import to uniquely identify each geographic region. Each coordinate point is in a separate row.
|
|
•
|
The Part column to indicate discontiguous regions, and the XY coordinates (in latitude and longitude degrees).
|
JMP supports two-dimensional .shp files (no elevation information).
dBase Table (.dbf)
You add a Shape ID column to the .dbf table, which maps to the Shape column in the .shp file. Add any number of columns that provide common names or values to refer to specific regions.
|
1.
|
Open the .shp file in JMP.
|
|
2.
|
Make sure that the Shape column is the first column in the .shp file. Add formatting and axis settings for the X and Y columns (optional). Graph Builder uses those settings for the X and Y axes.
|
|
3.
|
|
4.
|
Open the .dbf file.
|
|
5.
|
Add a Shape ID column as the first column in the table. This column should be the row numbers from 1 to n, the number of rows in the data table.
|
Note: You can use Cols > New Column > Initialize Data > Sequence Data) to fill the column with sequential numbers.
|
6.
|
Assign the Map Role column property to any column that you use for place names in the Shape role of Graph Builder. To do this, right-click at the top of the column and select Column Properties > Map Role.
|
|
7.
|
Select Shape Name Definition from the drop-down box in the property definition.
|
|
8.
|
|
•
|
Windows: C:\Program Files\SAS\JMP\<Version Number>\Maps
|
|
•
|
Mac: /Library/Application Support/JMP/<Version Number>/Maps
|
|
•
|
On Windows: C:\Users\<user name>\AppData\Roaming\SAS\JMP\Maps
|
|
•
|
On Mac: /Users/<user name>/Library/Application Support/JMP/Maps
|
Note: On Windows, in JMP Pro, the “JMP” folder is named “JMPPro”. In JMP Shrinkwrap, the “JMP” folder is named “JMPSW”.
SAS/GRAPH® Map Data Sets
You can now import the converted file and save it as Belize-XY.jmp.
The next step is to import the matching feature data set (in this case: MAPS.BELIZE2). After importing the feature data set, move the ID column to the first position in the data table. Then assign the Map Role column property to the columns that you use for place names in the Shape role of Graph Builder. To do this, right-click the top of the column and select Column Properties > Map Role. Then select Shape Name Definition from the drop-down box in the property definition. For MAPS.BELIZE2, use the IDNAME column. Save the feature data table as Belize-Name.jmp.
To convert SAS maps, download the SAS to JMP Map Converter add-in from the JMP File Exchange page. For each map, the add-in reads the data from the two SAS map tables, rearranges and formats the data and then places it into the two JMP map tables.