Microsoft Excel files open in the Excel Import Wizard by default. The wizard shows a preview of the data. You can then modify the settings before importing the data. For example, you might indicate which row the data begin on and whether the worksheet contains column headers or hidden rows or columns. Microsoft Excel .xls, .xlsm (on Windows), and .xlsx file formats are supported.
For information about opening a Microsoft Excel file outside the wizard, see Import a Microsoft Excel File Directly.
|
•
|
Password-protected Microsoft Excel .xlsx files cannot be opened in JMP.
|
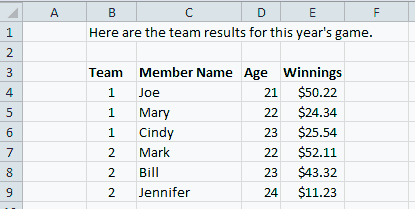
For the figures in this example, we used the Team Results.xlsx file located in the JMP Samples/Import Data folder. The file has the following characteristics:
Team Results.xlsx Worksheet
|
2.
|
To open an Excel file in JMP, select File > Open.
|
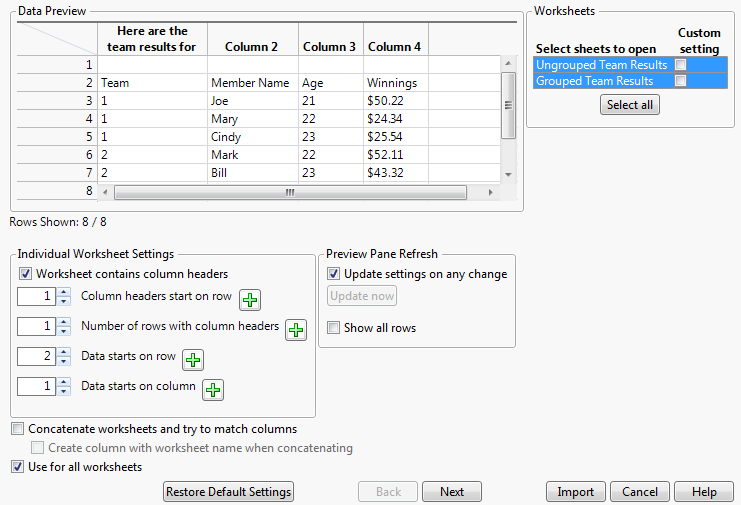
The worksheet opens in the Excel Import Wizard, where a preview of the data appears along with import options (Example Initial Data Preview).
Note: JMP remembers your previous changes each time you import a worksheet, even after closing and reopening JMP. This feature is helpful when you want to reimport the same worksheet several times and experiment with options. To clear those changes when you import a different worksheet, click Restore Default Settings.
|
4.
|
Type 3 for Column headers start on row
|
|
5.
|
Type 4 for Data starts on row.
|
|
6.
|
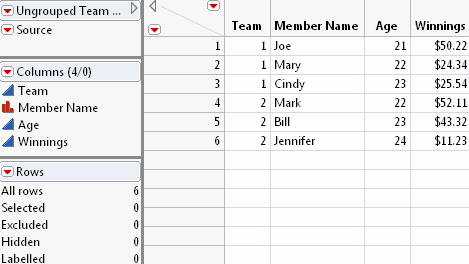
Select Ungrouped Team Results in the Worksheets pane.
|
|
7.
|
Deselect Use for all worksheets.
|
Selecting the Column Header Row shows your changes.

See Individual Worksheet Settings for details about all options.
|
8.
|
Click Next to configure other import settings.
|
|
9.
|
For Data ends with row, type 9.
|
|
10.
|
For Data ends with column, type 5.
|
Specifying the Last Column shows your changes.

See Additional Individual Worksheet Settings for details about all options.
|
11.
|
Adds a new Source Table column that lists the worksheet name for each imported table. This option is available after you select the preceding concatenate option.
If you deselect Replicate data in spanned rows, JMP unspans the cells and copies the cell contents into the topmost cell. The remaining unspanned cells are left empty.
|
•
|
As you experiment with settings for a large worksheet, the data preview might be slightly delayed. To speed up the preview, deselect Update settings on any change on the first wizard window. Modify the settings and then click Update now to refresh the data preview.
|
|
•
|
To view all rows in the Data Preview pane, select Show all rows. The preview might be slightly delayed depending on the size of the spreadsheet.
|
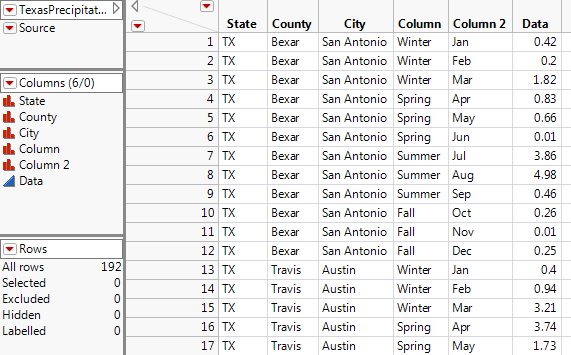
In an Excel worksheet, multiple header rows can have an implied hierarchy; the second header row contains data that are categories of the first header row. The Original Data in Excel and Final Data in JMP shows an example. In the worksheet at the top, the seasons “Winter” and “Spring” are in spanned cells above the months within those seasons. In the JMP data table, you want the seasons in one column and their corresponding months in another column.

|
1.
|
In JMP, select File > Open.
|
|
2.
|
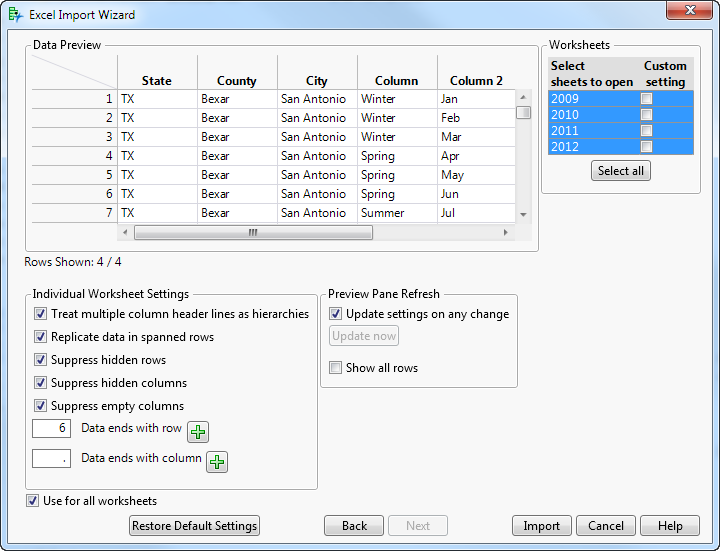
In the Open Data File window, select Texas Precipitation.xlsx, located in the JMP Samples/Import Data folder, and then click Open.
|

Excel Import Wizard Preview shows the default settings for this worksheet:
|
3.
|
Under Preview Pane Refresh, make sure that Update settings on any change is selected.
|
|
4.
|
Next to Number of rows with column headers, click the up arrow once.
|
Notice that Data starts on row automatically updates to 3.
Updated Settings on Page One shows the updated settings.

|
5.
|
Click Next.
|
|
6.
|
Select Treat multiple column header lines as hierarchies.
|
|
7.
|
Next to Data ends with row, type 6 and press Enter.
|
Updated Settings on Page Two shows the updated settings.
Notice that Replicate data in spanned rows is selected by default. JMP unmerges data that were merged in the worksheet and copies the cell contents as separate categories. “TX” was originally in a merged cell. In JMP, it will be copied into separate cells.
|
8.
|
Click Import.
|
The four worksheets open as separate data tables. The data tables contain a Source script, which you can run to import the data into new data tables using the same import settings (The Final Data). Your import settings are also saved the next time you open the worksheet in the Excel Import Wizard in any JMP session.
Instead of opening spreadsheets in the Excel Import Wizard, you can select File > Open to open the file. By default, JMP detects whether the first row contains labels and converts them to column headings. You can change this setting in the General preferences. The Excel Open Method preferences are in File > Preferences > General (Windows) and JMP > Preferences > General (Macintosh). From the Use Excel Labels for Headings list, select Always or Never.
|
1.
|
|
2.
|
Select the Excel Files file type, select the file, or enter the URL.
|
|
3.
|
To convert text in the first row to column headings, select Always next to Always enforce Excel Row 1 as labels.
|
|
4.
|
To select the worksheets that you want to open, click the Open button arrow, and then select Open Selected Worksheets. Select one or more worksheets and click OK.
|
1.
|
Select File > Open and select the file.
|
|
2.
|
(.xls only) To convert text in the first row to column headings, select Use Excel Labels as Headings.
|
|
3.
|
|
4.
|
Click Open.
|
If you chose to open specific worksheets, select those worksheets from the list, and then click OK. You can also click Select All if you change your mind and want to import all worksheets.
If you chose to open specific worksheets, select those worksheets from the list, and then click OK. You can also click Select All if you change your mind and want to import all worksheets.
If you selected an .xlsx file, a preview of the data appears in the Excel Wizard. See Preview and Import the Microsoft Excel Data for details.