|
1.
|
|
2.
|
|
3.
|
|
4.
|
From the Matching Specification area, select By Row Number.
|
|
5.
|
Click OK.
|
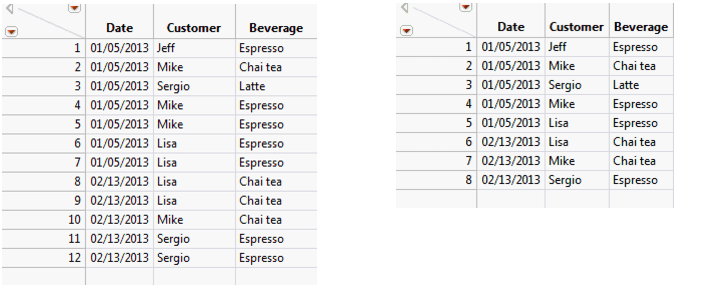
If the two tables have column names that are the same, the names of these columns in the new table appear as “column name of table name.” For example, suppose that you want to combine the eight rows from the Trial1.jmp and Trial2.jmp data tables shown in Original Tables and the Joined Table into a single table. You want to combine them so that the new table contains all of the columns from both tables.
|
1.
|
|
2.
|
|
3.
|
|
4.
|
From the Matching Specification menu, select By Row Number.
|
|
5.
|
Click OK.
|
|
1.
|
|
2.
|
|
3.
|
|
4.
|
From the Matching Specification menu, select By Row Number.
|
|
5.
|
Click Select columns for joined table to specify the subset of columns that you want to include.
|
|
6.
|
In the Source Columns list, select popcorn and yield from the Trial1 list and select yield from the Trial2 list.
|
Because identical data exists in the popcorn column of both tables, you need to select only one column.
|
7.
|
Click Select.
|
|
8.
|
Click OK.
|

|
1.
|
|
2.
|
|
3.
|
|
4.
|
From the Matching Specification menu, select Cartesian Join.
|
|
5.
|
Click OK.
|
The data in Species1.jmp is crossed with the data in Species2.jmp to produce the joined table, which shows all combinations of the values in each set.
In this example, use the Tables > Join command twice:
|
•
|
The first join combines the Oil Amount.jmp table with the Batch.jmp table using the Cartesian option.
|
|
•
|
The second join combines the resulting table (Cartesian oil amount + batch) with the Popcorn Type.jmp table and produces a final table with all tables joined.
|
|
1.
|
|
2.
|
|
3.
|
|
4.
|
From the Matching Specification menu, select Cartesian Join.
|
|
5.
|
|
6.
|
Click OK.
|
The joined table contains all of the columns from the Oil Amount.jmp and Batch.jmp tables. Add the Popcorn Type.jmp columns, as follows:
|
7.
|
|
8.
|
|
9.
|
From the Matching Specification menu, select Cartesian Join.
|
|
10.
|
Click OK.
|

|
1.
|
The Students1.jmp data table contains names, ages, and sexes of the students. The Students2.jmp data table contains names, height, and weight of the students. Instead of working with two separate tables, you would like to combine the tables into one. Notice that the students’ names are not in the same order in both tables. For example, Alice is in row 7 and row 9.
|
2.
|
|
3.
|
Because both tables have one column (name) that contains the same values, you need to tell JMP that they are matches. JMP then examines each of the values in the name column of the first table to determine whether there was a corresponding value in the second table’s name column. For example, it detects that Alice is located in both tables. It creates a name column in the new table with Alice as a value. It then takes the age and sex of Alice from table one and puts it in the new table. Then it takes the height and weight of Alice and puts them in the new table.
|
4.
|
Select By Matching Columns in the Matching Specification area.
|
|
5.
|
|
6.
|
Click Match.
|
|
7.
|
You want the new table to contain only one row for each name, so select the Drop multiples boxes for both tables.
|
|
8.
|
Click OK.
|
Suppose that Sarah and Joe are performing a popcorn experiment. They are popping different types of popcorn (gourmet and plain) in different amounts of oil. They are recording the amount (yield) of popcorn that is produced. Sarah gave you the first trial data in a file named Trial1.jmp. Joe gave you the second trial data in a file named Little.jmp. You want to combine the two tables into one table.
|
1.
|
|
2.
|
|
3.
|
You can see that three of the columns (popcorn, oil amt/oil, and batch) contain the same values in both tables. Identify these columns as matches. Also, because Sarah and Joe gave the oil and oil amt columns different names, you can tell JMP that oil amt and oil match.
|
4.
|
Deselect Preserve main table order.
|
|
5.
|
Select By Matching Columns in the Matching Specification area.
|
|
6.
|
|
7.
|
|
8.
|
Click Match.
|
Looking at the two data tables, you can see that they have different numbers of rows. Trial1.jmp has values for eight experimental conditions, and Little.jmp has values for only four of those conditions. Sarah completed her experiment, but Joe only partially completed his experiment. You want the joined table to contain all of the rows in Trial1.jmp. even if that row in the Little.jmp table contains a missing value.
|
9.
|
Select the Include non-matches boxes for both tables.
|
In the joined table, you want only one column for popcorn, one column for oil, and one column for batch. However, you want two columns for yield: one representing the yield from Trial1.jmp, and another representing the yield from Little.jmp.
|
10.
|
Select the box beside Select columns for joined table.
|
|
11.
|
From the Trial1 list, select all of the columns.
|
|
12.
|
Click Select.
|
|
13.
|
|
14.
|
Click Select.
|

|
15.
|
Click OK.
|
Trial1.jmp and Little.jmp Joined

The joined table is sorted by the matching columns. Note that the yield column from the Little.jmp table (Yield of Little) has missing values indicating no matching values with the Trial1.jmp table.
|
1.
|
|
2.
|
Select Tables > Join.
|
|
3.
|
|
4.
|
Select By Matching Columns in the Matching Specification area.
|
|
5.
|
|
6.
|
Click Match.
|
|
7.
|
Select the Drop multiples boxes for both tables (the Main Table and the With Table).
|
|
8.
|
|
9.
|
Click OK.
|