Frame Box <<Add Graphics Script(<order>, <"description">, script)
|
•
|
The optional order argument specifies in what order to draw the graphics element. The order can be the keyword Back or Front or an integer that specifies the drawing order for a number of graphics elements. For example, if you add an oval to a scatterplot, the oval is drawn on top of the markers. The keyword Back or 1 cause the oval to be drawn in the background. Front or 2 means the object is drawn first.
|
|
•
|
The optional Description argument is a string that appears in the Customize Graph window next to the graphics script.
|
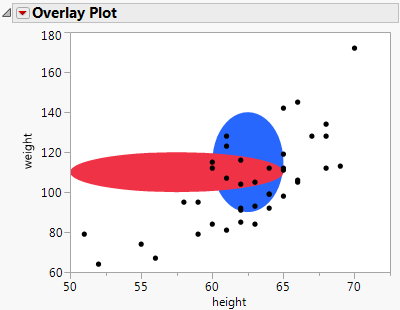
To specify the drawing order for a number of graphics elements, use an integer for the order argument to determine where each is drawn in relation to the others. The following script first adds a blue oval and then adds a red oval over the blue oval. Both ovals are behind the points.
dt = Open( "$SAMPLE_DATA/Big Class.jmp" );
op = dt << Overlay Plot(
X( :height ),
Y( :weight ),
);
Report( op )[Frame Box( 1 )] << Add Graphics Script(
1, // draw the blue oval
Description( "Blue Oval" ),
Fill Color( "Blue" );
Oval( 60, 140, 65, 90, 1 );
);
Report( op )[Frame Box( 1 )] << Add Graphics Script(
2, // draw the red oval over the blue oval
Description( "Red Oval" ),
Fill Color( "Red" );
Oval( 50, 120, 65, 100, 1 );
);
Figure 12.3 Specifying the Drawing Order
obj << Copy Frame Contents // contents such as a graph or line of fit
obj << Paste Frame Contents
obj << Copy Frame Settings // settings such as background color
obj << Paste Frame Settings
dt = Open( "$SAMPLE_DATA/Big Class.jmp" );
biv = dt << Bivariate( y( :weight ), x( :height ) );
rbiv1 = biv << Report; // create a report object
rbiv2 = rbiv1 << Clone Box; // create a copy of the Bivariate graph
rbiv1 << Append( rbiv2 );
// place the cloned box below the Bivariate graph
// to create a second Bivariate graph
framebox1 = rbiv1[Frame Box( 1 )]; // assign references to the reports’ frame boxes
framebox2 = rbiv2[Frame Box( 1 )];
biv << Fit Line; // fit a line to the first Bivariate graph
framebox1 << Copy Frame Contents;
// copy the frame contents from framebox1
framebox2 << Paste Frame Contents;
// paste the frame contents to framebox2
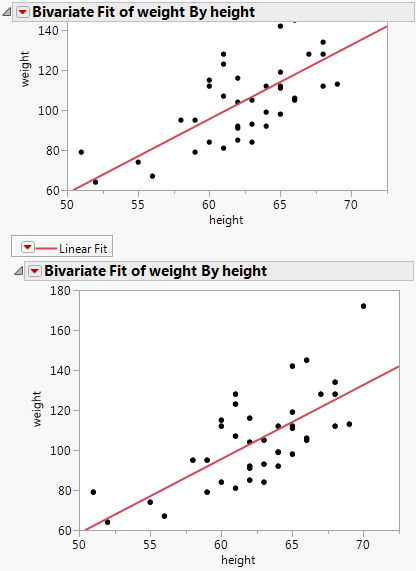
Figure 12.4 Copying and Pasting Frame Contents
dt = Open( "$SAMPLE_DATA/Big Class.jmp" );
biv1 = dt << Bivariate( y( :weight ), x( :height ) );
// create the first Bivariate graph
rbiv1 = biv1 << Report; // create a report object
rbiv2 = rbiv1 << Clone Box; // create a copy of the Bivariate graph
rbiv1 << Append( rbiv2 );
// place the cloned box below the Bivariate graph
// to create a second Bivariate graph
framebox1 = rbiv1[Frame Box( 1 )]; // assign a reference to the reports’ frame boxes
framebox2 = rbiv2[Frame Box( 1 )];
framebox1 << Background Color( "Blue" );
// assign the background color to framebox1
framebox1 << Copy Frame Settings;
// copy the frame settings from framebox1
framebox2 << Paste Frame Settings;
// paste the frame settings to framebox2
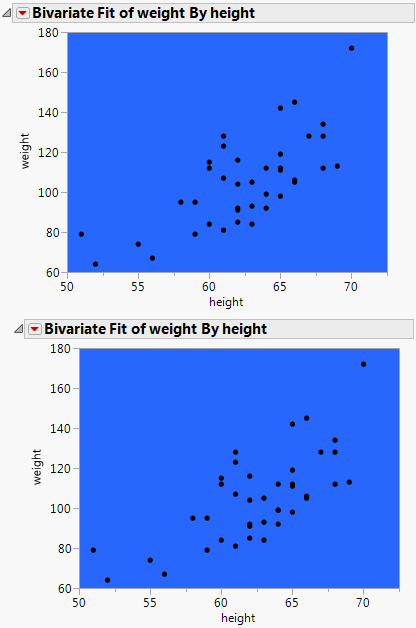
Figure 12.5 Copying and Pasting the Background
dt = Open( "$SAMPLE_DATA/Big Class.jmp" );
dist = dt << Distribution(
SendToByGroup( {:sex == "F"} ),
Nominal Distribution( Column( :age ) ),
Histograms Only,
By( :sex ),
SendToByGroup(
{:sex == "M"},
SendToReport(
Dispatch(
{"Distributions sex=M", "age"},
"Distrib Nom Hist",
FrameBox,
{DispatchSeg(
Hist Seg( 1 ),
Fill Color( "Light Yellow" ),
// set the histogram color for males
)}
)
)
)
);
For( i = 2, i <= N Items( dist ), i++,
Report( dist[i] )[FrameBox( 1 )] << Copy Frame Contents;
// copy the the second histogram into the first histogram
Report( dist[1] )[FrameBox( 1 )] << Paste Frame Contents;
);
New Window( "Distribution", Outline Box( "age", Report( dist[1] )[Picture Box( 1 )] ) );
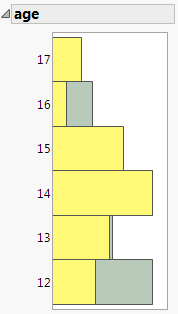
Figure 12.6 Pasted Histogram
|
1.
|
Right-click the graph and select Edit > Copy Frame Settings.
|
|
2.
|
Right-click the frame to which you want to paste the settings and select Edit > Paste Frame Settings.
|
|
1.
|
Right-click the graph and select Edit > Copy Frame Contents.
|
|
2.
|
Right-click the frame to which you want to paste the contents and select Edit > Paste Frame Contents.
|