|
1.
|
|
3.
|
After you create the blank application, you add open reports, display boxes, and other objects to the workspace. See Example of Creating an Application for more information.
|
2.
|
Drag the object onto the Module1 tab (or double-click the object).
|
|
3.
|
|
4.
|
Add scripts to scriptable objects. See Write Scripts for details.
|
|
5.
|
(Optional) To prevent a module from launching when you run the application, select the module in the Objects pane and deselect Auto Launch. (You might do this while testing one out of multiple modules.)
|
|
6.
|
From the Application Builder red triangle menu, select Run Application to test your application.
|
|
1.
|
Select Format > Add Module.
|
|
2.
|
In the Properties pane, select the Module Type:
|
|
–
|
|
–
|
|
–
|
Change the Variable Name in the module’s object properties.
Select Format > Delete Module.
|
•
|
ret = Module1 << Create Instance() will not return until the dialog is complete. By this time, the dialog has been destroyed. Therefore, the return value will not be a handle to the Module Instance. Like New Window(), the return will instead be of the form {Button(1 | -1), User Data}. (1 | -1) indicates whether the OK (1) or Cancel (-1) button was pressed.
|
|
•
|
User Data() is a new property on the Module Instance. During execution of the dialog, the Module script can set the user data:
|
thisModuleInstance << Set User Data(...);
to store something to be parsed by the caller. The user data will be evaluated at the time that it is set. There is also a corresponding Get User Data().
|
•
|
Like New Window(), if there is no OK or Cancel button included, an OK button will be added.
|
|
•
|
There is an optional Validate script property on the Module Instance. This script is only used for Modal dialogs and behaves like On Validate() in New Window(). It is called when the OK button is pressed, and returns 1 to accept the input or 0 to disallow the close.
|
|
•
|
Unlike other module types, a Modal Dialog will not show until the module script has completed. For other module types, the window is created during the call to thisModuleInstance << Create Objects. JMP cannot display a Modal Dialog here because control would stop and there would be no way to initialize the contents of the boxes in the display. Since the window is not created yet, you will not be able to do actions like set the window title or set an on-close script.
|
|
•
|
The top and left edges of an object align (or snap) to the nearest dotted grid lines as you drag them on the workspace. For a more precise placement, deselect Snap to Grid in the Application Builder red triangle menu. You can also turn off Snap to Grid for all applications in the JMP Preferences. Select File (Windows) or JMP (Macintosh)> Preferences > Platforms > JMP App to change the option.
|
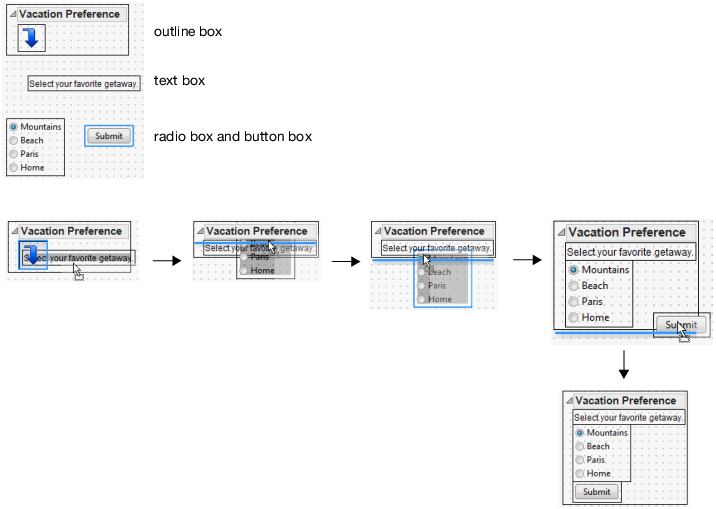
Figure 15.5 shows the various methods for dragging objects inside a container.
Figure 15.5 Examples of Dragging Objects into a Container
|
•
|
To position a container object precisely, select the object and then change the X Position and Y Position properties. After you enter a new X position, press the TAB key to see the object move to the new position and then enter the new Y position.
|
|
•
|
To place an object in the upper left corner, right-click the object and select Move to Corner. This is a shortcut to setting the X and Y positions to 0. On Macintosh, hold down CTRL and COMMAND and then select Move to Corner.
|
To line up objects horizontally or vertically, select the objects and then select an option from the Format > Align Boxes menu.
|
•
|
The Align Boxes options are unavailable when you select a container rather than the internal objects.
|
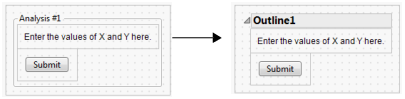
After inserting some containers, you can change them to a different type of container without having to re-create the object. Suppose that you create a panel that contains text and a button. To see what the panel looks like as an outline, select the panel, right-click in the module, and then select Change Container > Outline Box (Figure 15.6).
Figure 15.6 Change a Panel to an Outline
Tip: To change the orientation of a list box quickly, select or deselect Horizontal in the object properties.
The toolbar at the top of the Application Builder window provides buttons for containers such as border boxes and mouse boxes (Figure 15.7).
To insert selected objects into a container, click the appropriate button on the toolbar or select Format > Add Container.
Figure 15.7 Container Toolbar

|
•
|
On Windows, select Edit > Clear to delete all objects in a module.
|
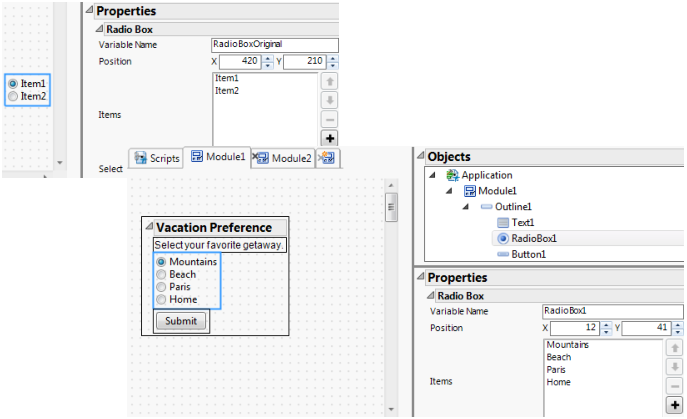
To create the radio box list items in Figure 15.8, double-click the placeholder items “Item1” and “Item2” and enter the new list item.
Figure 15.8 Radio Box Object Properties
For more information about an object, right-click the object and select Scripting Help. The JMP Scripting Index appears, and the object that you selected is highlighted. The Scripting Index often includes a script that you can run to see an example of the object.
Prevents users from editing the application in a text editor. Only applications that the user runs are encrypted (the .jmpapp file and the application in a JMP add-in). Scripts that you save to a data table, journal, and add-in are encrypted. For more information about encryption, see Encrypt and Decrypt Scripts in Programming Methods.
Specifies the absolute or relative filepath for the data table used in the application. You can precede the data table name with a path variable (such as $HOME or $USER_APPDATA).
Specifies the string used when prompting the user to open a data table. Figure 15.9 shows the default value.
Figure 15.9 Label in Data Table Prompt Window
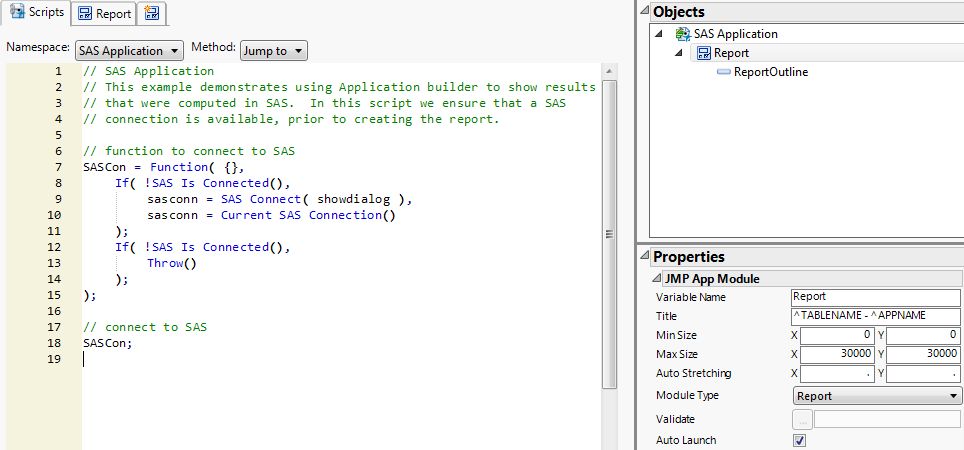
To see the scripts in these namespaces, click the Scripts tab and then select the namespace in the Namespace list (or in the Objects pane). See Figure 15.10.
Figure 15.10 Application and Module Namespaces
A named script is a function that several controls can use. The this argument tells which control is calling the function. In the following example, Get Button Name is sent to the this argument to print the button name to the log when the button is clicked:
Button1Press = Function({this}, Print(this <<Get Button Name))
On another button, use Button1Press script to produce the same results.
|
1.
|
Right-click the object, select Scripts, and then select the script that you want to add. In this example of creating a button, select the Press script. (On Macintosh, press OPTION, and then select Scripts > Press.)
|
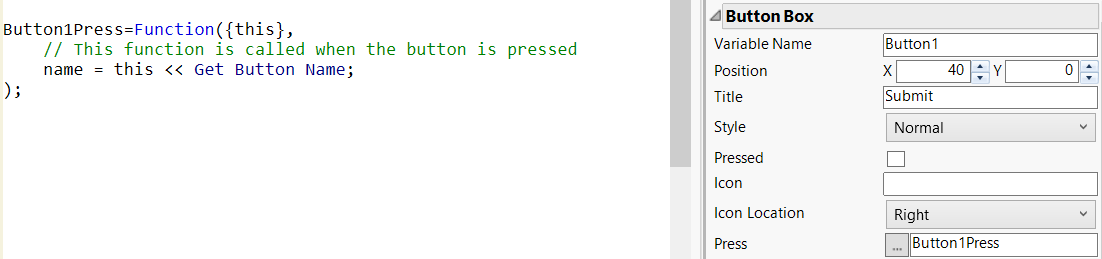
The object’s placeholder script appears on the Scripts tab (Figure 15.11). The name of the named script, Button1Press, shows up in both the script and the object properties.
Figure 15.11 New Script and Script Properties
|
2.
|
Edit the object’s placeholder script and properties to provide the necessary functionality. For example, the button box shown in Figure 15.11 was renamed. The Title property was changed to Submit, the text that appears on the button.
|
|
Tip: After you add a script to an object and then delete the object, delete the object’s script from the Scripts tab if you no longer need the script. This feature prevents scripts that you might want in the future from being deleted.
If you rename the script in the object properties, rename it on the Scripts tab also. And if the script is used in another part of the application, rename it there as well.
|
An anonymous script is available only to the object that defines it. For example, you might want a simple Print statement for one button that is not used elsewhere. By writing an anonymous script, you reduce the number of names to manage in the script. Anonymous scripts also reduce clutter among more important named scripts in the Scripts tab, because you add them to the object properties.
Print(Button1 <<GetButtonName) // simple anonymous
Function({this}, Print(this <<GetButtonName)) // parameterized anonymous
Notice that the simple script sends a message to the “Button1” variable, but this is the control in the parameterized script.
Objects such as check boxes might provide additional arguments after this that are not otherwise available. One example is an argument that tells which check box in a column of check boxes just changed.
 in the object properties.
|
2.
|
|
•
|
Double-click the object on the Module tab.
|
|
•
|
When an object has multiple scripts, right-click the object, select Scripts, and then select the script name. You can also select the Scripts tab, select the module name from the Namespace list and then select the script name from the Method list. Likewise, to see the application scripts, select Application from the Namespace list.
|
In each case, the Scripts tab appears with the cursor in the first line of the object’s script.
Right-click the platform object on the workspace and select Edit Platform Script. After you edit the script and click OK, the object on the workspace is updated.