|
•
|
Select Cols > New Column
|
|
•
|
Click an existing column heading and select Cols > Column Info
|
|
•
|
|
•
|
|
‒
|
Numeric columns contain only numbers (with or without a decimal point).
|
|
‒
|
Character columns contain any characters, including numbers. In character columns, numbers are seen as characters and are treated as discrete values instead of continuous values. The maximum field width for character values is 32,766 bytes.
|
|
‒
|
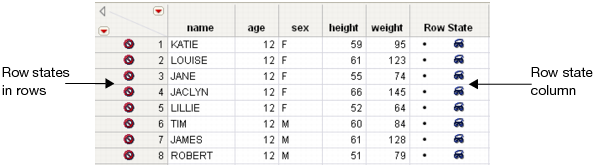
Row State columns contain row state information, which indicates whether the rows are excluded, hidden, labeled, colored, or marked. See Row State Columns.
|
|
‒
|
Expression columns contain JSL expressions that can range from simple entries to complicated statement sequences. In particular, an expression can correspond to a picture, a matrix, or an expression. You can drag-and-drop expressions, such as an image, from your desktop to cells in an expression column. See Expression Role.
|
|
‒
|
If you enter non-numeric data in a column with a Numeric data type, a warning window is displayed, prompting you to change the data type to Character. Click Try Again to return to the data table to re-enter the value. Click Change to change the data type. Click Revert to cancel your edit and return the cell’s value.
|
(Numeric or Character data types only) Select or change the modeling type of a column, which tells JMP how to treat the column’s values during analyses. You can change the modeling type to look at a variable in different ways. See About Data Types and Modeling Types.
|
‒
|
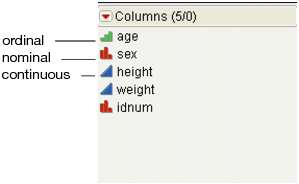
Continuous columns contain only numeric data types. Continuous values are treated as continuous measurement values. JMP uses the numeric values directly in computations.
|
|
‒
|
Ordinal columns contain either numeric or character data types. JMP analyses treat ordinal values as discrete categorical values that have an order. If the values are numbers, the order is the numeric magnitude. If the values are character, the order is the sorting sequence.
|
|
‒
|
Nominal columns contain either numeric or character data types. All values are treated in JMP analyses as if they are discrete values with no implicit order.
|
(Numeric data types only) Select or change the display format of a numeric column. See Numeric Formats.
(Appears only during new column creation) Specify the type of initial data values that you want to appear in the column. See Fill in Initial Data Values.
Modeling Type Icons in the Columns Panel illustrates the icons that identify the different modeling types.
Tip: You can select Continuous only if your data type is numeric. If the Continuous option is dimmed on the menu and you want to make the column continuous, you must first change the column’s data type in the Column Info window.
|
1.
|
|
2.
|
Select the Allow short numeric data format option.
|
|
3.
|
Click OK to return to the data table.
|
|
2.
|
|
•
|
For 1-byte integer, the range of numbers that you can enter is from -126 to 127.
|
|
•
|
For 2-byte integer, the range of numbers that you can enter is from -32,766 to 32,767.
|
|
•
|
For 4-byte integer, the range of numbers that you can enter is from -2,147,483,646 to 2,147,483,647.
|
|
•
|
|
•
|
To add commas to values that equal a thousand or more, select the Use thousands separator option. You must account a space for each comma in the Width box, or else they might not appear. This option is available for the Best, Fixed Dec, Percent, and Currency formats.
|
When you specify a number in the Width field, be sure to include the total number of possible characters. Characters include: numbers, decimal points, commas, and currency symbols.
|
‒
|
If the number of integers following the decimal point is smaller than the number of decimal places that you specify, zeros are added to reach the number of decimal places. For example, if the value is 1.23 and you type 5 in the Dec box, JMP shows the number with five decimal places: 1.23000.
|
Formats values with two decimal positions, thousands separators, and the currency sign that is specified in your computer’s locale settings. The default width of the Currency format is 15. If you have a number that requires a wider field width, the format defaults to the Best format. Once assigned, the currency symbol appears in the column and in graphs that contain the column.
Shows all values in the column as a specific instance in time, such as 12/2/03 at 2:23 PM. See Time Formats.
|
‒
|
:day:hr:m, :day:hr:m:s show a duration of time, such as 52:03:01:30, or fifty-two days, three hours, one minute, and thirty seconds.
|
|
‒
|
hr:m, hr:m:s, min:s shows a duration of time, such as 17:37, or seventeen hours and thirty-seven minutes.
|
In each format, the last field can have a fraction part. You can specify the direction with either a signed degree field or a direction suffix. To show a signed degree field, such as -59°00'00", deselect Direction Indicator. To show the direction suffix, such as 59°00'00" S, select Direction Indicator.
To use spaces as field separators, deselect Field Punctuation. To use degrees, minutes, and seconds symbols, select Field Punctuation.
When you choose a Date format, you can also specify an Input Format. The Date format indicates how the date appears in the data table cells, and the Input Format indicates how you enter the date.
If you assign a date format to a numeric column that already contains data, then the numeric values are treated as the number of seconds since January 1, 1904. For example, if you have a numeric column with a cell value of 1,234,567,890 and you change the format to Date > m/d/y, the cell value appears as 02/13/1943.
The examples in Date Formats use the date of December 31, 2004.
Note: To change how a date appears in a graph without changing how it appears in a data table, see Change the Numeric Format of an Axis in JMP Platforms.
When you choose a Time format, you can also specify an Input Format. The Time format indicates how the time appears in the data table cells, and the Input Format indicates how you enter the time.
|
‒
|
|
‒
|
|
‒
|
|
•
|
:day:hr:m and :day:hr:m:s show the number of days, hours, minutes, and seconds since January 1, 1904. For example, the results for December 31, 2004 are :36890:00:10: and :36890:00:10:00.
|
|
•
|
h:m:s and h:m show the hours, minutes, and seconds portion of the date in the date field. For example, the results for December 31, 2004 at 12:10 AM are 12:10:00 AM and 12:10 AM.
|
|
•
|
yyyy-mm-ddThh:mm and yyyy-mm-ddThh:mm:ss show the year, month, day, and time. For example, 2004-12-31T12:10:00. T is a literal value, representing itself.
|
Note: To change how a time appears in a graph without changing how it appears in a data table, see Change the Numeric Format of an Axis in JMP Platforms.
If you are importing or entering data that contains formatting specific to country standards, you might need to make sure that your number formats are interpreted correctly. On Windows, access the Control Panel’s region and language option, and select the country for which the number should be formatted. On the Macintosh, from the Apple menu, select System Preferences > Language & Text> Formats, and select the correct country. On later versions of Macintosh, this option may appear under System Preferences > Language and Region.
|
1.
|
Select Cols > New Column.
|
|
2.
|
|
3.
|
Click OK.
|
|
2.
|
Right-click and select Row States Cells.
|
|
‒
|
Copy from Row States Replaces the row states in the column with the row states from the rows.
|
|
‒
|
Add from Row States Adds the row states from the rows to the row state column.
|
|
‒
|
Copy to Row States Replaces the row states in the rows with the row states from the column.
|
|
‒
|
Add to Row States Adds the row states from the row state column to the row states in the rows.
|
|
1.
|
Right-click a cell and select Row States Cells > Select/Deselect.
|
|
3.
|
To remove the highlight, right-click on the cell and select Row States Cells > Select/Deselect.
|
Places today’s timestamp in the column for each row. This option is relevant only for the Date or Time formats.
Inserts sequential data based on the parameters that you specify. See Numeric or Character Sequence Data.
|
1.
|
|
2.
|
|
3.
|
|
4.
|
In the Step box, assign the sequence.
|
|
5.
|
(Optional) In the Repeat each value N times box, enter the number of times that you want each numeric value repeated.
|
|
6.
|
Click OK.
|
For example, if you want the column to contain even numbers from 2 to 60, type 2 in the From box, 60 in the To box, and 2 in the Step box.
|
1.
|
|
2.
|
|
3.
|
|
4.
|
(Optional) In the Repeat each value N times box, enter the number of times that you want each character value repeated.
|
|
5.
|
Click OK.
|