Creating and Viewing a Constrained Fast Flexible Filling Design
Constructing the Design
1. Select DOE > Special Purpose > Space Filling Design.
2. Add 3 continuous factors.
3. Alter the factor level values to 0 and 1 and click Continue.
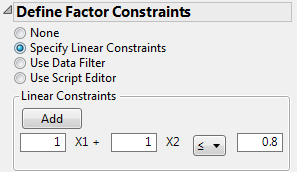
4. In the Define Linear Constraints outline, select Specify Linear Constraints.
Notice that Fast Flexible Filling is the only available Space Filling Design Method.
5. Select Add.
6. Enter the following coefficients and bound:
1 for X1
1 for X2
0.8 for the bound
Figure 21.23 Linear Constraint
7. Type 200 next to Number of Runs.
8. Select Fast Flexible Filling.
JMP creates a design that satisfies the constraints. Open the Design outline to view the design.
9. Select Make Table to construct the data table.
Constructing the Plot
1. With the data table active, select Graph > Graph Builder.
2. Drag X1 to the drop zone labeled X.
3. Drag X2 to the drop zone labeled Y.
4. Remove the Smoother by clicking the smoother icon.
5. Click the Graph Builder red triangle and click Show Control Panel to deselect it.
You should see a graph similar to the one in Figure 21.24. Note that the points satisfy the linear constraint X1 + X2 ≤ 0.8.
Figure 21.24 Fast Flexible Filling Design with One Linear Constraint
