Example of the Bias Report Option
Note: These data come from the Automotive Industry Action Group (2002).
Assume that as a plant supervisor, you are introducing a new measurement system into your process. As part of the Production Part Approval Process (PPAP), the bias and linearity of the measurement system needs to be evaluated. Five parts were chosen throughout the operating range of the measurement system, based on documented process variation. Each part was measured by layout inspection to determine its reference value. Each part was then measured twelve times by the lead operator. The parts were selected at random during the day. In this example, you want to examine the overall bias and the individual measurement bias (by standard).
1. Select Help > Sample Data Library and open Variability Data/MSALinearity.jmp.
2. Select Analyze > Quality and Process > Variability / Attribute Gauge Chart.
3. Select Response and click Y, Response.
4. Select Standard and click Standard.
5. Select Part and click X, Grouping.
6. Click OK.
7. Click the Variability Gauge red triangle and select Gauge Studies > Bias Report.
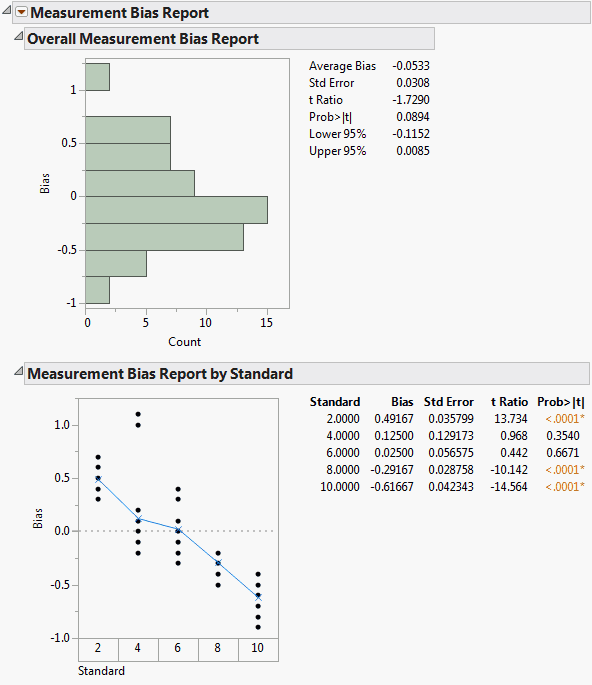
Figure 5.10 Measurement Bias Report
The bias (Response minus Standard) is calculated for every measurement. The Overall Measurement Bias Report shows a histogram of the bias and a t test to see whether the average bias is equal to 0. You can see that the Average Bias is not zero, it is -0.0533. However, zero is contained within the confidence interval (-0.1152,0.0085), which means that the Average Bias is not significantly different from 0. Using a significance level of 0.05, you can see that the p-value is greater than 0.05, which also shows that the Average Bias is not significantly different from 0.
The Measurement Bias Report by Standard shows average bias values for each part. The bias averages are plotted on the graph along with the actual bias values for every part, so that you can see the spread. In this example, part number 1 (with a standard value of 2) is biased high and parts 4 and 5 (with standard values of 8 and 10) are biased low.
Tip: To see confidence intervals for the bias, right-click in the table and select Columns > Lower 95% and Upper 95%.
Example of a Linearity Study
Using the same data and scenario as the Bias Report option, you can now examine the linearity to determine whether there is a significant relationship between the size of the parts and the operator’s ability to measure them.
1. Select Help > Sample Data Library and open Variability Data/MSALinearity.jmp.
2. Select Analyze > Quality and Process > Variability / Attribute Gauge Chart.
3. Select Response and click Y, Response.
4. Select Standard and click Standard.
5. Select Part and click X, Grouping.
6. Click OK.
7. Click the Variability Gauge red triangle and select Gauge Studies > Linearity Study.
8. In the window that prompts you to Specify Process Variation, type 16.5368.
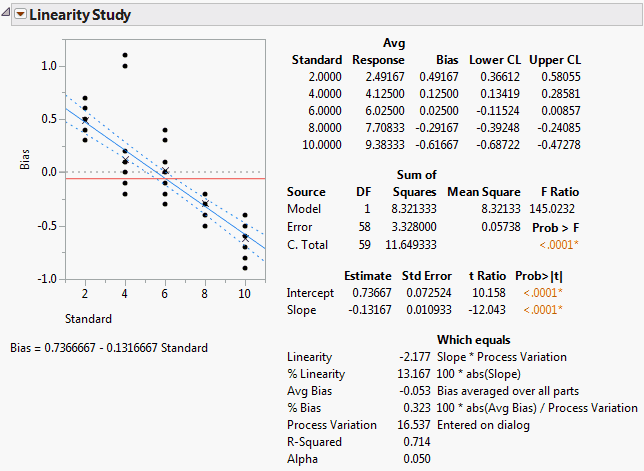
Figure 5.11 Linearity Study
Note the following:
• The slope is -0.131667. This value appears as part of the equation below the graph, and also in the third table.
• The p-value associated with the test on the slope is quite small, <.0001. The t test for the slope is testing whether the bias changes with the standard value.
Because the p-value is small, you can conclude that there is a significant linear relationship between the size of the parts and the operator’s ability to measure them. You can also see this in the graph. If the part or standard value is small, the bias is high, and vice versa.

