Import Data
You can move data into JMP by importing data from another application, such as Excel, SAS, or text files. The basic steps to import data are as follows:
1. Select File > Open.
2. Navigate to your file’s location.
3. If your file is not listed in the Open Data File window, select the correct file type from the Files of type menu.
4. Click Open.
Example of Importing a Microsoft Excel File
1. Select File > Open.
2. Navigate to the Samples/Import Data folder.
3. Select Team Results.xls.
Note the rows and columns on which the data begin. The spreadsheet also contains two worksheets. In this example, you import the Ungrouped Team Results worksheet.
4. Click Open.
The spreadsheet opens in the Excel Import Wizard, where a preview of the data appears along with import options.
Text from the first row of the spreadsheet are column headings. However, you want text in row 3 of the spreadsheet to be converted to column headings.
5. Next to Column headers start on row, type 3, and press Enter. The column headings are updated in the data preview. The value for the first row of data is updated to 4.
6. Save the settings only for this worksheet:
– Deselect Use for all worksheets in the lower left corner of the window.
– Select Ungrouped Team Results in the upper right corner of the window.
7. Click Import to convert the spreadsheet as you specified.
When you import Excel files, JMP predicts whether columns headings exist, and if the column names are on row one. The copy and paste method is recommended for the following situations:
• If the column names are located in a row other than row one
• If the file does not include column names and the data does not start in row one
• If the file contains column names and the data does not start in row two
See Copy and Paste Data and Import Microsoft Excel Files in Using JMP for more information about importing Excel files.
Example of Importing a Text File
One way to import a text file is to let JMP assume the data’s format and place the data in a data table. This method uses settings that you can specify in Preferences. See Text Data Files in Using JMP for information about setting text import preferences.
Another way to import a text file is to use a Text Preview window to see what your data table will look like after importing, and make adjustments. The following example shows you how to use Text Import Preview window.
1. Select File > Open.
2. Navigate to the Samples/Import Data folder.
3. Select Animals_line3.txt.
4. At the bottom of the Open window, select Data with Preview.
5. Click Open.
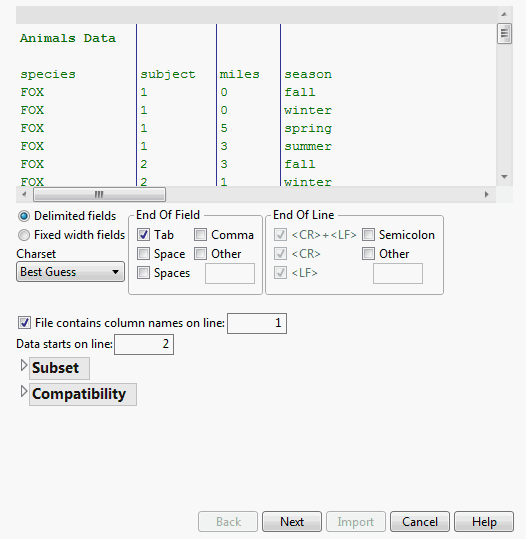
Figure 3.2 Initial Preview Window
This text file has a title on the first line, column names on the third line, and the data starts on line four. If you opened this directly in JMP, the Animals Data line would be the first column name, and all the column names and data afterward would be out of sync. The Preview window lets you adjust the settings before you open the file, and see how your adjustments affect the final data table.
6. Enter 3 in the File contains column names on line field.
7. Enter 4 in the Data starts on line field.
8. Click Next.
In the second window, you can exclude columns from the import and change the data modeling of the columns. For this example, use the default settings.
9. Click Import.
The new data table has columns named species, subject, miles, and season. The species and season columns are character data. The subject and miles columns are continuous numeric data.
Tip: You can import several text files at once to create a data table. See Import Multiple Files in Using JMP.
