Text Import Wizard Options
When you open a text file that JMP supports, JMP can show a preview of the text before opening the file as a data table. This option lets you manually arrange and format the data. For example, you can specify the end-of-line character or strip quotation marks.
JMP detects the file’s structure and shows options for importing text with either delimiters or fixed width fields. If JMP chooses the wrong file structure, click the Delimited fields or Fixed width fields radio button to import the data as the correct format. (For example, the fixed width window might appear when your file is actually delimited.)
The text import wizard options are shown in Figure 3.13 and Figure 3.14.
Figure 3.13 Text Import Wizard for Fixed Width Files
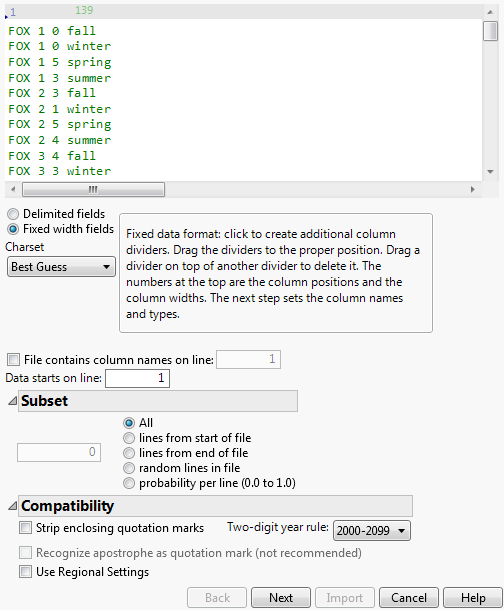
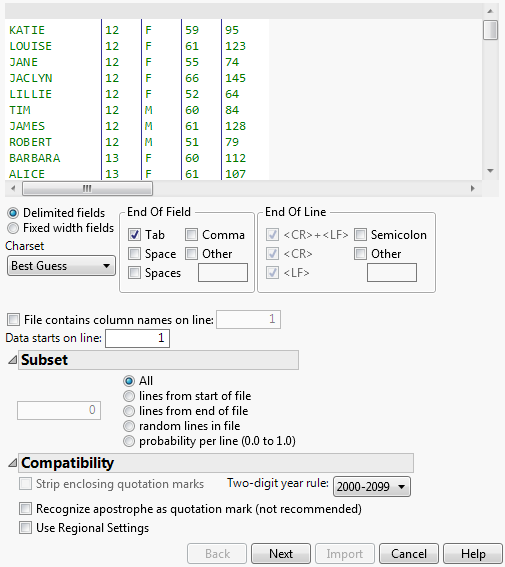
Figure 3.14 Text Import Wizard for Delimited Files
Charset
Select the character set used in the imported file, or let JMP detect the character set. If incorrect characters are displayed in the imported file, open the file again and select another character set.
End of Field
(Available only in the Delimited Import window.) Select the check boxes beside the character that marks the end of a field. Alternatively, select the check box beside Other and enter a character if the appropriate character is not listed.
End of Line
(Available only in the Delimited Import window.) Select the check boxes beside the character that marks the end of a line (row). Alternatively, select the check box beside Other and enter a character if the appropriate character is not listed. Note that when JMP finds double quotation marks, the delimiter rules change to look for an end double quotation mark. Other text delimiters, including spaces embedded within the quotes, are ignored and treated as part of the text string.
File contains column names on line
Tell JMP where to find data to use as column names. For example, if the column names in your text file are on line (row) 3, select this option and type 3 in the check box. Otherwise, JMP uses the data in the first line of the imported file as the column name in the JMP data table or takes the first line as data.
Data starts on line
Specify the number of the first line that contains data.
Number of Lines
Specify the number of lines (rows) that you want to import.
Strip enclosing quotation marks
(Available only on fixed-width imports.) Select this check box when you want JMP to remove quotation marks that enclose data in the text file.
Two-digit year rule
Specify how to display dates that have two-digit years. Select the 100-year range in which your dates fall. For example, if the earliest date is 2/2/79, and the year is 1979, select 1970-2069. If the earliest date is 2/2/12, and the year is 2012, select 2000-2099. If dates span centuries, you must recode the dates with four-digit years before importing the data.
Recognize apostrophe as quotation mark (not recommended)
(Available only in the Delimited Import window). Use this option only if your data comes from a nonstandard source that places apostrophes around data fields rather than quotation marks.
Use Regional Settings
Specifies whether the operating system’s regional settings are used when importing a text file. If the option is deselected (the default setting), files that use a period for a decimal point and a comma for the value separator import correctly. You must specify the value separator in the Text Data Files import preferences.
If the file uses a comma for a decimal point, you must also set the following options: the OS regional settings must use a comma for a decimal point (Windows and macOS), or the Windows Specific Display Language preference must be set to a language that uses commas for decimal points.
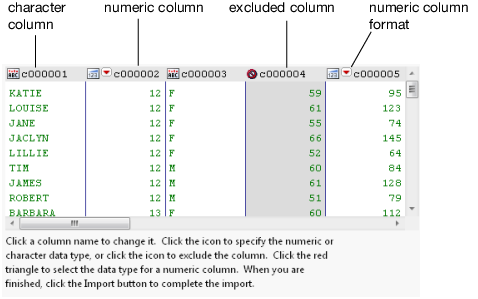
When you are finished selecting the settings, click Next. The next window shows each column’s modeling type. To change the default modeling types, do one of the following:
• Click the data type icon to change the data type from numeric ( ) to character (
 ). Clicking the icon cycles between the modeling type and exclude (
 ). Exclude means that the column is not imported.
• To change a numeric column’s data format, select the format from the red triangle menu.
• Click the column heading to modify the text.
The top of the text import window shows a preview of the text file as it appears when imported into a JMP data file. Click the Import button to import the data.
Figure 3.15 Text Import Wizard Window with Column Options
Note: To specify the format of dates, select the red triangle next to the column name, select Date, and then select the date format. To specify how the dates appear after you’ve imported the data, right-click the date column in the data table, select Column Info, and change the date next to Format.
6. When you are finished setting up the data, click Import to complete the text import.
Note: Both the Text Import Wizard and Multiple File Import import columns of numbers as numbers by default. If you have something like part numbers with leading zeros that you want to keep, or part numbers with more than 15 digits, you can force the column to be character. In the Text Import Wizard, you can do this column-by-column (on the second wizard pane, top of the column). In Multiple File Import, you can select the check box that causes all columns to be imported as character. (Otherwise leading zeros are not preserved, and digits beyond 15 are lost.) See Import Multiple Files for more information about Multiple File Import.