Create Menu Items and Toolbar Buttons
Menus consist of the following menu items:
• Commands are the items that you click to execute a command (such as Data Table and Script).
• Submenus are menu items that you click to reveal more menu options. An example of submenu is New inside the top-level File menu. New is also a submenu because it contains commands (such as Data Table and Script).
• Separators ( ) are lines that divide or group commands and submenus.
The button on a toolbar is considered a type of command, so you also complete the following steps to create new toolbar buttons.
When you want to create a menu item or button based on an existing item, make a copy of the existing item and then change settings as necessary. See Copy and Paste Menus, Menu Items, Toolbars, and Buttons.
Step 1: Create a New Menu Item or Button
1. Select View > Customize > Menus and Toolbars.
The Menu Editor appears.
2. (Optional) Change the customization set to control which users see your customizations. See Change Customization Sets.
3. Right-click where you want to add the menu item or button.
A list of possible locations appears.
4. Select Insert Before or Insert After.
The Specify Type window appears.
Figure 12.2 Specify Type Window
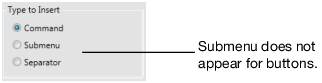
5. Do one of the following:
– To create a button, select Command.
– To create a menu within a menu, select Submenu. (Not available for buttons.)
– To create divider between menu items or toolbar buttons, select Separator.
6. Click OK.
The new untitled button, submenu, or separator is added.
Step 2: Specify the Caption, Tooltip, and Internal Name
Buttons have several basic properties:
• The caption appears in the View > Toolbars list, which lets you show or hide the toolbar. Give each toolbar a unique name. JMP merges toolbars with the same name after you close and reopen the Menu Editor.
• The tooltip appears when you place the cursor over a menu item or button.
• The internal name, which is case insensitive. JMP identifies the location of an item by its internal name rather than its caption.
Submenu items include many of the same General properties as buttons, except that submenu items do not have tooltips.
To specify these properties, follow these steps:
1. With the Menu Editor still opened, select the menu item or button.
The General properties appear on the right.
2. Enter the internal name next to Internal name.
3. Enter a unique name for the menu item or button in the Caption box.
4. Enter a description for button in the Tip box.
5. (Optional) To specify the translation for the caption or tip, do the following:
– Click the Localize button for the item that you want to customize.
– Select the language.
– Enter the translation next to Text.
– Click OK.
6. Customize the untitled button or menu item as described in the following procedure.
Step 3: Assign Functionality
Clicking a menu item or button either executes a predefined command or runs a JSL script. The script can be stored in a separate file, or you can enter the JSL in the Run this JSL area of the Menu Editor. If users have access to a central location, such as a network, you typically want to run the script from that location. This also simplifies giving users access to updated scripts. Otherwise, store the JSL in the menu item or button definition.
To associate a menu item or button with an add-in JSL script, you have two options:
• Select Run JSL in this file, and then browse to find the external file.
• Type the relative path to the JSL script, and select the add-in from the Use add-in home folder list. For example, the following command runs the mds_application.jsl script from the selected add-in:
$ADDIN_HOME(com.jmp.mdswithr)/mds_application.jsl
In addition, you can select Use the “Here” namespace for unqualified JSL variable names if you include namespaces in the internal or external JSL script. See Global and Local Variables in the Scripting Guide for more information about namespaces.
To assign this functionality, follow these steps:
1. With the Menu Editor still opened, select the menu item or button that you want to modify.
The Action properties appear on the right.
2. Select the action that you want to execute.
3. To run an internal JSL script, delete the placeholder text print(“Not implemented.”); in the Run this JSL area and enter the JSL.
4. (Optional) If your internal or external JSL script includes namespaces, select Use the “Here” namespace for unqualified JSL variable names.
5. Click Save to save your changes.
Step 4: Show an Icon on the Menu Item or Button (Optional)
New menu items have no icon next to the item. New buttons show up as blue squares on the toolbars. You can assign a descriptive icon to the menu item or button. The graphic can reside on your computer or in an add-in folder. .ico, .png, .jpg, and .bmp graphics are supported.
Assigning an icon to a button is particularly important. Otherwise, the user must view the button’s tooltip to see what the button does.
To show an icon on the menu item or button, follow these steps:
1. With the Menu Editor still opened, select the menu item or button.
The Icon properties appear on the right.
2. Select one of the following options:
None
Select this option to show a blue square instead of an icon.
Built-in icon
Select this option to show an icon that JMP provides, and then select the icon from the list.
Use image from file
Select this option to show an image that you created. Click Browse, select the graphic, and then click OK.
Use add-in home folder
Select this option to display an icon from an add-in to the left of the menu item. After you select the checkbox, select the add-in, click Browse, and then select the icon. The path to the image is displayed in the Use image from file field. The image can be an ICO, PNG, JPG, or BMP graphic.
3. Click Save to save your changes.
Step 5: Assign a Shortcut Key (Optional)
A shortcut key executes an action so that you do not have to select the menu item or click the button on the toolbar. This option is also helpful when the button’s toolbar is not shown, but you still want to execute the action.
Shortcuts begin with Ctrl, Ctrl+Shift Ctrl+Alt and end with a number, letter, or symbol that appears on the keyboard. The Function keys (such as F1) are also supported. Many Ctrl + letter and Function shortcuts are already assigned in JMP, but you can reassign them to your buttons if you want.
Shortcut keys appear in menus next to each menu item.
To assign a shortcut key, follow these steps:
1. With the Menu Editor still opened, select the menu item or button.
The Shortcuts properties appear on the right.
2. Do one of the following:
– To assign a new shortcut, click in the New shortcut area and press the shortcut keys. If the keystrokes then appear in the Currently assign to box, press another combination of shortcut keys. (You do not have to delete the keystrokes before pressing the shortcut keys.)
– To change a shortcut that you previously specified, click Remove, click in the New shortcut area and press the shortcut keys.
3. Click Assign.
The shortcut appears in the Current shortcuts list.
4. Click Save to save your changes.
To remove a shortcut, select the shortcut and click Remove.