Customize Regex in the Regular Expression Editor
When you select the Customize Regex option, the Text Explorer Regular Expression Editor appears. Use this window to parse text documents using a wide variety of built-in regular expressions, such as phone numbers, times, or monetary values. You can also create your own regular expression definitions.
Note: Using the Customize Regex option is recommended only if you are not getting desired results from the default Regex method. This can happen when your text contains structures that the default Regex method does not recognize.
Tip: If Japanese, Chinese (Simplified), or Chinese (Traditional) is specified as the Language option in the launch window, the list of Regex patterns contains a single Regex for the specified language. If you want to add other Regex patterns, it is recommended that you add them after the single Regex pattern. You should avoid using the Words pattern before the language-specific Regex pattern, because the Words pattern can gather long runs of Asian language characters into single words.
Figure 12.7 Text Explorer Regular Expression Editor
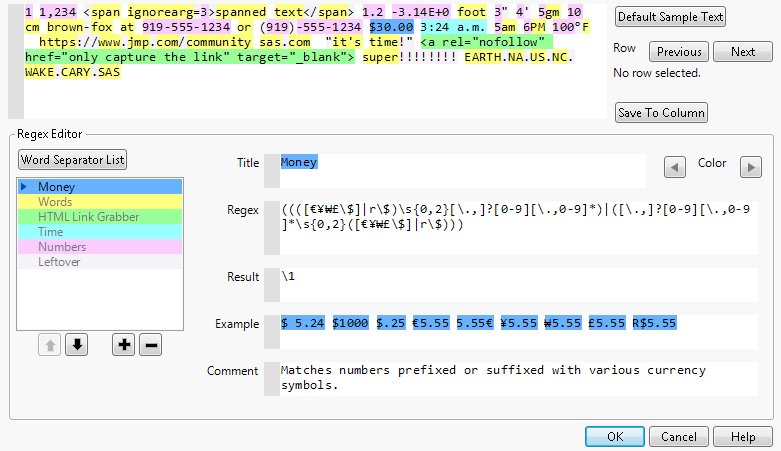
Parsing with the Script Editor Box
The script editor box at the top of the window shows you how the parsing would proceed for sample text. The results of parsing the regular expressions in the Regex Editor list are highlighted in colors that correspond to the colors in the Regex Editor list.
• Click the Previous and Next row buttons to populate the script editor box with text from your own data. This enables you to see how a given row of text data is parsed.
• Click the Save to Column button to save a new column to the data table that contains the result of the regular expression tokenization. For more information about specifying the result of the regular expression, see Editing the Regular Expressions.
Note: The Save to Column button uses only the regular expression to match text. The following settings are not used: stop words, recodes, stemming, phrases, or minimum and maximum characters per word to modify the output of the regular expression.
Adding Regular Expressions
To add a regular expression to be used in tokenization, click the plus sign below the list. The Regex Library Selections window appears. This window contains all the built-in regular expressions as well as any recently modified regular expressions that you created in previous instances of the Regular Expression Editor. Built-in regular expressions are labeled. Custom regular expressions that are saved in your library are labeled with the name that you specified. Only the most recent expression for a given name is stored in the Regex Library.
Select one or more regular expressions in the list and click OK to add the selected regular expressions to be used in tokenization. Use the Delete Selected Item button to remove one or more custom regular expressions from the Regex Library. The Regex Library for each user is stored as a JSL file in a directory called TextExplorer. The location of this directory is based on your computer’s operating system, as follows:
• Windows: "C:/Users/<username>/AppData/Roaming/SAS/JMP/TextExplorer/"
• macOS: "/Users/<username>/Library/Application Support/JMP/TextExplorer/"
These files can be shared with other users, but you should not edit the file directly. Use the Regular Expression Editor instead.
Editing the Regular Expressions
Terms are tokenized by processing the regular expressions in the order specified in the Regex Editor panel. To change the order of the regular expressions, select a regular expression in the list and click the up or down arrow buttons below the list. You can also drag and drop items in the regular expression list to change the order of execution. A blue triangle represents the currently selected regular expression. To remove a regular expression and exclude it from the tokenization, select it in the list and click the minus sign below the list. The “Leftover” regular expression cannot be removed and must appear last in the sequence of regular expressions.
When you select a regular expression in the list, the editable fields in the Regex Editor panel refer to the selected regular expression. Click and type in any of these fields to edit them.
Each regular expression has the following attributes:
Title
Specifies a name used to identify the regular expression in the current window (as well as in the Regex Library later).
Regex
Specifies the regular expression definition. The regular expression must have at least one set of parentheses to designate the regular expression capture.
Result
Specifies what replaces the text matched by the regular expression. This value can be static text, blank, or the value of the regular expression capture. The regular expression capture is defined as the result of the Regex definition:
– To replace the matched text with static text, specify the static text in the Result field.
– To ignore the matched text, leave the Result field blank.
– To keep the text that results from the outer-most parentheses in the regular expression, use “\1” (without quotation marks) in the Result field.
– To keep the entire result of the regular expression, use “\0” (without quotation marks) in the Result field.
Example
(Optional) Specifies an example text string with colors indicating the behavior of the regular expression.
Comment
(Optional) Specifies a comment to explain the regular expression and its behavior.
Color
Specifies the color used to identify matches of the regular expression in the text in the Script Editor box and in the Example field. Use the arrow buttons to change the color.
Note: If the regular expression definition in the Regex field is invalid, a red X appears next to the name of the regular expression in the list of regular expressions.
Creating a Custom Regular Expression
Follow these steps to create your own custom regular expression:
1. Click the plus sign below the list.
2. In the Regex Library Selections window, note that the Blank regular expression is selected.
3. Click OK.
4. Edit the Regex definition in the Regex Editor panel.
5. Give your custom regular expression a unique name in the Title field.
Tip: When editing the Regex definition field, it is helpful to have the Log window open and visible. Some error messages appear only in the Log window. To open the Log window, select View > Log. There are many internet resources available for troubleshooting regular expressions, such as https://regexr.com/.
The Word Separator List
The Word Separator List button enables you to specify a list of characters that occur between words in the tokenization process. The between-word characters cannot begin a word, but they can appear inside a word if one of the regular expressions allows it. You can add or remove characters from the list in the window that appears when you click the button. By default, the only character in the list is a whitespace character. In the Separator Characters window, click the Reset button to undo any modifications to the list of separator characters. Modifications to the list of separator characters are applied only to the current regular expression tokenization.
The processing of the specified regular expressions and the required “Leftover” regular expression proceeds as follows:
1. Compare the current character in the text stream to the list of separator characters.
– If the character is in the list of separator characters, ignore the character, process any accumulated characters in the “Leftover” temporary string, move to the next character, and repeat step 1.
– If the character is not in the list of separator characters, go to step 2.
2. Compare the string starting at the current character to each regular expression (one at a time, up to, but not including, the “Leftover” regular expression).
– If the string starting at the current character matches one of the regular expressions, the following events occur. Any accumulated characters in the “Leftover” temporary string are processed. The value of the Result field is saved as a term. The current character in the text stream becomes the character following the matched string. The processing returns to step 1.
– If the string starting at the current character does not match any of the regular expressions up to the “Leftover” regular expression, go to step 3.
3. Collect characters into the “Leftover” temporary string by appending the current character and setting the current character to the next character in the text stream. Return to step 1.
– The “Leftover” temporary string is accumulated one character at a time, until one of the other regular expressions produces a match.
– The default Result of the “Leftover” regular expression is to discard the accumulated “Leftover” temporary string.
Tips:
• If you set the Result of the “Leftover” regular expression to \1, you might want to add more separator characters, such as punctuation marks. This ensures that your results do not include the specified punctuation marks.
• Instead of changing the Result of the “Leftover” regular expression to \1, you might want to consider one or more of the following actions to capture terms of interest:
– Add more regular expressions from the Regex Library.
– Create custom regular expressions.
The processing follows the above steps until reaching the end of the text string for each row in the data table.
Saving the Results to a Column in the Data Table
Click the Save to Column button to save to the data table a new column that contains the results of the regular expression tokenization. The new column is a character column with the same name as the text column specified in the Text Explorer launch window; a number is appended to the name so that the column names are unique.
Note: When you save the results of the custom regular expression tokenization to a column in the data table, the regular expression process is run on the original text in each row of the data table. It is not run on the version of the text string that was converted to lowercase.
Closing the Text Explorer Regular Expression Editor
After you click OK in the Text Explorer Regular Expression Editor window, the following events occur:
1. The custom regular expressions defined in the Text Explorer Regular Expression Editor window are saved to the Regex Library.
Caution: The custom Regex Library is saved only when you click OK and there are customized regular expressions. The most recently saved regular expressions will be available next time. Use unique names to keep additional regular expressions in the Regex Library. To ensure that a regular expression is available later, you can save a script from the Text Explorer report window.
2. The Text Explorer report appears. The report shows the result of using the specified regular expression settings to tokenize the text.