Import Multiple Files
Multiple File Import (MFI) is designed to import CSV data and unstructured text files from one directory and stack them in a data table (or to import them in separate data tables). You can save the import settings as a script and then run the script when the data is updated in the future.
Multiple File Import supports the following file types:
• XLSX
• CSV
• TSV
• DAT
• TXT
• SAS7BDAT
• XML
• JMP
• JSON
• PNG
• JPG
• GIF
Multiple File Import can also import only one file. Table 3.3 can help you decide whether to use the standard Text Import, Multiple File Import, or JSL.
|
Import Characteristics |
One File |
Multiple Files |
|---|---|---|
|
CSV, TSV, DAT |
Text Import has a preview wizard to help name the columns, pick date formats, and subset the data. |
MFI can stack similar files automatically. You can change formatting later. |
|
Unstructured text |
MFI, possibly in JSL with Load Text File(). |
MFI |
|
Large files over 100MB |
You can use the Source script from a previous Text Import to speed up the next import. |
MFI imports in parallel and might be much faster than Text Import. |
|
Unsure about format |
Text Import might be able to guess. The preview wizard lets you see the results before the text is imported. |
MFI does not guess. You specify the tab delimiters. There is no preview, but select Keep dialog open, and it is easy to try different import settings. |
|
Pictures |
Try the JSL Open() function. |
MFI understands PNG, JPG, and GIF files. You’ll get a table with a picture column. |
|
JMP, XLSX, and JSON |
Try the JSL Open() function. |
MFI opens JMP, XLSX, and JSON files using JSL Open() and will stack them if requested. MFI does not keep the table and column scripts when it opens JMP tables, so you might need to use Files In Directory() and Open() if you need all of those scripts. |
To import multiple files, follow these steps:
1. Place the files that you want to import in the same directory.
This example uses import data found in the JMP Samples/Import Data folder.
2. Select File > Import Multiple Files (Windows) or File > Open Multiple (macOS).
3. Browse to select the JMP Samples/Import Data folder.
4. In the Select Files by name or extension box, type UN*.csv and press Enter.
In this example, the files have the UN prefix and are CSV files.
The Files list updates to show which files have been selected.
Specify multiple file names and extensions by separating them with semicolons, or click Add Extension and select an extension.
Figure 3.18 Selected CSV Files
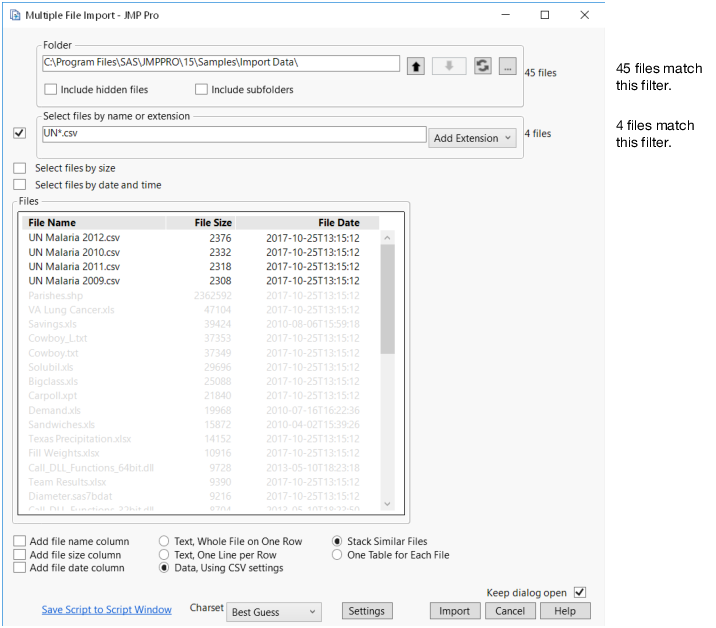
Notice that the Refresh button  flashes if the files have changed in the directory since the last refresh.
5. Specify the columns that you want added to the data table.
By default, no extra columns are added. You might like a File Name column to show the names of the imported files.(CSV files) Select Data, Using CSV Settings to import a comma-delimited file.
Note: The Text Data Files preferences do not determine which options are selected in the CSV settings, although the settings are similar.
6. Keep Stack Similar Files selected because these CSV files have the same columns.
7. Click Import.
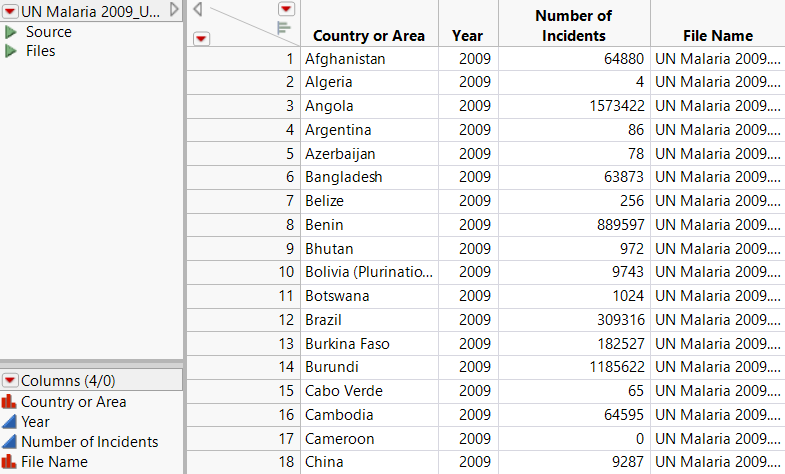
JMP applies the file name, file size, and file date and time filters to stack the files. Data with columns that contain the same column headings are imported in the same data table. If the columns do not match, the mismatched columns are imported into a separate data table.
Figure 3.19 Imported CSV Data
Notes:
• To import hidden files, select Include hidden files.
• To import files that are in subdirectories, select Include subfolders.
• To import files in a certain size range, in the Select files by size box, type the lower and upper file size limits.
Consider specifying the limits if you don’t want to import large files over a certain limit.
Specify file sizes in KB (kilobytes). One KB equals 1,000 bytes.
• To import files that were modified during a certain date and time range, in the Select files by date and time box, click the calendar button  to specify the range.
• (Unstructured text files) Select Text, Whole File on One Row or Text, One Line Per Row based on how the file is structured.
Notes:
– These two options are not supported for XLSX, JSON, and JMP files.
– When you select Text, Whole File on One Row, the import includes the whole file and does not skip lines before the first data line.
• JMP creates a data table that lists the files that could not be imported (for example, SAS datasets).
Importing Structured Data with Different Quoting
Sometimes export filters place something other than quotation marks around fields. You specify the delimiter in the CSV settings.
Text in a CSV file might contain escape sequences such as a backslash instead of doubling the quotation mark. You also specify the delimiter in the CSV settings.
Tips:
• Keep dialog open is off by default, but you might turn it on while testing. This enables you to import files to see what the data looks like, edit the source files if necessary, and reimport them with the same settings.
• When you import files that are not supported, a data table called “@ Unused Files” is created. The file names are listed in the Files table script. Right-click the script and select Edit. To output the file names of unsupported files in this data table, select Add file name column on the Multiple File Import window.
• Right-click the Files list and select Sort by Column to change the way the Files list is sorted.
• The Import button is unavailable if no files match the filters that you selected.
• JMP automatically changes the CSV settings when you select either of the two options for Text Explorer-style data (the bottom center radio buttons). A delimiter is not specified, which loads all data in one column. JMP also changes the CSV settings to not use an end-of-line character, which loads the entire file in one row. You can also change the CSV settings. If you try the manual approach, be sure to set No Headers and First Data Line to 1.