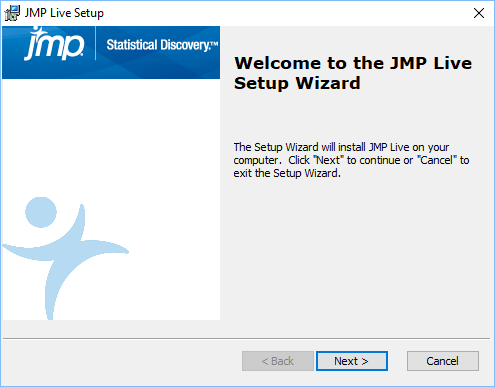
JMP Live Installation Help
This help walks you through installing JMP Live. Components must be installed in this order:
The following sections provide information about installing and managing JMP Live:
Install JMP Pro 15.2
Note: Before you can install JMP Live, you must install JMP Pro 15.2.
To install JMP Pro 15.2, double-click the associated setup.exe file and follow the on-screen instructions. By default, this file is located where the Software Depot is downloaded, under this folder structure: \JMP\JMP_Pro\15_2\Windows\setup.exe.
Note: You cannot interactively run the JMP Pro instance that is installed for use by JMP Live. JMP Live runs hidden when operating in this mode.
Install the JMP Live Database
The JMP Live Database installation adds the PostgreSQL database and a dedicated database for JMP Live, which includes an owner log on account and a database schema.
|
1.
|
(Optional) If you already have a PostgreSQL database version 9.6.3 or higher installed, you can use SQL instead of the JMP Live Database installer. Skip to Install Using an Existing Database.
|
|
2.
|
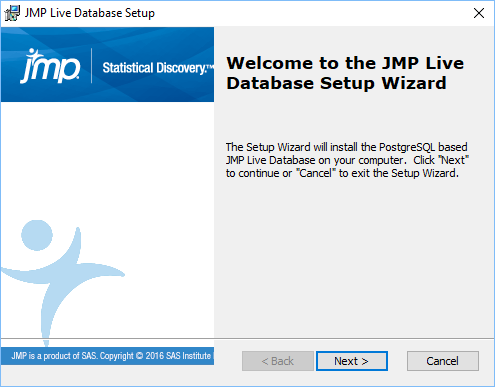
Double-click JMPLiveDatabase.msi.
|
By default, this file is located where the Software Depot is downloaded, under this folder structure: \JMP\JMP_Live_Server\15_2\Windows\JMPLiveDatabase.msi.
Figure 1.1 JMP Live Database Setup Wizard
|
3.
|
Click Next.
|
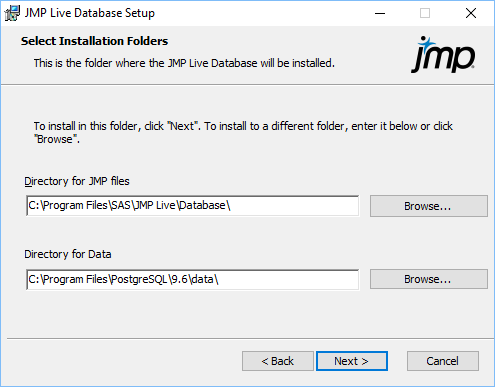
Figure 1.2 Specify Installation Folders
|
4.
|
Specify where to install the JMP Live database and the PostgreSQL database:
|
|
–
|
Click Next to accept the default location.
|
|
–
|
Click Browse to change the default installation folder.
|
Note: Make sure you have adequate space in the directory where you install the PostgreSQL database.
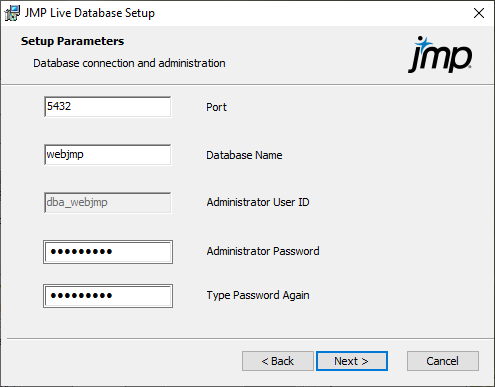
Figure 1.3 Specify Database Parameters
|
5.
|
Enter these parameters:
|
|
–
|
Port: The TCP port that PostgreSQL uses to communicate with other databases. This is usually 5432.
|
|
–
|
Database Name: The name of the default database that JMP Live uses. It is recommended to keep this set to webjmp. The administrator user ID cannot be changed from dba_webjmp.
|
|
–
|
Administrator Password: The administrator password, which is Password1 by default. It is strongly recommended that you change this password.
|
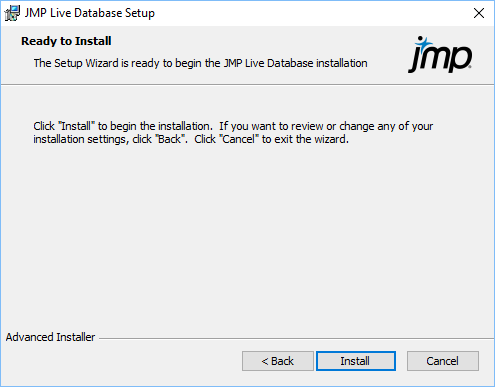
Figure 1.4 Start JMP Live Database Installation
|
6.
|
Click Install to proceed, and Finish once this installer is done.
|
|
7.
|
Reboot your machine before installing JMP Live, to ensure that the PostgreSQL server starts. You can use the pgAdmin tool to verify that your database has started.
|
Network Security Consideration
During the installation process, a network permissions file named pg_hba.conf is added to your data drive, located here (by default): C:\Program Files\PostgreSQL\9.6\data. This file is in a format required by PostgreSQL. The version that JMP provides allows network access to the database from outside of the installed machine. This permits the distribution of the database outside of the machine where JMP Live is installed. If you do not want this type of access, it is important to change the settings in pg_hba.conf accordingly. The file itself contains instructions on how to do this, but you can also search the PostgreSQL site for information.
Install Using an Existing Database
If you already have an existing, compatible version of PostgreSQL installed (9.6.3 or higher), instead of installing the JMP Live Database, you can add the required database, schema and log on credentials yourself. Using the pgAdmin tool or other database exploration tools that allow queries, use the following SQL:
CREATE USER dba_webjmp WITH CREATEDB CREATEROLE LOGIN ENCRYPTED PASSWORD 'Password1';
CREATE DATABASE webjmp WITH OWNER dba_webjmp;
\connect webjmp
CREATE SCHEMA IF NOT EXISTS webjmp AUTHORIZATION dba_webjmp;
If you change the default names, you must also change the names in the environment files for JMP Live and JMPPool, where the database access is described. See Configure Advanced Settings.
Install Keycloak
Note: Make sure that you install the JMP Live Database before installing Keycloak, and install JMP Live after installing Keycloak.
JMP Live uses Keycloak to manage authentication, such as identity management and access. Behind the scenes, when JMP Live users log on, they authenticate to Keycloak. Since Keycloak supports many different identity providers, JMP Live users can sign in using most popular mechanisms and can provide federated single sign-on capabilities.
Tip: Installing Keycloak is straightforward. Most of the customization to connect to identity providers is done through Keycloak after it is installed and running.
|
1.
|
Double-click Keycloak.exe.
|
By default, this file is located where the Software Depot is downloaded, under this folder structure: \JMP\JMP_Live_Server\15_2\Windows\Keycloak.exe.
Figure 1.5 Select Your Setup Language

|
2.
|
Select your setup language, and then click Next.
|
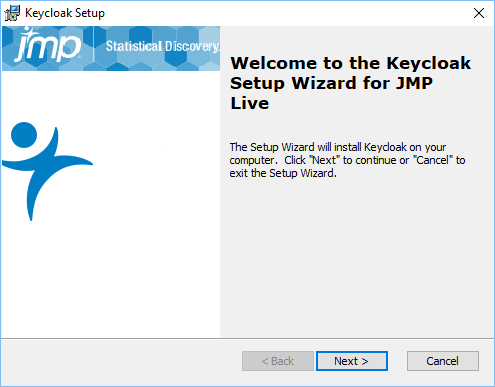
Figure 1.6 Keycloak Welcome Window
|
3.
|
Click Next.
|
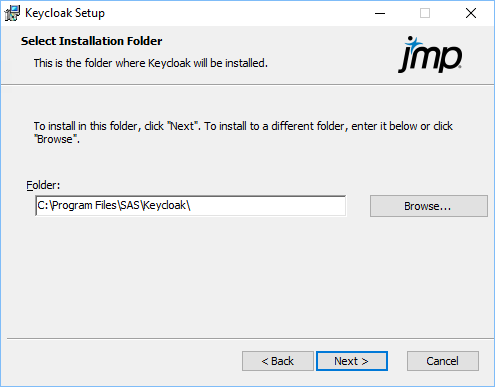
Figure 1.7 Specify the Keycloak Install Location
|
4.
|
Specify where you want to put the Keycloak installation files, and then click Next.
|
Note: The Keycloak files are installed in a subfolder called keycloak-7.0.1. This subfolder cannot be moved or changed.
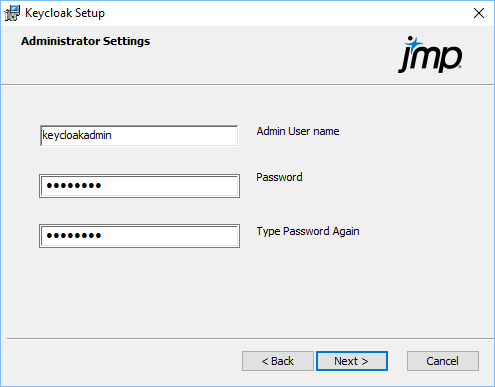
Figure 1.8 Set Up the Keycloak Administrator
|
5.
|
Specify the administrator credentials, and then click Next.
|
By default, the user name is keycloakadmin and the password is password. It is recommended to change the password.
Figure 1.9 Specify the Java Install Location

During the Keycloak installation, the Azul Java distribution is also installed. If you already have this installed, no changes are made to your current installation.
|
6.
|
Specify the directory where you want to install Java, and then click Next.
|
Note: The installer adds a JAVA_HOME environment variable to the Windows advanced system settings.
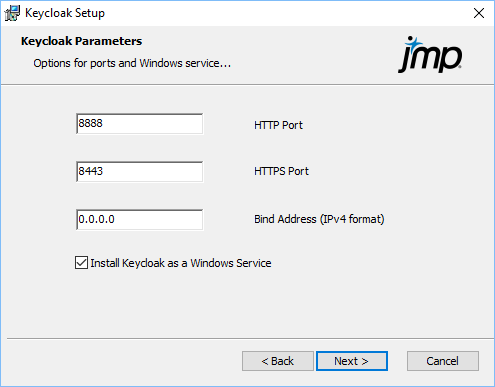
Figure 1.10 Configure Ports and Services
|
7.
|
Specify these Keycloak details:
|
|
–
|
HTTP port: Enter the HTTP network port. The default port is 8888. This port needs to be open to the Keycloak server.
|
|
–
|
HTTPS Port: Enter the HTTPS network port. The default port is 8443. This port needs to be open to the Keycloak server.
|
|
–
|
Bind Address (IPv4 format): Enter the IP address that the Keycloak instance listens on (using the specified port numbers) for requests. The default address is 0.0.0.0, which means that Keycloak accepts connections on all IP addresses assigned to the machine where Keycloak is installed.
|
|
–
|
Install Keycloak as a Windows Service: Select this option to install Keycloak as a Windows service. This means that Keycloak will automatically be started, and if the machine reboots it will automatically restart, so that it is always running. If you do not select this option, you will need to start Keycloak manually the first time and anytime the machine is rebooted. This option is selected by default, and it is recommended to keep it selected.
|
|
8.
|
Click Next.
|
Figure 1.11 Specify Keycloak Certificates
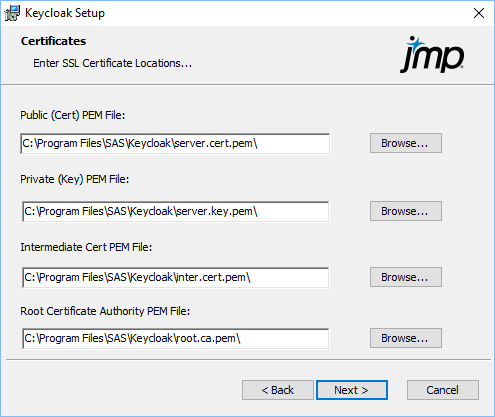
Keycloak requires SSL certificates to guarantee your organization's authenticity and to allow secure connections between Keycloak and identity providers.
Caution: Installation fails if you do not specify these certificates.
|
9.
|
Specify the locations of your organization’s SSL certificates. These must be obtained from an authorized provider.
|
|
10.
|
Click Next.
|
Figure 1.12 Configure Database Parameters
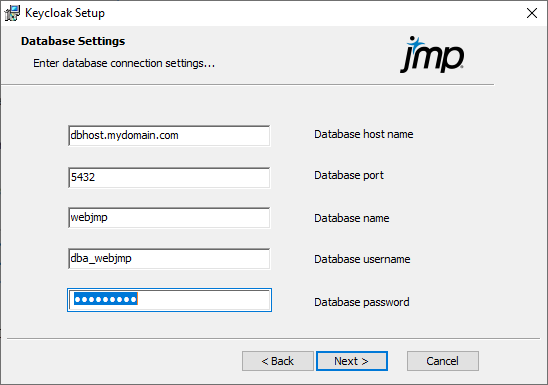
Keycloak stores information about users and clients in a database.
|
11.
|
Specify the database information:
|
Note: The following information should match what you entered when you installed the JMP Live database. See Install the JMP Live Database.
|
–
|
Database host name: Specify the alias or DNS name of the machine with the JMP Live database.
|
|
–
|
Database port: Specify the port that the database listens on.
|
|
–
|
Database name: Specify the name of the JMP Live database.
|
|
–
|
Database username: Specify the user name of the database administrator.
|
|
–
|
Database password: Specify the password of the database administrator.
|
|
12.
|
Click Next.
|
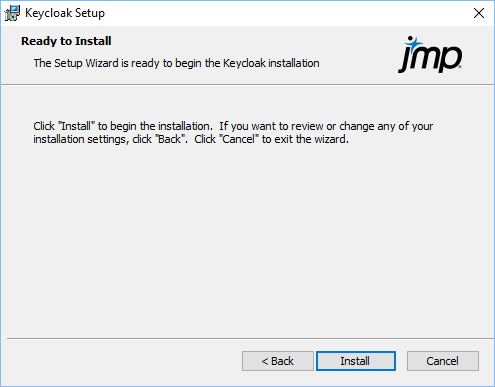
Figure 1.13 Ready to Install Keycloak
|
13.
|
Click Install to proceed.
|
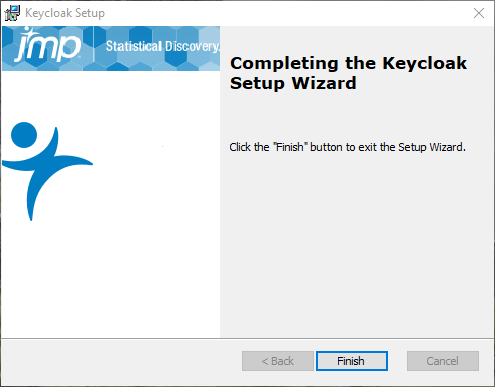
Figure 1.14 Completion Window
|
14.
|
Click Finish.
|
This process can take several minutes, since separate procedures run for Java and Keycloak. You will see progress indicators and a command prompt.
If you selected Keycloak to run as a Windows service, Keycloak should be running when the installation finishes. Otherwise, to launch Keycloak manually, use this command:
<your keycloak directory>\bin\standalone.bat -c standalone-ha.xml
|
15.
|
Open a browser and navigate to http://localhost:8888 or https://localhost:8443 (if you specified one of the default ports).
|
Figure 1.15 Keycloak Welcome Page
|
16.
|
Click Administration Console.
|
Figure 1.16 Keycloak Administration Console General Options
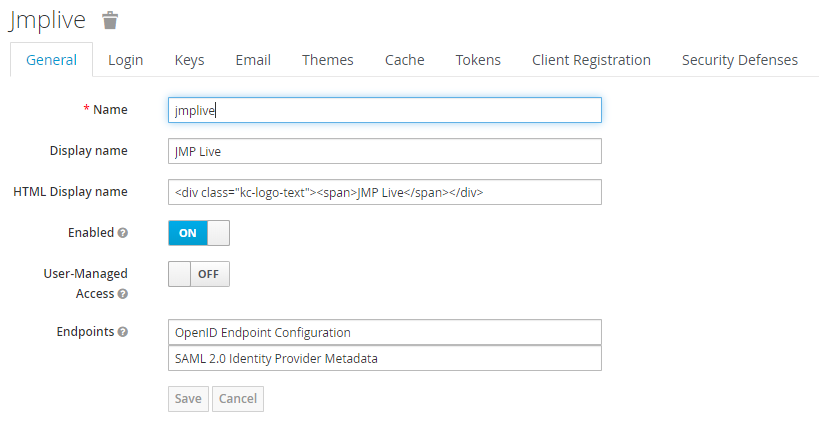
Refer to the Keycloak manual to set up user access.
|
17.
|
Proceed to Install JMP Live.
|
Install JMP Live
|
1.
|
Double-click JMPLive.exe.
|
By default, this file is located where the Software Depot is downloaded, under this folder structure: \JMP\JMP_Live_Server\15_2\Windows\JMPLive.exe.
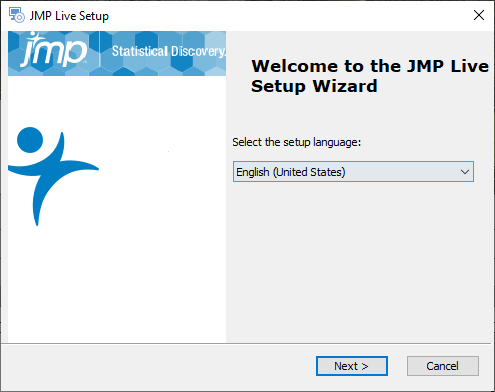
Figure 1.17 Select Your Setup Language
|
2.
|
Select your setup language, and then click Next.
|
Figure 1.18 JMP Live Prerequisites Setup Wizard

|
3.
|
Click Next.
|
Figure 1.19 Select Prerequisites to Install
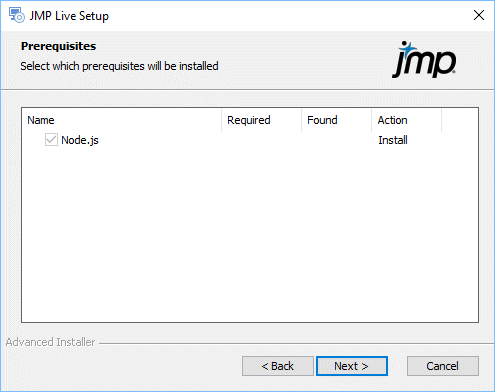
Node.js is selected by default and must be installed.
|
4.
|
Click Next.
|
Figure 1.20 JMP Live Setup Wizard
|
5.
|
Click Next.
|
Figure 1.21 Specify Installation Folder
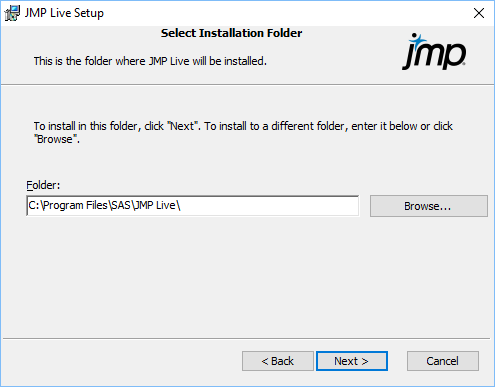
|
6.
|
Specify where to install JMP Live:
|
|
–
|
Click Next to accept the default location (recommended).
|
|
–
|
Click Browse to change the default installation folder.
|
If you change the default location, note the following:
|
–
|
The changed folder contains the JMP Live installation files, but PostgreSQL is always installed in its default location.
|
|
–
|
Since JMP Live can generate log information, make sure that there is adequate disk space in the new location. 1 gigabyte is the recommended minimum.
|
Figure 1.22 Component Selection Window
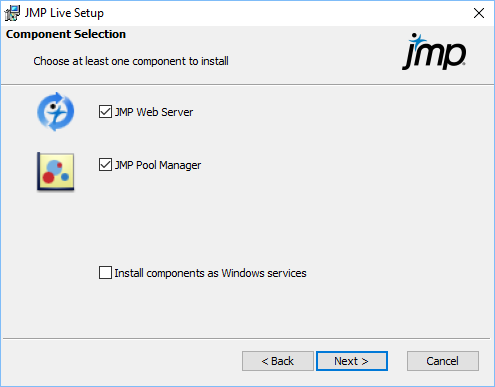
|
7.
|
Select the components that you want to install on this machine (you must select at least one):
|
|
–
|
If you want to install both components on this machine, keep both selected.
|
|
–
|
If you want to distribute the components across different machines, select the component that you want to install on this machine. You will need to run the installer on the other machine to install the other option.
|
Note: If you are installing for the worker pool architecture, select the JMP Pool Manager component, and skip to step 14. For more information, see About JMP Live Architecture and Authentication.
|
8.
|
(Optional) Choose whether you want to install the selected components as Windows services.
|
If you choose this option, note the following:
|
–
|
JMP Live runs in the background whether you are logged in or not.
|
|
–
|
If a machine is rebooted, the services for JMP Live automatically restart.
|
|
–
|
Information is written to log (text) files instead of to the Windows console. Make sure that there is sufficient space for the log files and regularly delete them to avoid storage issues. Log files are located here (by default):
|
C:\Program Files\SAS\JMP Live\JMPLive\build\daemon\webjmpsvc.out.log
C:\Program Files\SAS\JMP Live\JMPPool\build\daemon\jmppoolsvc.out.log
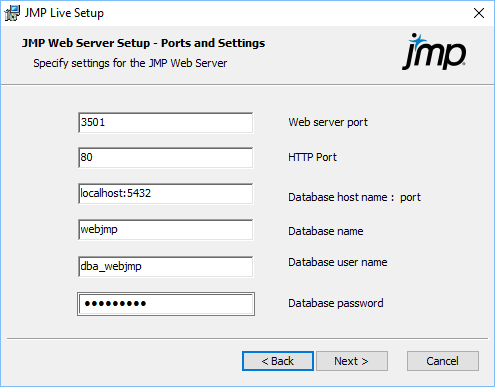
Figure 1.23 Specify Ports and Database Details
|
9.
|
Specify the following JMP web server settings:
|
|
–
|
Web server port: Enter the HTTPS port that will take requests from a browser. By default, this port is set to 3501. You can specify port 443 (the default HTTPS port), but it is recommended to use a dedicated port for easier monitoring and access control. If you install an application load balancer in front of the web server component, specify this port.
|
|
–
|
HTTP Port: Enter the HTTP port. The default port of 80 should be adequate for most purposes. Some organizations use 8080, so you can specify that port if required.
|
|
–
|
Database host name: port:
|
Enter the DNS name of the machine that is running the PostgreSQL database for JMP Live. The default name is localhost (the install machine), but typically this would specify a dedicated server running PostgreSQL. This machine could be within a corporate firewall, outside the firewall, or in a cloud service.
Enter the port that was specified during the installation of PostgreSQL for communication from the outside. The default PostgreSQL port is 5432.
|
–
|
Database name: Enter the name assigned to the JMP Live database within PostgreSQL. It is possible to change this name, but not recommended, as the database installer defaults to webjmp.
|
|
–
|
Database user name and Database password: Enter the administrator user ID and password that you specified while installing the JMP Live Database. The Database user name should be dba_webjmp, but you likely changed the password from the default (which is Password1). Enter that password here.
|
Figure 1.24 Create an Administrator Account
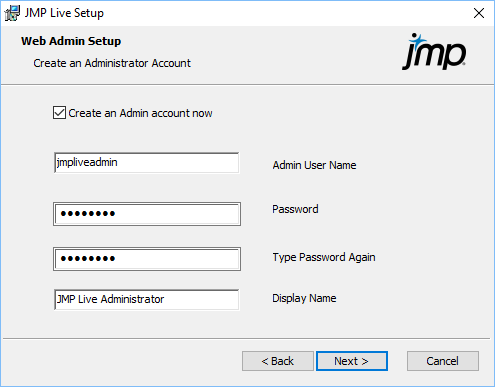
Note: It is strongly recommended that you create an administrator account. However, if you are updating JMP Live from a previous version and already have an administrator account in the database, then you can safely skip this step by deselecting the Create an Admin account now box.
|
10.
|
Enter the administrator user name that you will log on to JMP Live with. Provide a password (default is password) and a display name that will appear when you post content to JMP Live. Note the following:
|
|
–
|
The Admin User Name must not contain spaces and must be lowercase.
|
|
–
|
Once you create an administrator account, you can log on to this account and designate other users as administrators.
|
|
–
|
You can create an administrator account at any time using a command line interface. See Create an Administrator Account for JMP Live.
|
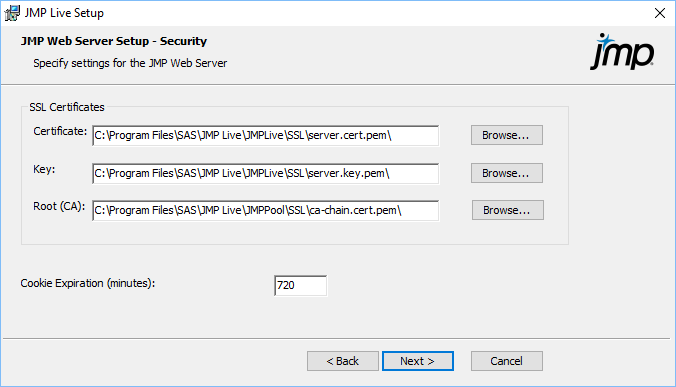
Figure 1.25 Specify SSL Certificates
|
11.
|
Navigate to or enter the SSL certificates for your organization.
|
|
–
|
SSL certificates are text files containing cryptographic keys that enable a browser and the web server to have secure communication. These keys are specific to an organization and are provided by third-party vendors like DigiCert, Symantec, and Network Solutions. JMP Live cannot run without these certificates.
|
|
–
|
The primary certificate and key are configured for the purchaser. The Root (CA) certificate comes from the third-party vendor.
|
|
–
|
The JMP Live installer provides a certificate set that allows for minimal testing on a localhost setup. However, it generates warnings when the site is viewed in the local browser, and the site is inaccessible from browsers outside the install machine.
|
|
12.
|
Cookie Expiration: Specify how long the JMP web component remembers that you signed in to JMP Live.
|
|
–
|
The default value is 720 minutes (12 hours) but you can shorten this for increased security.
|
|
–
|
Cookie Expiration is not the same as an idle time-out. You can be using the site constantly, but the cookie expiration forces you to sign in again after it expires.
|
Figure 1.26 Set Up Keycloak
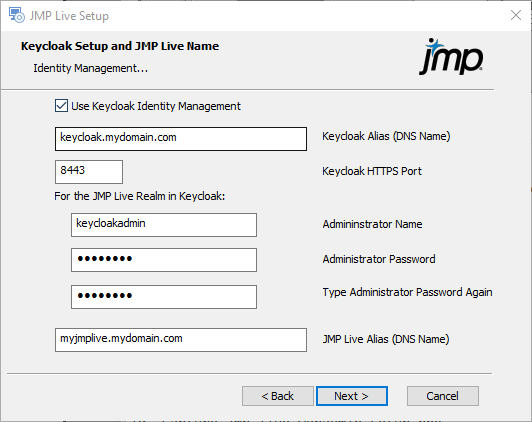
Note: Instead of using Keycloak, it is possible to add a direct connection to Microsoft Active Directory. See Configure Advanced Settings. Please be advised that this method will not be supported in future versions of JMP Live.
|
13.
|
Specify the following Keycloak settings:
|
|
–
|
Use Keycloak Identity Management: Enables the Keycloak authentication system. If you deselect this option, Local authentication is used. In this case, you need to create accounts in Keycloak for each user. These users will not be authenticated against different identity providers. For details about connecting Keycloak to your identity provider, see the Keycloak documentation.
|
|
–
|
Keycloak Alias (DNS Name): Specify the name of the server machine that is running the Keycloak authentication service.
|
|
–
|
Keycloak HTTPS Port: Specify the number of the port that Keycloak expects to receive requests on. The default port is 8443.
|
|
–
|
Administrator Name: Specify the administrator name for the JMP Live realm in Keycloak. The realm keeps JMP Live credentials separate from any other software applications that might be using Keycloak authentication.
|
|
–
|
Administrator Password: Specify the administrator password for the JMP Live Keycloak realm.
|
|
–
|
JMP Live Alias (DNS Name): Specify the name of the machine that will be running the main JMP Live site.
|
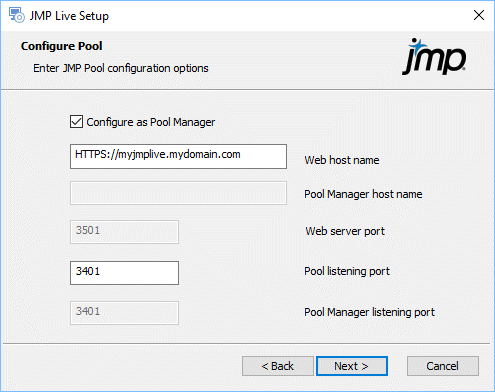
Figure 1.27 Configure the Pool Manager
|
14.
|
If you want to run the Pool Manager on this machine, select the Configure as Pool Manager box:
|
|
–
|
If you are using one machine for all components, or one machine for the Pool Manager and JMP sessions, select this option.
|
|
–
|
If you are using this machine for a worker pool only, do not select this option.
|
|
15.
|
Specify the Pool Manager options:
|
|
–
|
Web host name: Enter the DNS name, which typically looks like this: machine name.domain name.com/org. Note the following:
|
Unless you are installing all components using the localhost option, you need to specify the web host name.
Even if you have all components on one machine, you will likely want to use your organization's SSL certificates for a secure connection. In that case, specify the machine name as the web host name, since the certificates are usually tied to the machine.
|
–
|
Pool Manager host name: (Disabled if you are selected Configure as Pool Manager.) If you are setting up a worker pool on a separate machine, enter the DNS name of the machine that is handling the Pool Manager duties.
|
|
–
|
Web server port: (Disabled if you are installing all components on the same machine, as the port number is already specified in the JMP web component.) If you are installing only the JMP Pool component, enter the port that you used when installing the JMP web component on another machine.
|
|
–
|
Pool listening port: Enter the port that this pool is listening on for communication from the JMP Pool Manager and JMP web components.
|
|
–
|
Pool Manager listening port: (Enabled only if you are configuring a worker pool.) Enter the port that was specified as the Pool listening port for the JMP Pool Manager setup. The worker pool needs to know this port in order to tell the JMP Pool Manager that it is available.
|
Figure 1.28 Configure JMP Settings
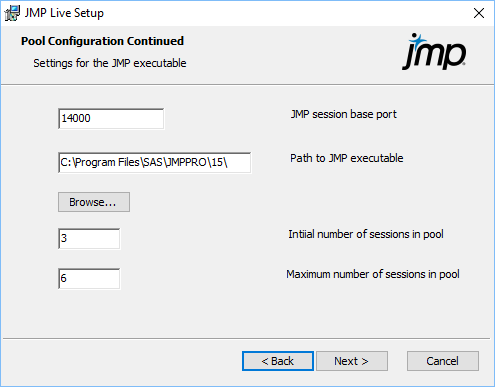
JMP needs to be installed using its own installer on all machines that support creating JMP sessions, whether that is part of the JMP Pool Manager or the worker pool. These sessions of JMP will be started to do work for JMP Live when reports are modified.
|
16.
|
Specify these JMP details:
|
|
–
|
JMP session base port: Enter the base port used by the JMP sessions to talk with the JMP Pool Manager. Each instance of JMP has a unique number starting with this base number.
|
|
–
|
Path to JMP executable: Enter the path to the JMP Pro location. The default installation path appears, so you need to change this only if JMP Pro is located elsewhere.
|
|
–
|
Initial number of sessions in pool: Enter the number of JMP sessions that will be started when the pool is first run.
|
|
–
|
Maximum number of sessions in pool: Enter the upper limit for the number of JMP sessions that are allowed to run on this machine as part of this pool. These sessions are added if the number specified in the initial number of sessions are all in use.
|
Note: If you are installing the Pool Manager, and only want it to handle resource allocation to other worker pools, you can set both the initial and the maximum numbers to zero. In this case, the site will not function until worker pools are configured and running.
Figure 1.29 Configure JMP Settings
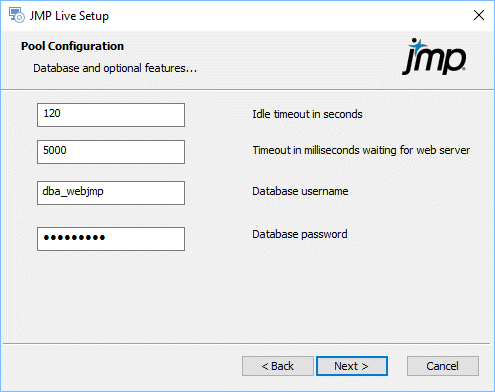
|
17.
|
Specify these JMP details:
|
|
–
|
Idle timeout in seconds: Enter the length of time that a JMP instance waits for additional work before dropping the connection with the JMP web component and waiting for a new request.
|
|
–
|
Timeout in milliseconds waiting for web server: Enter how long an instance waits for further communication during an existing transaction before it gives up and discards the existing work request.
|
|
–
|
Database username: Specify the user name of the database administrator.
|
|
–
|
Database password: Specify the password of the database administrator.
|
|
–
|
SSL Root Certificate: (Appears if you are installing the JMP Pool Manager component only) Specify the location of your organization’s certificate authority file.
|
Figure 1.30 Start JMP Live Installation
|
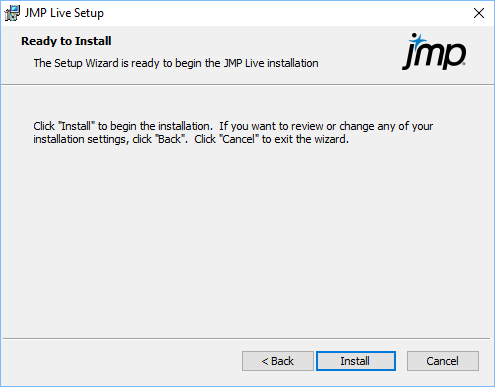
18.
|
Click Install to start the JMP Live installation, and Finish once the installer is done.
|
JMP Live should automatically connect to Keycloak, and you should be able to log into JMP Live using the JMP Live alias you provided in step 13. If you have problems logging in to JMP Live, you might need to connect manually. See Manually Connect Keycloak and Start JMP Live.
Configure Advanced Settings
During the installation, you specify certain settings in JMP Live. To change these settings later, or add to the advanced settings, update the environment (.env) files. The JMP web and JMP Pool Manager components each have their own environment file here (by default):
|
•
|
C:\Program Files\SAS\JMP Live\JMPLive
|
|
•
|
C:\Program Files\SAS\JMP Live\JMPPool
|
Caution: Make changes to environment files with caution, as even a small mistake could cause JMP Live to fail.
Once you update the environment file, you need to restart the component for the changes to take effect. For details about how to restart components, see Manually Connect Keycloak and Start JMP Live.
JMP Live Environment File Settings
PORT
(Required) HTTPS port that this instance of JMP Live is running on.
PORT_HTTP
(Optional) HTTP port that this instance of JMP Live listens on and redirects to the specified HTTPS port. The default value is 80.
NODE_ENV
(Required) Set this to production. This is the correct mode for the JMP Server.
COOKIE_SECRET
(Required) Secret used for computing the hash for session cookies for this instance of JMP Live.
DEBUG
(Optional) List of comma-separated string values that determine which debug statements in the code are active and which are not. There is no default value.
DEBUG_DEPTH
(Optional) Determines the depth to which objects are sent to the log in a debug statement (for example: debug('This is my object: %O', myObject);). The default value is 10.
LOG_LEVEL
(Optional) Sets the lowest level of Bunyan logger messages that are active in this JMP Server instance. These are the messages that go to Loggly. Possible values include trace, debug, info, warn, error, or fatal. The logger lines in the code look like "logger.debug(...);". The default value is info.
LOG_PRETTY
(Optional, Boolean) Determines whether the Bunyan logging in the console stream displays as raw JSON (0) or is pretty printed (1). This affects only the console stream; the Loggly stream is always raw JSON. The default value is 0 (raw JSON).
LOG_HTTPHEADERS
(Optional, Boolean) Determines whether HTTP headers are included in pretty-printed log records of HTTP requests. The default value is 0 (off, no headers are included).
DB_HOST
(Required) Host name of the machine where the PostgreSQL database is running. The format is host-name:port. Port must be included.
DB_DATABASE
(Required) Name of the PostgreSQL database on DB_HOST to use. Normally, it is webjmp.
DB_USERNAME
(Required) User name of the PostgreSQL user. Normally, it is dba_webjmp.
DB_PASSWORD
(Required) Password that DB_USERNAME uses to connect to PostgreSQL.
SHOW_GENERATED_SQL
(Optional, Boolean) Sends all of the SQL statements that are generated by Sequelize out to the console log before executing. The default value is 0 (off). Note that there are a large number of log files.
SSL_CERT_FILE
(Optional) Relative path to the .crt file.
SSL_KEY_FILE
(Optional) Relative path to the certificate key file.
SSL_CA_FILE
(Optional) Relative path to the certificate authority file.
AUTH_SCHEME
(Required) Authentication scheme that the JMP web component uses. Possible values are keycloak, ldap, and local. This should be set once for a given JMP Server instance and never changed unless starting over with an empty database.
JMP_RELEASE
(Restricted) Major release of the JMP client that is allowed to publish content to this JMP Live instance. This setting cannot be changed by administrators and is fixed in JMP Live.
APIKEY_ENABLED
(Optional, Boolean) Specifies whether users need a key to access the JMP Live APIs using JSL. Users can get an API key through their user profile in JMP Live. The default is 1 (enabled).
JMPLIVE_BASEURL
(Required) The URL that components such as the JMP Pool and Keycloak use to communicate with the JMP Live website.
ALLOW_SOCIAL_SHARING
(Optional, Boolean) Specifies whether users on this JMP Live instance can share posts using social media. The default is 0 (no).
SESSION_TICKET_EXPIRE_MINUTES
(Optional) Number of minutes to retain JMP session ticket records in the Tickets table before they are removed. This is for JMP sessions, not log on sessions. The default value is 1440 minutes (24 hours).
SESSION_TICKET_EXPIRE_HOURS
(Optional) The number of hours to retain JMP session ticket records in the Tickets table. This is for JMP sessions, not log on sessions. If both _MINUTES and _HOURS are specified, the one that specifies the longer amount of time is used. The default value is 24 hours.
COOKIE_EXPIRE_MINUTES
(Optional) Length of time in minutes that a session cookie is valid. If both _MINUTES and _SECONDS are specified, the one that specifies the longer amount of time is used. The default value is 720 minutes (12 hours).
COOKIE_EXPIRE_SECONDS
(Optional) Length of time in seconds that a session cookie is valid. If both _MINUTES and _SECONDS are specified, the one that specifies the longer amount of time is used. If you want to use COOKIE_EXPIRE_SECONDS, you should set COOKIE_EXPIRE_MINUTES to 0. The default value and the minimum expiration allowed are five seconds.
SESSION_PURGE_INTERVAL_MINUTES
(Optional) Frequency (in minutes) at which expired sessions are purged from the database. If both _MINUTES and _SECONDS are specified, the one that specifies the longer amount of time is used. The default value is 15 minutes.
SESSION_PURGE_INTERVAL_SECONDS
(Optional) Frequency (in seconds) at which expired sessions are purged from the database. If both _MINUTES and _SECONDS are specified, the one that specifies the longer amount of time is used. If you want to use SESSION_PURGE_INTERVAL_SECONDS, you should set SESSION_PURGE_INTERVAL_MINUTES to 0. The default value and the minimum purge interval allowed are five minutes.
JMP Pool Environment File Settings
HOST
(Optional) Host name of this JMP Pool. The default host name is os.hostname().
PORT
(Required) Port that this JMP Pool is listening on.
JMP_PATH
(Required) Path to the JMP executable.
JMP_INSTALLDIR
(Optional) Tells JMP Live where the JMP desktop application is installed.
JMP_LOGSTART
(Optional) Creates a log of JMP start-up, such as where JMP is getting license and preference information from.
JMP_BASE_PORT
(Required) Start of a range of ports that JMP sessions listen on.
DB_USERNAME
(Required) User name for logging in to the PostgreSQL database.
DB_PASSWORD
(Required) Password for logging in to the PostgreSQL database.
IS_POOL_MANAGER
(Optional, Boolean) Specifies if this pool is the pool manager. If it is, set this to 1.
WEBJMP_RETRY_WAIT
(Used only if this is the pool manager.) Number of milliseconds JMP waits before trying to reconnect to the JMP web component. The default value is 5000 milliseconds.
POOL_MANAGER_HOST
(Used only if this is not the pool manager, so it can find the pool manager.) DNS name of the machine running the pool manager process. The default value is localhost.
POOL_MANAGER_PORT
(Used only if this is not the pool manager.) Port that the pool manager uses to communicate with worker pool instances. The default port is PORT.
INITIAL_JMP_PROCESSES
(Optional) Number of JMP sessions that will be started to help recalculate reports when they are explored on the website. The default value is 4 sessions.
MAX_JMP_PROCESSES
(Optional) Maximum number of JMP processes that will be launched based on demand (an elastic JMPPool). The default value is specified in INITIAL_JMP_PROCESSES.
JMP_SERVER_IDLE_TIMEOUT
(Optional) Amount of time (in seconds) a committed JMP server can remain idle before being recycled. The default value is 120 seconds.
APPLYPACKAGEPREFS
(Optional, Boolean) Determines whether preferences stored with the package are applied on the server. Specify 0 for false and 1 for true. The default value is false (0).
WIPE_TEMP_FOLDER_AT_STARTUP
(Optional, Boolean) Deletes the temporary folder when the JMP Pool starts up initially. If you have more than one JMP Pool sharing a single machine, set this value to false (0). The default value is true (1).
WIPE_TEMP_FOLDER_ON_CRASH
(Optional, Boolean) If you want the Temp folder associated with a JMP session that has crashed to be cleaned up, set this value to true (1). The default value is false (0) so that you can investigate scenarios where JMP might be crashing.
About JMP Live Architecture and Authentication
If you are installing the JMP Live server on-premises, you should understand the architecture of the JMP Live system and possible configurations for authentication with third-party identity providers.
Architecture Overview
JMP Live consists of several modules communicating with each other. This architecture makes it possible to distribute the workload across different computing resources to handle larger request loads.
Figure 1.31 JMP Live Architecture
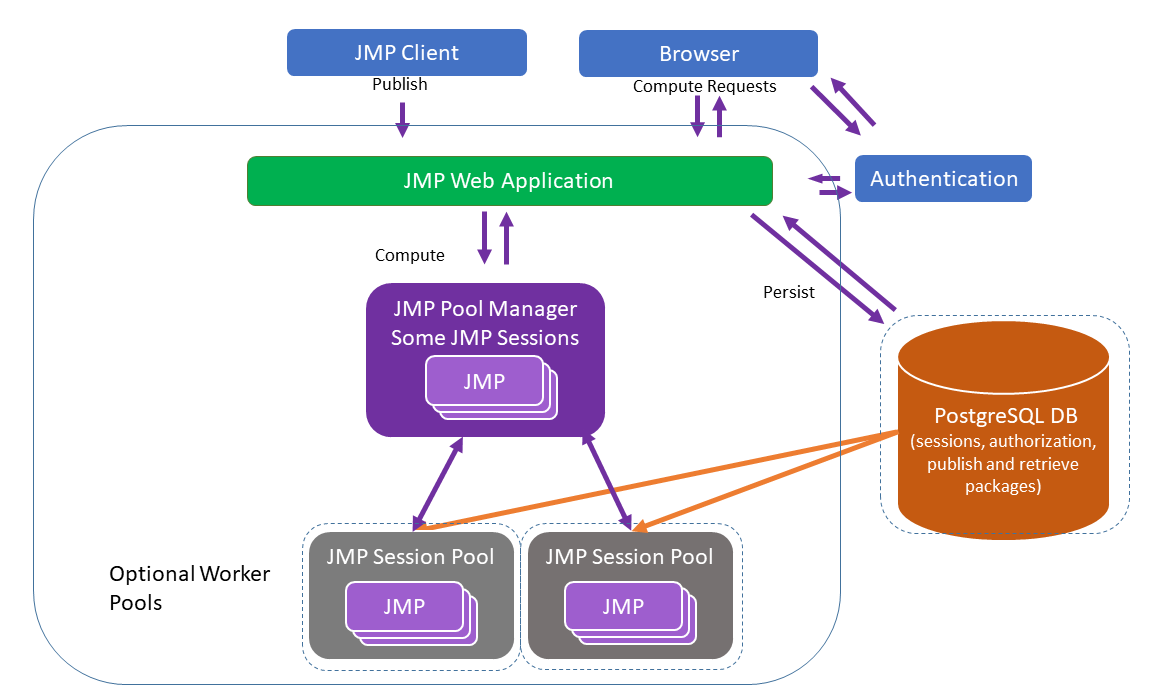
You can run JMP Live on a single computing resource, but this setup is not recommended. The recommended setup is to keep the database separate from the other components of JMP Live, and to give the database a dedicated computing instance that is frequently backed up to ensure the safety of the JMP Live content. The database can be on a hosted service, and the rest of the installation is in on-premises resources. In that scenario, you would not use the JMP Live Database Installer, but would need to set up a PostgreSQL 9.6 compatible instance on the hosted service. Follow the instructions in Install Using an Existing Database.
Determine the Installation Size
Determining the size of the installation is challenging, since there can be unknown factors at individual installation sites that can impact performance. Network speed is an important factor, and the decision to use dedicated machines or virtual machines also impacts performance. SAS cannot guarantee that any of the configurations described here will perform well at every location.
The main criterion when considering possible installation size is the number of users:
|
•
|
A small deployment is considered to be 100 users.
|
|
•
|
A medium deployment considered to be is 500 users.
|
|
•
|
A large deployment is considered to be 2,000 users.
|
In all cases, it is assumed that every user uses the site occasionally and are looking at a variety of reports with fairly distributed usage. Occasional usage might be 10 times per day.
|
•
|
If you have users that heavily use the site constantly, you will need a much more robust setup.
|
|
•
|
If you have users frequently accessing just a few reports, then both the robustness of the computing resource dedicated to the JMP web component and the database will be important.
|
Small Deployment
In a small deployment (such as 100 users), it is possible to install everything except the database on a single dedicated machine.
Figure 1.32 Recommended Configuration for a Small Deployment

In this scenario, the JMP web and the JMP Pool components are installed on the same machine. During the installation, select the option to Configure as Pool Manager. The number of JMP instances associated with this JMP Pool Manager are the total number of JMP instances that are run for the site.
For the capabilities of this computing resource, more is always better, and much depends on the processor type, network speeds, and so on. An absolute minimum to consider is a 4-core machine with at least 16 gigabytes of dedicated RAM. The amount of storage is most important for the database and depends on the number of reports stored. One terabyte of storage is the minimum.
Medium Deployment
In a medium deployment (such as 500 users), there are two configurations that you can consider, based on the type of reports that are being retrieved:
|
•
|
If you have a high number of report retrievals, but the reports themselves do not contain data filters or the need to recompute the statistics, then the primary area of concern is the JMP web component.
|
|
•
|
If there are a lot of report computations required, then the primary area of concern is the JMP Pool Manager.
|
In cases where the JMP web component is of primary importance, or if you do not know whether you will have a compute-intensive environment, the recommended configuration is below.
Figure 1.33 Recommended Configuration for a Medium Deployment
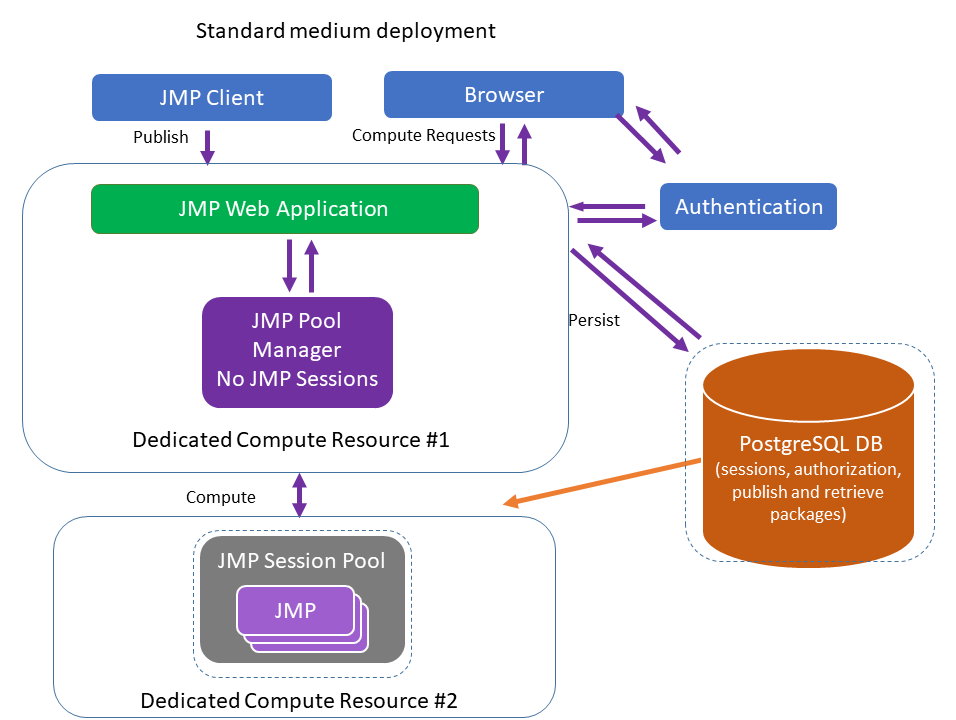
In a standard configuration where the JMP web component needs optimum performance, the JMP Pool Manager does not have JMP sessions of its own. You set the number of JMP sessions in the JMP Pool Manager to zero. All JMP sessions reside on the second computing resource, the JMP Session Pool.
If you need a more compute-intensive environment, then assign sessions to the JMP Pool Manager (perhaps five). This might reduce the performance of the JMP web component, but provides additional computing capacity for reports.
Large Deployment
In a large deployment (such as 2,000 users), you might need multiple JMP Session Pools and a separate dedicated computing resource for the JMP Pool Manager.
Figure 1.34 Recommended Configuration for a Large Deployment
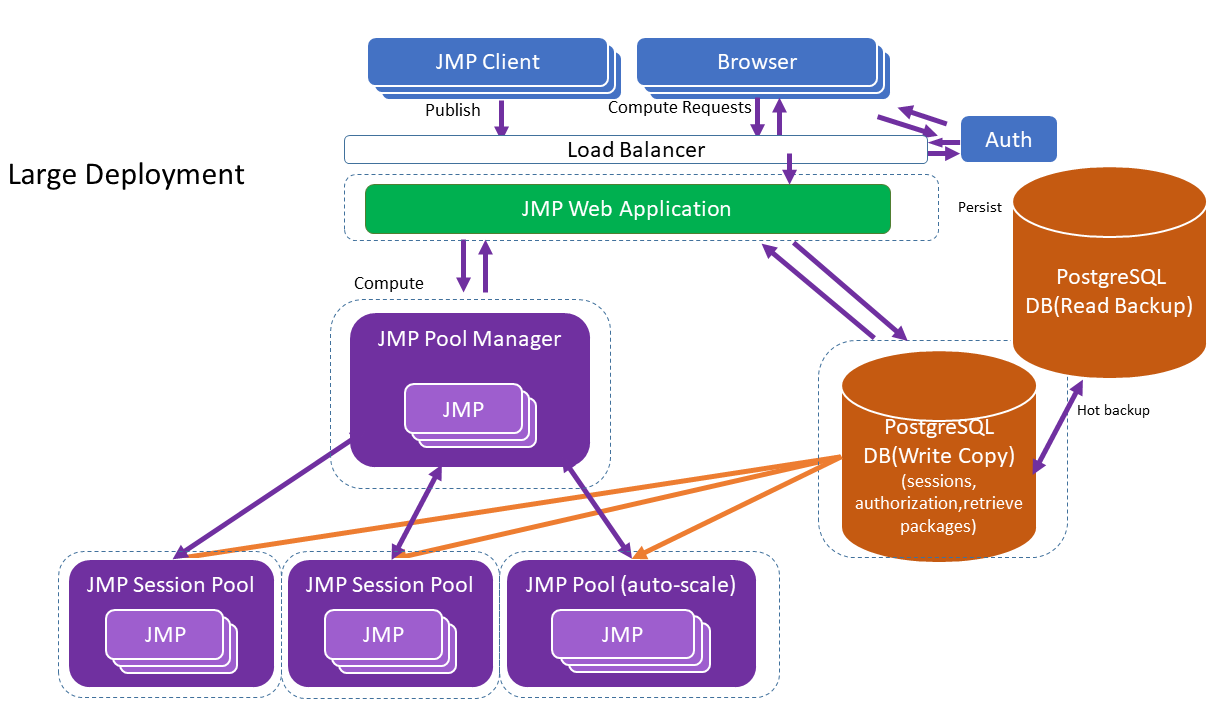
The JMP web component, JMP Pool Manager component, JMP Session Pools, and PostgreSQL databases are all dedicated instances. The number of JMP sessions that you can have depends on the computing power and memory capacity of each instance.
Here are some suggestions for each instance:
|
•
|
JMP web component and JMP Session Pool instances: A suggested minimum of 4-core machines, but preferably 8-core machines with 32 gigabytes of RAM.
|
|
•
|
JMP Pool Manager: A suggested minimum of a 4-core machine with 16 gigabytes of RAM.
|
|
•
|
PostgreSQL databases: The machines should anticipate the storage requirements based on the volume of publishing for your organization. A scalable instance would be best, otherwise 5 terabytes of storage is a suggested minimum.
|
The following elements are also suggested:
|
•
|
A load balancer to provide a single entry point to handle the security of HTTP and HTTPS requests.
|
|
•
|
A read backup of the PostgreSQL database to provide a quick switchover in the event of a failure or connectivity issue with the primary database. The backup should be updated frequently.
|
Considerations for Hosting Services
For some hosting services like Amazon Web Services or Microsoft Azure, it is possible to set up auto-scaling for the JMP Session Pools. This works as follows:
|
1.
|
A trigger, like a time of day or a CPU utilization on a Session Pool node, can cause an additional computing resource to be started.
|
|
2.
|
The JMP Session Pool on the newly started resource reports to the Pool Manager when it becomes live.
|
To use auto-scaling, during installation of the Session Pool on the image that will be replicated during scaling, you must have selected the option to install components as Windows services. This automatically starts the Session Pool component when the computing instance is instantiated. The Session Pool reports to the Pool Manager and registers its availability to provide computing services.
Authentication Considerations
The facilities that JMP Live provides for authentication are based on the location of the installation. For an on-premises installation, JMP Live can connect to a Microsoft Active Directory endpoint if your organization supports Active Directory or LDAP (Lightweight Directory Access Protocol). Otherwise, users need to have an existing SAS Profile. They can then authenticate to JMP Live using those credentials.
The authentication mechanisms covered here relate to how JMP Live connects to the user's identity providers. Communication between JMP and JMP Live is different.
Figure 1.35 JMP Live Authentication Options and Flow
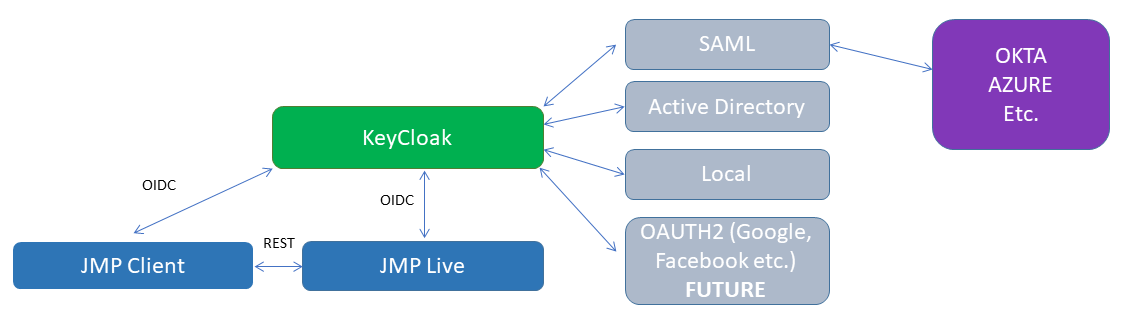
KeyCloak Application
The KeyCloak application acts as a bridge to various authentication mechanisms. OpenID Connect (OIDC) is used between the JMP Client, JMP Live, and KeyCloak to secure those transactions. The connection between KeyCloak and the various authentication mechanisms depends on that mechanism, but it is often TLS.
KeyCloak provides authentication session tokens to JMP Live and JMP. These tokens indicate whether the user is allowed to use JMP Live. The tokens also tell JMP Live when the authentication session has expired.
Use Active Directory or LDAP
To enable on-premises authentication using Active Directory or LDAP, you need to specify certain parameters in the environment file for the JMP web component.
|
1.
|
Open the environment file for the JMP web component, located here (by default): C:\Program Files\SAS\JMP Live\JMPLive\.env.
|
|
2.
|
If you have installed the JMP web component as a Windows service, use the Task Manager to stop the service before you update the environment file.
|
|
3.
|
Specify these parameters in the .env file:
|
AUTH_SCHEME=ldap
This specifies the authentication method as LDAP or Active Directory.
LDAP_URL="ldap://site_ldap_endpoint.mycompany.com:port#"
This is the communication endpoint for the Active Directory requests, where port# is the 4-digit port used for the Active Directory communications. The connection must be direct to the Active Directory or LDAP instance.
LDAP_BIND_DN="CN=COMPANY LDAP-Read,OU=Generic and Shared Accounts,OU=Admin,DC=mydepartment,DC=mycompany,DC=com"
This is the administrator account for the Active Directory binding. This is site specific. If your site does not allow for anonymous binding, this might be a domain-specific account.
LDAP_SEARCH_BASE="DC= mydepartment,DC= mycompany,DC=com"
This is the base domain from which to search for users by user name.
LDAP_BIND_CRED="abcd1234efgh"
This is the administrator account password
LDAP_VALIDATION_GROUP=JMP Web Server
JMP Live requires the specification of an LDAP or Active Directory group that defines all of the members that will be allowed to authenticate against this installation of JMP Live. You cannot reference multiple groups or query groups within the Active Directory. It is not possible to have JMP Live groups that derive from Active Directory groups.
LDAP_SEARCH_FILTER=(samAccountName={{username}})
The filter used to search for the user. The user name in {{}} is interpolated as the provided user name.
|
4.
|
Save the .env file.
|
|
5.
|
If you have installed the JMP web component as a Windows service, use the Task Manager to restart the service once you finish updating the environment file.
|
Update a JMP License
In JMP Live, JMP sessions run in the background to recompute the analytics. In order for these JMP sessions to work, you must have a valid JMP license.
For security reasons, JMP Live ships with an expired license. You will need to update this within 90 days.
How to Tell if Your JMP License Has Expired
If you are signed in as an administrator to JMP Live, at the top of the JMP Pool Status page, you will see this message: “The JMP Application is reporting a licensing error.” Also, you might notice that reports are not recalculating results.
Figure 1.36 JMP Live Licensing Error Message

How to Update an Expired JMP License
|
1.
|
Find the new license file. It is a text file that might be emailed to you if you have been running JMP Live successfully, and the JMP license expires. If you open it, at the top you will see [_SID_].
|
The license file might also be in the SAS Software Depot\sid_files folder. However, if you are working from a new installation of JMP Live, this file might be expired.
|
2.
|
Navigate to C:\Program Files\SAS\JMPPRO\15_2 and find the JMPExtractPER64.exe file.
|
|
3.
|
Create a temporary folder on your computer. Copy and paste these files into the folder:
|
|
–
|
JMPExtractPER64.exe
|
|
–
|
The new license file
|
|
4.
|
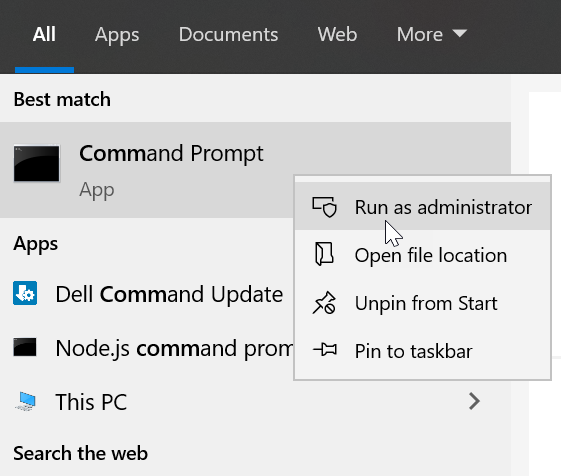
Type Command Prompt in the Windows search bar. Make sure to run the command prompt as an administrator (right-click Command Prompt and choose Run as administrator).
|
Figure 1.37 Run a Windows Command Prompt as an Administrator
|
5.
|
Go to the temporary folder that contains the copy of the JMPExtractPER64.exe file and the new license file.
|
|
6.
|
Run this command, replacing MyLicenseTextFileName_x64.txt with the name of your new license file:
|
JMPExtractPER64.exe .\MyLicenseTextFileName_x64.txt .\jmp.per
This creates a jmp.per file in the same directory (the temporary folder that you created).
Alternatively, you can replace an existing jmp.per file by running a command like this:
JMPExtractPER64.exe .\MyLicenseTextFileName_x64.txt "C:\Program Files\SAS\JMPPRO\15_2\jmp.per"
|
7.
|
Copy the jmp.per file and paste it into the directory containing the JMP installation. By default, this directory is C:\Program Files\SAS\JMPPRO\<version>.
|
|
8.
|
Restart JMP Live. For details, see step 8.
|
Update Code Modules
Much of JMP Live is developed using JavaScript. Node.js provides the coding ecosystem for the web server and much of the other infrastructure that JMP Live needs to run. This ecosystem contains numerous independently developed software applications to achieve specific functions. Occasionally, these modules might need to be updated with security fixes. This can also become part of a periodic, automated process. JMP always updates the code modules when distributing a new release of JMP Live, but the module update can provide interim security fixes.
To update the code modules, you must run the Node Package Manager (npm) from a Windows command processor. To do this manually, go to the Windows Start Menu and look under Node.js. Start a Node.js command prompt with administrator privileges. To have npm update any packages with security packages, run the following command:
npm audit fix
You can also prefix the fixes that will be applied in the above operation using this command:
npm audit -dry-run
If you want the output in a JSON format, append -json to the -dry-run command line.
Uninstall Windows Services
If you decide that you want to remove the Windows services but keep JMP Live installed, you can run the uninstall_services.cmd file in the main application directory. Similarly, you run the install_services.cmd file to re-install the Windows services. These files exist only if you selected the option during installation to install as Windows services.
Create an Administrator Account for JMP Live
If you did not create an administrator account during the JMP Live installation, you can create one later using a command line interface:
|
1.
|
From the Windows Start menu, open a command prompt.
|
|
2.
|
Go to the JMPLive folder, located here (by default): C:\Program Files\SAS\JMP Live\JMPLive\.
|
|
3.
|
Enter the following command:
|
.\bin\jmplive-cli createAdminUser -d displayname -p password - u user
The options are defined as follows:
|
–
|
-d displayname: Display name of the administrator. If you use spaces, enclose the name in quotation marks. The default name is “JMP Live Administrator”.
|
|
–
|
-p password: Password of the administrator. If not specified, you will be prompted for a password. If you use spaces, enclose the password in quotation marks.
|
|
–
|
-u user: Name of the administrator. Spaces are not permitted. The default name is jmpliveadmin.
|
Sign in to JMP Live as an Administrator
In JMP Live, click Help  > Sign in as administrator.
Manage JMP Live Publishing Using JSL
JMP Live is a website purchased and hosted by your company for private sharing of JMP content. JMP Public is a public instance of JMP Live that anyone can share JMP content to.
You can manage publishing settings using the jmpStartAdmin.jsl file, which is located here (by default): C:/ProgramData/SAS/JMP/<version>.
Enable or Disable Publishing to JMP Live
In jmpStartAdmin.jsl, the administrator can enable or disable publishing to JMP Live.
Enable JMP Live URL() specifies the URLs that users can publish to. For example:
Enable JMP Live URL( "https://public.jmp.com" ) // enables publishing to the JMP Public URL
Disable JMP Live URL() specifies the URLs that users cannot publish to. For example:
Disable JMP Live URL( "https://public.jmp.com" ) // disables publishing to the JMP Public URL
Note: If a URL appears in both lists, publishing to the URL is disabled.
You can use an asterisk as a wildcard to specify URLs:
|
•
|
* (any URL)
|
|
•
|
*.jmp.com (a URL that ends in jmp.com)
|
|
•
|
https://public.* (a URL that starts with https://public.)
|
|
•
|
*public* (a URL that contains public)
|
Create and Delete Bookmarks
In jmpStartAdmin.jsl, the administrator can add bookmarks that appear when users are publishing reports in JMP to JMP Live and JMP Public.
Add JMP Live Bookmark( "JMP Public 15", URL("https://public.jmp.com" ) );
Add JMP Live Bookmark( "JMP Live 15.2", URL( "myjmpliveinstall.mycompany.com" ) );
Get JMP Live Bookmarks() and Delete JMP Live Bookmarks() are also available.
Manually Connect Keycloak and Start JMP Live
After you install JMP Pro, the JMP Live Database, JMP Live and Keycloak, JMP Live and Keycloak should be automatically connected. If you have problems logging in to JMP Live after the installation, you might need to connect to Keycloak and start JMP Live manually.
|
1.
|
If you are using the JMP Live database as the Keycloak database, run JMP Live once.
|
This populates the JMP Live database with the correct schemas and tables for Keycloak to operate.
|
2.
|
If JMP Live is running as a Windows service, stop it:
|
|
a.
|
Type Task Manager in the Windows search bar. Or, press Ctrl+Alt+Delete and select Task Manager.
|
|
b.
|
Click the Services tab.
|
Tip: If you do not see the Services tab, you might need to click More Details.
|
c.
|
Right-click webjmpsvc.exe and jmppoolsvc.exe and click Stop.
|
|
3.
|
Type Command Prompt in the Windows search bar. Run the command prompt as an administrator (right-click Command Prompt and choose Run as administrator).
|
|
4.
|
Navigate to the JMPLive component installation directory. Enter: cd C:\Program Files\SAS\JMP Live\JMPLive (assuming that JMP Live is in the default directory).
|
|
5.
|
Edit the .env file using Notepad. Enter: start Notepad .env.
|
|
6.
|
In the .env file, add these lines:
|
AUTH_SCHEME=keycloak
Note: Alternative choices include ldap and local. ldap is the legacy choice to connect to LDAP/Microsoft Active Directory (do not choose this option unless you are using JMP 15.0). local allows for a stand-alone authentication without connecting to an identity provider.
KEYCLOAK_SERVER_URL=https://mykeycloakserver.mydomain.com:8443
Specify the correct URL and port for your installation. This line tells JMP Live the URL of your Keycloak server, along with the port that allows HTTPS access.
JMPLIVE_BASEURL=https://myjmpliveinstance.mydomain.com:3501
Specify the correct URL and port for your installation. This line specifies the DNS name or alias of your JMP Live server, along with the port that you are using for HTTPS access.
|
7.
|
Save the .env file updates. Click File > Save.
|
|
8.
|
Start the JMP Live components:
|
|
–
|
If you installed JMP Live as a Windows service, open the Task Manager, Services tab (refer to step 2) and start each JMP Live service. Right-click webjmpsvc.exe and jmppoolsvc.exe and click Start.
|
|
–
|
If you have not installed JMP Live as a Windows service, perform the steps under Components Not Installed as Windows Services.
|
JMP Live and Keycloak should now be working together.
Components Not Installed as Windows Services
|
1.
|
Go to the directory where JMP Live is installed. By default, it is installed here: C:\Program Files\SAS\JMP Live.
|
|
2.
|
Double-click the launch.cmd file. This starts any components installed on this machine.
|
|
3.
|
If the installation has been distributed across several machines, repeat step 2 on each machine.
|
A command prompt for each component starts, showing the operation status of each component.
Tip: To stop the components, press Ctrl+Break or Ctrl+C.
Technological Notice
The JMP Live software is provided with certain free and open-source software identified in the Help > Notices section of the customer’s JMP Live page, and also at the following link: https://support.sas.com/en/documentation/third-party-software-reference/licenses.html.