Gauge R&R Option
The Gauge R&R option shows measures of variation interpreted for a gauge study of operators and parts.
Once you select the Gauge R&R option, if you have not already selected the model type, you are prompted to do so. Then, modify the Gauge R&R specifications.
Note: The Platform preferences for Variability include the Gauge R&R Specification Dialog option. The preference is selected by default. Deselect the preference to use the spec limits that are defined in the data table.
Enter/Verify Gauge R&R Specifications
The Enter/Verify Gauge R&R Specifications window contains these options:
Choose tolerance entry method
Choose how to enter the tolerance:
Select Tolerance Interval to enter the tolerance directly, where tolerance = USL – LSL.
Select LSL and/or USL to enter the specification limits and then have JMP calculate the tolerance.
K, Sigma Multiplier
K is a constant value that you choose to multiply with sigma. For example, you might type 6 so that you are looking at 6*sigma or a 6 sigma process.
Tip: Modify the default value of K by selecting File > Preferences > Platforms > Variability Chart.
Tolerance Interval, USL-LSL
Enter the tolerance for the process, which is the difference between the upper specification limits and the lower specification limits.
Spec Limits
Enter upper and lower specification limits. See Spec Limits in Using JMP.
Historical Mean
Computes the tolerance range for one-sided specification limits, either USL-Historical Mean or Historical Mean-LSL. If you do not enter a historical mean, the grand mean is used.
Historical Sigma
Enter a value that describes the variation (you might have this value from history or past experience).
The Gauge R&R Report
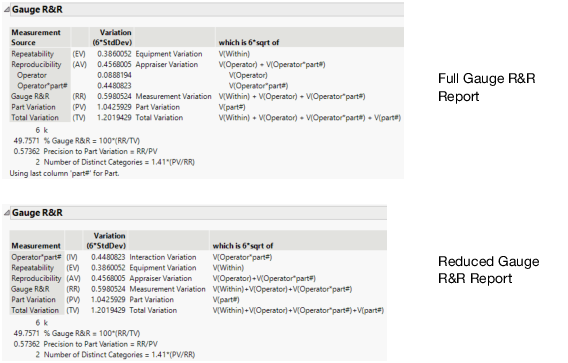
Figure 5.7 Example of the Gauge R&R Report
Note: To generate the reduced Gauge R&R report, select File > Preferences > Platforms > Variability Chart > Reduced Gauge R&R Report.
In this example, the values in the Variation column are the square roots of sums of variance components scaled by the value of k (6 in this example).
Table 5.2 shows guidelines for measurement variation, as suggested by Barrentine (1991).
< 10% | excellent |
11% to 20% | adequate |
21% to 30% | marginally acceptable |
> 30% | unacceptable |
Note the following:
• If you have provided a Tolerance Interval in the Enter/Verify Gauge R&R Specifications window, a % of Tolerance column appears in the Gauge R&R report. This column is computed as 100*(Variation/Tolerance). Also, a Precision-to-Tolerance ratio appears at the bottom of the report. This ratio represents the proportion of the tolerance or capability interval that is lost due to gauge variability.
• If you have provided a Historical Sigma in the Enter/Verify Gauge R&R Specifications window, a % Process column appears in the Gauge R&R report. This column is defined as 100*(Variation/(K*Historical Sigma)).
• The Number of Distinct Categories (NDC) is defined as (1.41*(PV/RR)), rounded down to the nearest integer.
