Recode Data in a Column
Use the recoding tool to change all of the values in a column at once. For example, suppose you are interested in comparing the sales of computer and pharmaceutical companies. Your current company labels are Computer and Pharmaceutical. You want to change them to Technical and Drug. Going through all 32 rows of data and changing all the values would be tedious, inefficient, and error-prone, especially if you had many more rows of data. Recode is a better option.
Notes:
• To recode similar values within multiple columns, use the Recode option in Cols > Standardize Attributes. See Standardize Column Attributes.
• To recode only column headings, select Cols > Column Names > Recode Column Names.
To recode data, follow these steps:
1. Select Help > Sample Data Library and open Companies.jmp.
2. Select the Type column by clicking once on the column heading.
3. Select Cols > Recode.
Notice that New Column is selected by default to place the recoded values in a new column. The new column is named Type 2.
4. In the Recode window, enter the desired values in the New Value boxes. For this example, enter Technical in the Computer row, and Drug in the Pharmaceutical row.
Notice that the recoded values appear in the Changes box.
Figure 4.43 Recode Window
5. Click Recode.
The new values appear in the data table under a new column called Type 2.
Notes:
• By default, the recoded data appears in a new column. To always recode the column that you selected, select File > Preferences (Windows) or JMP > Preferences (macOS), select Recode, and then select In Place from the Commit Style list.
• By default, the data in the Recode window is sorted by new value in ascending order. This applies to both Recode and Recode Column Names. To change how data is sorted, select File > Preferences (Windows) or JMP > Preferences (macOS), select Recode and change the Sort Style preference. Select Old Value to sort column names by the natural order they appear in the data table and data by the order in the value order column property, if specified. Select Count to sort by count in descending order.
• If the data table contains value labels, the labels appear in a column in the Recode window called New Labels. Editing the labels also modifies the Value Labels column property. You can also select Replace values with value labels to modify the data in the New Values column.
• The following column properties are updated when you recode a column: Value Labels, Value Scores, Value Order, Value Colors, Supercategories, Coding, and Missing Value Codes.
• If you enter a non-numeric value in a column with a Numeric data type, you are prompted to convert the data type to Character. Click Yes to convert the column and display the new value. Click No to keep the column Numeric and display a missing value.
• Selecting rows on the Recode window also selects them in the data table for quick editing.
Recode Options
The following options are available in the list next to the Recode red triangle:
New Column
Creates a new column for the changed data and retains the original column.
Formula Column
Creates a new column with the changes as a formula instead of values. Changing a value in the original column in the data table causes the formula column to update that value automatically.
In Place
Applies any change to the original data column.
The remaining options are available on the Recode window:
Filter
Searches for specific values. Click the down arrow to select search options. For more information about each option, see Search Filter Options in Recode. Note that you can type a regular expression to customize the filter.
View Groups
Deselect to view ungrouped values. Selected by default.
Show Only Grouped
Shows recoded values that have been grouped.
Show Only Ungrouped
Shows values that have not been grouped.
Group
Becomes active when multiple values are selected. Click Group to make highlighted values part of the same group. If you previously edited a value before grouping, the edited value becomes the group representative in the New Value column. Otherwise, the group representative is the value that occurs most often.
All
Shows all data values.
Only Modified
Shows only modified recoded values.
Only Unmodified
Shows only unmodified recoded values.
Changes
Shows a list of changes made in the Recode window.

Reverses the last change made to the window.

Recalls the last change made to the window.
Scripting
To save a script to re-create the recoded data table, select Script from the red triangle menu and then select an option.
The Recode window includes the following script options:
Script sequence of actions
Attempts to save your actions to a script and omit the data. If you convert all strings to uppercase using the red triangle option, the generated script contains code that converts input strings to uppercase without including the data.
Compress sequence
Compresses the script of sequenced actions by removing unnecessary operations. Consider this option to speed up recoding that contains multiple edits.
Multiple Response
Remove empty items
In a Multiple Response column, excludes empty items in the column when recoding the column in the data table.
Remove duplicate items
In a Multiple Response column, excludes duplicate items. For example, if the original data were a, b, b, c, and no changes to those particular items were made, the recoded column in the data table would contain a, b, c.
Sort items
In a Multiple Response column, sorts items alphabetically. For example, if the original data were b, a, c, and no changes to those particular items were made, the recoded column in the data table would contain a, b, c.
Red Triangle Options for Recode
The red triangle menu contains options for the Recode window.
Convert to Titlecase
Converts the first letter of each word to uppercase, and the remaining letters to lowercase.
Convert to Uppercase
Converts all values to uppercase.
Convert to Lowercase
Converts all values to lowercase.
Trim Whitespace
Removes leading and trailing whitespace characters. For example, if an extra space was imported before and after the name John, this command would delete the spaces.
Remove Whitespace
Removes trailing, leading, and interior whitespace characters.
Collapse Whitespace
Removes leading and trailing whitespace characters and removes duplicate interior whitespace characters. That is, if more than one whitespace character is present, the Collapse Whitespace command replaces the two spaces with one space.
Remove Punctuation
Removes special characters (such as quotation marks and ampersands) from the beginning, middle, and end of words.
Replace String
Replaces all occurrences of specified characters with a new string or with nothing. Note that you can type a regular expression to customize the replacement.
First Word
Groups values based on the first word of the string. For example, if “John Smith” and “John Adams” were values, this command would group them under “John.”
Last Word
Groups values based on the last word of the string.
Group Similar Values
Enables you to customize how data is grouped. Choose from the grouping options list. See Group Similar Values Options for Recode.
Advanced
All but First Word
Splits values based on the remaining value after the first word is excluded.
All but Last Word
Splits values based on the remaining value after the last word is excluded.
Apply Mapping from Table
Enables you to use columns in a mapping data table to modify values in the target table. See Example of Applying Values from Mapping Columns.
Extract Segment
Enables you to extract specific strings. See Example of Splitting on a Comma.
Choose Closest
Enables you to map values in the column of a mapping data table to the column that you are recoding.
Parse as Numbers
Converts the data to numbers.
Labels to Codes
Converts labeled values to codes.
Convert to Character
In a numeric column, converts the column to a character column.
Add Value Labels
Enables you to assign value labels to each value.
Replace Values with Value Labels
Replaces the values specified in the Value Label column property with the value labels that you specify. This option is available only when the column has a Value Label property.
Recall
Recalls previous changes made in the Recode window.
Start Over
Returns the window to the default condition.
Script
View options to import, merge, or save Recode scripts.
– Import from File imports a JSL script to recode previously recoded data. Run the same script on different data to recode data the same way.
– Import from Data Table imports a JSL script saved to a data table.
– Import from Recode Result Column imports data from the column that you select, usually the column in which you saved previous recode results.
– Save to File saves Recode changes to a JSL script. After selecting Save, you are prompted to name and save the file.
– Save to Data Table saves a Recode script to current data table.
To modify the recoding in a saved script, right-click the script in the data table and select Edit with Recode. After making changes, select Script > Save to Data Table from the red triangle menu again to save your changes in a new script.
– Merge with Data Table Script merges changes made in the Recode window to the current Recode script saved to the data table. If there are multiple scripts, you are prompted to choose which script to merge your recoded data with.
– Save to Script Window appends the Recode script to the script window.
 Publish to Formula Depot
Publishes the recode script to the Formula Depot, which enables you to reuse the code in other scripts.
Right-Click Options for Recode
The first six options are available for grouped values:
Group to New Value
(Available only when you select multiple values) Enables you to specify a new value for the two or more selected values.
Group to
(Available only when you select multiple values) Right-click selected values to select a different grouping value, or group representative. The list shows the first eight possible group representatives.
Swap New Values
When two values are highlighted, select Swap New Values to make the new value of the first value adopt the new value of the second value, and vice versa.
Make Representative
Right-click a single value from a group and select Make Representative to make the selected value the new value.
Remove From Group
After values are grouped, right-click one or more values to remove them from that group.
Group Similar Values
Right-click a single string to find values that are similar. The Grouping Options window appears. See Group Similar Values Options for Recode.
Open All Groups
Opens the groups so that you can see all of the values in each group.
Close All Groups
Collapses the values within each group.
The following options are available for all data:
Select Rows
Selects the selected rows in the data table. When you select a row in the Recode window, the corresponding rows are automatically selected in the data table. However, if you select rows in the data table, the rows are not selected in Recode. If you want to select only the rows shown in the Recode window, right-click the row, and select this option.
Make into Data Table
Creates a data table of the results shown in the Recode window.
Copy Selected Column Rows
Copies the data only from the column that you right-clicked. You can then paste the data into a data table.
Copy Selected Table Rows
Copies the data for all columns. You can then paste the data into a data table.
Group Similar Values Options for Recode
Select the following Group Similar Values commands to increase the accuracy of grouping:
Ignore Case
Item case is ignored.
Ignore Non-Printable Characters
Non-printable characters are ignored. Some data can include non-printable characters (such as file separators) that only the computer can read.
Ignore Whitespace
White space is ignored.
Ignore Punctuation
Punctuation is ignored.
Allow Character Edits
Enables characters to be replaced by the new value when similar values are grouped.
Max Difference Ratio
Groups values according to the maximum proportional difference. For example, type “.25” to group values that are at most 25% different.
Max Character Difference
Groups values according to a maximum number of nonadjacent character differences. For example, type “5” to group values that differ by five characters or less.
Min Source String Length
Prevents strings from being matched if they are too short. Experiment with this option and the Difference Ratio and Max Character Difference options to specify a value that works for your data.
Search Filter Options in Recode
Click the down arrow button next to the search box to refine your search.
Contains Terms
Returns items that contain a part of the search criteria. A search for “ease oom” returns messages such as “Release Zoom”.
Contains Phrase
Returns items that contain the exact search criteria. A search for “text box” returns entries that contain “text” followed directly by “box” (for example, “Context Box” and “Text Box”).
Starts With Phrase
Returns items that start with the search criteria.
Ends With Phrase
Returns items that end with the search criteria.
Whole Phrase
Returns items that consist of the entire string. A search for “text box” returns entries that contain only “text box”.
Regular Expression
Enables you to use the wildcard (*) and period (.) in the search box. Searching for “get.*name” looks for items that contain “get” followed by one or more words. It returns “Get Color Theme Names”, “Get Name Info”, and “Get Effect Names”, and so on.
Invert Result
Returns items that do not match the search criteria.
Match All Terms
Returns items that contain both strings. A search for “t test” returns elements that contain either or both of the search strings: “Pat Test”, “Shortest Edit Script” and “Paired t test”.
Ignore Case
Ignores the case in the search criteria.
Match Whole Words
Returns items that contain each word in the string based on the Match All Terms setting. If you search for “data filter”, and Match All Terms is selected, entries that contain both “data” and “filter” are returned.
Example of Grouping by Similar Values
You can group similar values according to the number of characters that differ between them.
1. Select Help > Sample Data Library and open Candy Bars.jmp.
2. Select the Name column.
3. Select Cols > Recode.
4. Click the red triangle and select Group Similar Values.
5. Make sure that Allow Character Edits is selected.
6. Next to Max Different Ratio, type “.5”.
This allows JMP to group values that differ by 50% or less. In other words, values that share at least 50%, or half, of the same characters. The Difference Ratio is determined by comparing the total number of characters of each value and the total amount of unique characters between two given values.
7. Next to Max Character Difference, type “6”.
Values that have no more than six characters are grouped.
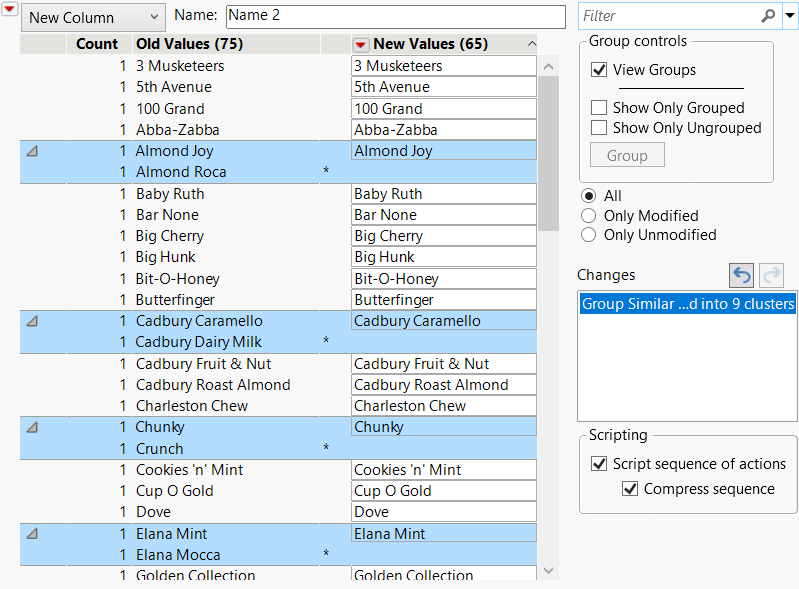
8. Click OK.
Figure 4.44 Grouping Similar Values
The values shown in the New Value column represents the grouped values in the recoded data table.
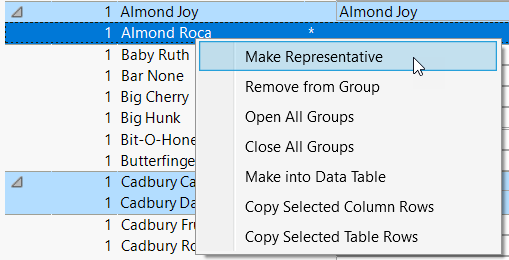
9. (Optional) To change the new value to represent a different old value in a group, right-click Almond Roca and select Make Representative.
Figure 4.45 Make Representative
10. (Optional) To replace the original data in the data table with the recoded data, select In Place from the red triangle menu, and then click Recode.
Example of Splitting on a Comma
The Aircraft Incidents.jmp sample data table contains a column of city and state names separated by a comma. You can split the values in that column on the comma and recode the column with only state names.
1. Select Help > Sample Data Library and open Aircraft Incidents.jmp.
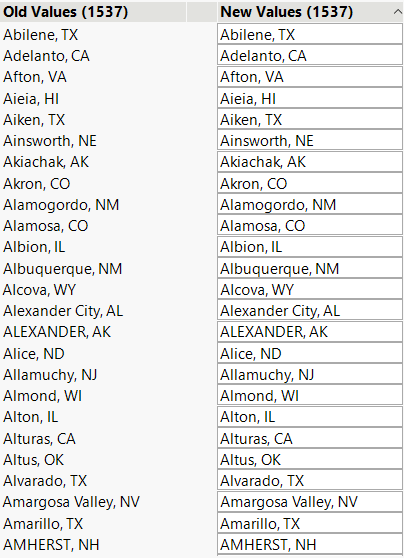
2. Select the Location column and select Cols > Recode.
Figure 4.46 Original Data
3. Click the red triangle and select Advanced > Extract Segment.
In the Preview pane, notice that the data contain cities followed by a comma and abbreviated state names. You will extract the last two characters of each string.
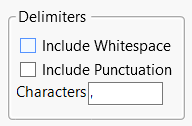
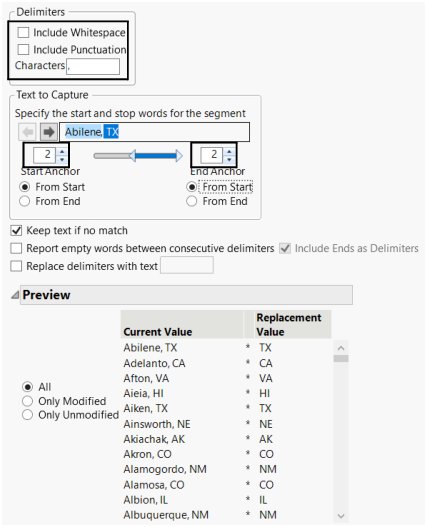
4. Deselect Include Whitespace and Include Punctuation at the top of the window.
Whitespace and punctuation will not be considered in the extraction.
5. Type a comma in the Characters box.
Figure 4.47 Specifying a Delimiter
The comma is used to extract the last two characters.
6. In the Extract Segment window, type “2” above Start Anchor and End Anchor.
The segment extraction begins and ends with the second word.
7. Make sure that From Start is selected for the Start Anchor and End Anchor options.
Figure 4.48 Extract Segment Window
Tip: In the Text to Capture section, click the left or right arrow to scroll through the values. This enables you to preview your settings.
8. In the Preview pane shown in Figure 4.48, notice that the replacement values contain only the state abbreviations.
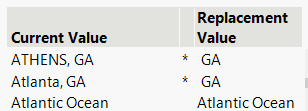
9. Scroll down in the Preview pane. Notice that the current value and replacement value for Atlantic Ocean are the same. The data couldn’t be split on a comma.
Figure 4.49 Data with No State
10. Click OK.
Entries with a matching state name are grouped.
Figure 4.50 Recoded City, State Name
Example of Applying Values from Mapping Columns
A column in a mapping data table contain values that you can use to recode a column in another data table. In this example, U.S. states in State Capitals.jmp are replaced with the state abbreviations defined in State Abbreviations.jmp (the mapping data table).
1. Select Help > Sample Data Library and open State Abbreviations.jmp and State Capitals.jmp.
2. In State Capitals.jmp, select the U.S. States column.
3. Select Cols > Recode.
4. Click the red triangle and select Advanced > Apply Mapping from Table.
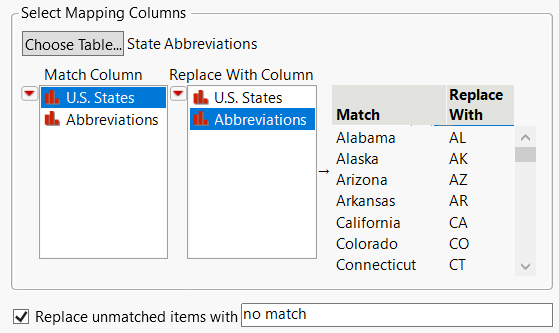
5. Click Choose Table, select State Abbreviations.jmp, and click OK.
6. In the Match Column box, select U.S. States.
7. In the Replace With Column box, select Abbreviations.
The Match and Replace With columns show the result of the mapping.
Figure 4.51 Matching and Replacing Columns
8. Select the Replace unmatched items with box and type “no match”.
The Preview section shows how the values are mapped. Scroll down and notice that the “no match” states are misspelled, so they don’t map to any state in the Abbreviations column.
Figure 4.52 Preview of Unmatched Columns
9. Click OK and then click Recode.
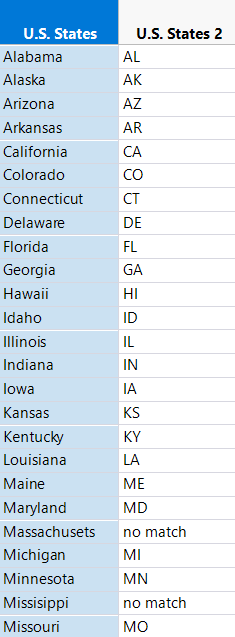
A new column of abbreviated state names appears in State Capitals.jmp in a new column called U.S. States 2.
Figure 4.53 Abbreviated State Names
To fix the entries that weren’t matched, see Example of Fixing Misspelled Words.
Example of Fixing Misspelled Words
You can use a data table as a dictionary to fix misspelled words. State Abbreviations.jmp contains columns of U.S. state names and abbreviations. State Capitals.jmp contains a few misspelled state names to mimic real data. This example shows how to fix the misspelled state names.
1. Select Help > Sample Data Library and open State Abbreviations.jmp and State Capitals.jmp.
2. In State Capitals.jmp, select the U.S. States column.
3. Select Cols > Recode.
4. Click the red triangle and select Advanced > Choose Closest.
5. Click Choose Table, select State Abbreviations, and click OK.
6. In the Match Column box, select U.S. States.
7. In the Preview pane, scroll down and notice that “Massachusets” will be replaced with “Massachusetts”, “Missisippi” will be replaced with “Mississippi”.
Figure 4.54 Misspelled State Replacement
8. Click OK and then click Recode.
A new column that contains the updated state names is added to the data table.
Example of Parsing as Numbers
The Parse as Numbers option turns character data into numeric data. This option is comparable to the JSL Num() character function.
Many formats are supported, such as date and times, currency, and scientific notations. If a format is unsupported, a missing value is displayed.
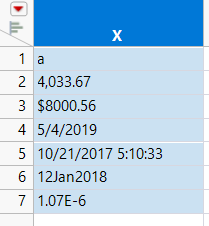
1. Open your data table and select a column that contains both numeric and character values.
Figure 4.55 Column of Numeric and Character Data
2. Select Cols > Recode.
3. Select Parse as Numbers from the red triangle menu.
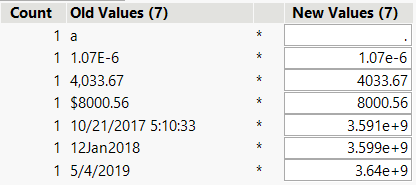
The old and new values are shown.
Figure 4.56 Preview of New Values
4. Click Recode.
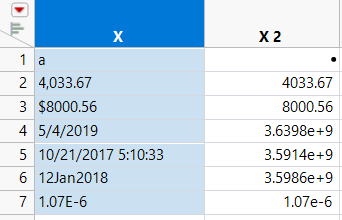
A new column with recoded values is added to the data table. The data type of the column is Numeric.
“a” couldn’t be parsed as a number, so a missing value is displayed in the new column for that value.
Figure 4.57 Parsed Numbers
Example of Applying Recoded Values to a Different Column
When you recode a column, you can save the recoded values in a script. When you import or run the script, the column that you originally recoded is recoded again.
Suppose that you want to recode a different column with the same values. Save the recoded values in a formula column and then edit the formula.
1. Enter the recoded values in the New Values column of the Recode window.
2. Select Formula Column from the list next to the red triangle menu.
3. Click Recode.
4. Right-click the formula column and select Formula.
5. In the formula, select the column that was recoded.
In this example, the sex column was recoded.
Figure 4.58 Recoded Column
6. In the Columns list, select the column that will replace sex.
In this example, you want to replace the sex column with gender, so select gender.
Figure 4.59 Selecting the gender Column

