JMP Live Help
Create visualizations with your data in JMP and share your analyses as posts in JMP Live. Anyone viewing these posts has the interactive capabilities of JMP to explore your data.
Find out more about these JMP Live topics:
Publish JMP Graphs and Reports
Create your graphs and reports in JMP and publish them as a JMP Live post. Posts can be private or shared with everyone or a group. If you publish several reports at once, they appear in a folder.
For details about how to publish your graphs and reports from JMP, see https://www.jmp.com/support/help/en/16.0/#page/jmp/save-and-share-reports.shtml.
Figure 1.1 JMP Live Thumbnails

Icons indicate the following information:
 |
The post is private; only you (and administrators) can see it
|
|
|
The post is shared with everyone
|
|
|
The post is shared with groups
|
|
|
The public post has been featured by an administrator
|
|
|
The post is a folder and can contain several reports
|
|
|
How many views the post has
|
|
|
How many user comments the post has
|
|
|
You have not bookmarked the post
|
|
|
You have bookmarked the post
|
Figure 1.2 Example of a JMP Live Post

Find out what you can do to JMP Live posts:
Open Posts
Tip: To navigate in JMP Live using a keyboard, use the Tab and Enter keys.
|
1.
|
Click an option under Home or click Featured:
|
|
–
|
My Dashboard contains your posts, posts of people that you follow, and posts in groups that you belong to.
|
|
–
|
Bookmarks contains posts that you have bookmarked.
|
|
–
|
All Posts contains all posts from your dashboard and all public posts (shared with everyone).
|
|
–
|
Featured contains any posts that are featured by a JMP Live administrator.
|
Figure 1.3 Home Options

|
2.
|
Click a post to open it.
|
A single post opens directly. If there are several posts, a folder opens and you can click the post that you want to see.
Tip: In a folder, use the navigation icons to move between posts.
|
3.
|
(Optional) To see detailed information about a post, click Details
 . From a thumbnail, click More . From a thumbnail, click More |
Figure 1.4 Open the Details Pane from a Thumbnail

Update Posts
In the Details pane, you can update posts that you own.
|
1.
|
In your post, click Details
or from a thumbnail, click More |
|
2.
|
Next to the section that you want to update, click Edit
|
You can update the title, thumbnail image, description, sharing settings, and more.
Tip: In the post description, you can use these HTML tags: <a href= "target">, <b>, <em>, <i>, <strong>, and <u>.
Figure 1.5 Update a Post’s Details

For more details, see these topics:
Share Posts
When you publish a JMP report, you choose how you want to share it. You can keep the post private, share it with everyone, or share it with specific groups (the post appears on both the group page and on the members’ Home pages). You can also change the sharing settings on a post or folder that you own in JMP Live.
Change the sharing settings on a post
|
1.
|
In your post, click Details
. |
|
2.
|
Next to Shared with, click Edit
|
|
3.
|
Select an option.
|
Tip: To stop sharing a post, set the option to Only Me. You can also quickly stop sharing a post with groups from a thumbnail by clicking  > Stop sharing with groups.
|
4.
|
Click Save.
|
Share posts on social media or with a link
In your post, click Share  or if you do not see the Share icon, click More > Share > Copy Link.
or if you do not see the Share icon, click More You can share a post in any of these ways:
|
•
|
On social media: such as Facebook, Twitter, LinkedIn
|
Note: These options do not appear if your JMP Live administrator has disabled them.
|
•
|
Email or copy a link
|
|
•
|
Copy embedded HTML code (for a web page)
|
Figure 1.6 Sharing Options

Tip: If you are sharing your own post, and it is private (only you can see it), you will not see all of these options. You must first share your post with everyone to see these options.
Comment on Posts
Tip: You can see how many user comments are on a post in the thumbnail next to the Comments icon  .
.
To see or add comments to a post or folder:
|
1.
|
In a post or folder, click
|
Any existing comments appear.
Note: In addition to user comments, you might also see system comments, which are mainly informative. System comments are not included in the comment count.
|
2.
|
In the Write your comment here box, enter a comment. To respond to an existing comment, click Reply and enter a comment.
|
Tip: You can use basic HTML, such as bold (<b> or <strong>), italics (<i> or <em>), preformatted (<pre>), or underline (<u>). You can also use markdown, such as headings (#, ##, etc.), bold (**text**), and italics (*text*).
|
3.
|
Click Submit.
|
|
4.
|
(Optional) To edit or delete your comments, click More
|
Assuming that you do not turn off these notifications, you get a notification in these situations:
|
•
|
If someone adds or replies to a comment on a post that you own
|
|
•
|
If someone replies to a comment that you made
|
|
•
|
If someone deletes a comment that you made
|
Bookmark Posts
If you want to quickly access a post or a folder, you can bookmark it in JMP Live.
In a post or folder, click Bookmark  or if you do not see the Bookmark icon, click More > Bookmark. To see all your bookmarked posts and folders, at the top, click Home > Bookmarks.
Figure 1.7 Bookmarks Page

Tip: On the Bookmarks page, updated posts have a green dot next to their time stamp. After you view the post, the green dot disappears.
To remove a bookmark on a post or folder, click Unbookmark  or if you do not see the Unbookmark icon, click More > Unbookmark.
Move Posts
You can move your JMP Live posts into a folder that you own. You can also move posts into a folder in a group that you are a member of. See Manage Group Posts.
|
1.
|
At the top right, click your user icon > My Profile.
|
|
2.
|
Under Posts, hover over a post and click the check mark at top. Repeat for any other posts you want to move.
|
|
3.
|
Next to Move to folder, click the arrow and select a folder.
|
|
4.
|
Click Move to folder
|
Remove a post from a folder
|
1.
|
In a folder, hover over a post and click the check mark at top. Repeat for any other posts you want to remove.
|
|
2.
|
Click Remove from folder
|
The posts are now stand-alone.
Delete Posts
To delete a single post or a folder that you own, from a post, folder, or thumbnail, click More > Delete post.
Figure 1.8 Delete a Post

Delete several posts or folders
|
1.
|
At the top right, click your user icon > My Profile. Or, if the posts you want to delete are in a folder, open the folder.
|
|
2.
|
Hover over a post and click the check mark at top. Repeat for any other posts you want to delete.
|
|
3.
|
Click Delete selected posts
 . . |
Flag Posts or Users
If you think a post or user profile contains inappropriate content, you can flag it to the administrator:
|
1.
|
Do one of the following actions:
|
|
–
|
To flag a post: On a thumbnail or from a post, click More
|
|
–
|
To flag a user profile: From a user profile, click More
|
|
2.
|
(Optional) Add comments to explain the issue.
|
|
3.
|
Click Submit.
|
Here is what happens when a post or user profile is flagged:
|
1.
|
JMP Live administrators determine whether a flagged post should be cleared (the flag removed), hidden, or removed, and whether a flagged user profile should be cleared or hidden.
|
|
2.
|
If the administrator hides or removes a flagged post, or hides a flagged user profile, a notification is sent to the owner of the post or the flagged user (if they have not turned off notifications for flags). For hidden posts or users, the owner or user can attempt to fix the problem and let the administrator know. The administrator can then reinstate the post or user if they approve.
|
Change the Theme in Posts
To temporarily change the page appearance while you are viewing a post, at the top right, click More > Themes.
Figure 1.9 Change the Page Theme

Show Log Messages for Posts
In a post, you can click More > Show Log Messages to see error messages from the server, connection messages, and any messages from the client.
Change the Layout of Posts
In a folder, click Display  to change the layout of the posts.
Interact with Data and Graphs
Find out what you can do with JMP Live data and graphs:
See Data Values or Descriptions
|
1.
|
Click or tap Identify Objects
 |
|
2.
|
Hover over or tap a data point or a calculation.
|
Figure 1.10 See a Data Point’s Values

Figure 1.11 See an Explanation of a P-Value Calculation

Tip: To hide or show reports and graphs, at the right of a title, click or tap the arrow.
Select Data and Navigate in Graphs
How you select data in a graph (points, bars, and so on) depends on whether you are on a computer or a mobile device. The default mode is to select a single data point.
|
On a computer
|
On a mobile device
|
|
|---|---|---|
|
Select or deselect a single data point
|
Click a data point.
|
Tap Select One Object
 then tap a data point. then tap a data point. |
|
Select or deselect multiple data points
|
Hold down the Shift key and click multiple data points.
|
Tap Select Multiple Objects
 then tap multiple data points. then tap multiple data points. |
|
Identify a single data point
|
Hover over a single data point.
|
Tap Identify Objects
 then tap a data point. then tap a data point. |
|
Select data points by brushing
|
Click and drag a rectangle over data points. Click and drag in the center to move the rectangle, or drag the corners to resize it.
|
Tap Select Multiple Objects
then draw a rectangle over the data points. Drag the center to move the rectangle, or drag the corners to resize it. |
|
Zoom
|
Click Magnifier
To zoom out, double-click in the graph, or press Shift and click in the graph.
You can also use the scroll wheel on your mouse to zoom in and out. If you are not in Zoom mode, press Alt before zooming with the scroll wheel.
|
Tap Magnifier
|
|
Pan in a graph
|
Click Grabber
|
Tap Grabber
|
|
Pan axes
|
Click the middle of an axis and drag.
|
Touch the middle of an axis and drag.
|
|
Scale axes
|
Click at either end of an axis and drag.
|
Touch either end of an axis and drag.
|
|
Return axes or graphs to their original state
|
Press Alt and double-click in the graph, or click More
 or or  > Reset All Axes. > Reset All Axes. |
Double-tap in the graph, or tap More
> Reset All Axes. |
Note: In interactive HTML, some graphs do not support panning and zooming. Panning and zooming is fully supported in JMP Live.
See Linked Data
If your JMP report contains multiple graphs, data in all graphs are linked. So if you select data, it is highlighted in all associated graphs.
Figure 1.12 Select Data in Linked Graphs

In this example, a histogram bar in the top graph is selected. The corresponding rows are highlighted in the scatterplot and in the marginal histogram.
Exclude and Hide Data
Once you have selected data, you can exclude it from report calculations and hide it in graphs. Reports and graphs automatically update.
Figure 1.13 Report Menu Options

To exclude and hide data, use the options in the More menu on the right:
Note: If the report contains a Local Data Filter, most of these options do not appear, since you use the Local Data Filter instead.
|
•
|
Exclude and Hide Selected Rows: Excludes and hides selected data.
|
|
•
|
Include and Show All Rows: Includes and shows any excluded or hidden data.
|
|
•
|
Invert Row Selection: Changes the current selection to the deselected data.
|
Filter Data
If the original JMP report included a Local Data Filter, you can use the filter to focus on specific data and see the impact on graphs and reports.
Figure 1.14 Filter Data in Graphs

In this example, the filter choices are showing only females between 51 and 63 inches tall who are between the ages of 12 and 14.
Tip: If several categories are selected and you want to select a single category, click the category (not the check box).
Local Data Filter Options
Conditional Filtering
Limits the options in the Local Data Filter by condition. For more information, see Using JMP.
Note: This option does not appear if there is more than one OR group, or if the columns are not hierarchical.
Invert filter
Inverts currently selected filters.
Select filtered rows in graphs
Selects all filtered rows in graphs.
Show filtered rows in graphs
Shows all filtered rows in graphs.
Include filtered rows in calculations
Only filtered rows are included in report calculations.
Update Data
If the data associated with a post changes, you can update the data in JMP Live without republishing the post. The post updates automatically once the data is updated.
JMP Live administrators and the publisher of a post can update data.
|
1.
|
In a post, click Details
or Warnings |
|
2.
|
Under Data, click Expand to open the pane.
|
|
3.
|
Click Manage.
|
|
4.
|
Click Update Data.
|
|
5.
|
Click in the Select data tables box, or next to a data table, click Update.
|
|
6.
|
Navigate to the updated data table on your computer and click Open.
|
|
7.
|
Click Submit.
|
|
8.
|
(Optional) To undo the update and revert to the previous version, click Undo Last Update, and then click Revert.
|
Switch Data Columns
If the original JMP report included a Column Switcher, you can quickly analyze different variables without re-creating the analysis. When you choose a different variable in JMP Live, the analyses automatically recalculate using the new variable.
In this example using Fisher’s Iris data, the JMP report includes a Column Switcher and a Local Data Filter.
Figure 1.15 Initial Selections

Initially, Petal length (the original column) is selected in the Column Switcher. All species are showing in the Local Data Filter. These selections are reflected in the graph and calculations.
Figure 1.16 Updated Selections

Here, Petal width is selected in the Column Switcher, and only the species versicolor is selected in the Local Data Filter. The graph and calculations update to reflect these selections.
Control Chart Warnings
Posts that contain control charts can generate notifications if there are control chart warnings. Notifications are sent to the publisher of the post and members of any groups that the post is shared with (if warnings are enabled for the group). See JMP Live Groups.
Depending on individual settings, notifications appear in JMP Live and via email. Email notifications contain more detail about the warnings.
Tip: At an individual level, you can specify which notifications you get and how often. See Manage Notifications on Posts.
When you publish a JMP report that contains a control chart, you can specify whether to enable warnings. You can also enable warnings from a JMP Live post.
Enable or disable warnings
|
1.
|
In a post that contains a control chart, click Details
or Warnings |
|
2.
|
Under Warnings, click on or off.
|
|
3.
|
(Warnings on only) If the post has active warnings, choose whether to notify people about these warnings.
|
See details about warnings
|
1.
|
In a post or from a thumbnail, click Warnings
|
|
2.
|
Under Warnings, click Expand to open the pane.
|
Figure 1.17 Example of Control Chart Warnings

|
3.
|
(Optional) For more detailed information, click Open Log.
|
To copy the log information, click Copy  .
.
Download Data or Scripts
When you publish a JMP report to JMP Live, you can specify whether to allow users to download the data and script associated with the report. You can also change the download setting from a JMP Live post.
Change the download setting
Note: You can change the download setting from a JMP Live post only if you published the data when you published the JMP report.
|
1.
|
In a post, click Details
. |
|
2.
|
Next to Allow download, click Edit
|
|
3.
|
Select or deselect Allow download.
|
|
4.
|
Click Save.
|
Download data or scripts
|
1.
|
In a post, click Details
. |
|
2.
|
Under Data or Script, click Download
|
|
3.
|
(Optional) To copy a script, click Copy
|
The Script pane and download options do not appear if the publisher chose not to allow downloading.
Customize Graphs
Note: These customizations are temporary while you are in the post.
Use the options in the More menu next to a report to customize graph elements.
menu next to a report to customize graph elements.
Figure 1.18 Change the Marker Size

The options in this menu can vary depending on the type of graph or JMP platform. For example:
|
•
|
In scatterplots and histograms, you can change the marker size.
|
|
•
|
In profilers, you can reset the profiler to its original state, or re-scale the vertical axis to include the response.
|
|
•
|
In data filters, you can choose how you want to filter data.
|
|
•
|
In bubble plots, you can change the appearance of the bubbles, add a time label, or change the aggregation method.
|
JMP Live Groups
There are different types of groups in JMP Live:
|
•
|
Personal groups: Users and administrators can create personal groups. Personal groups can be owned by the creator or administrators can change the owner. Only people that you add to a personal group can see the group and its posts.
|
|
•
|
Open, Closed, or Hidden groups: Only administrators can create these types of groups.
|
|
–
|
Open: Anyone can find the group, join the group, and see the posts and members.
|
|
–
|
Closed: Anyone can find the group, but only members can see the posts and members. People can request to join the group.
|
|
–
|
Hidden: Only members can find the group and see posts and members.
|
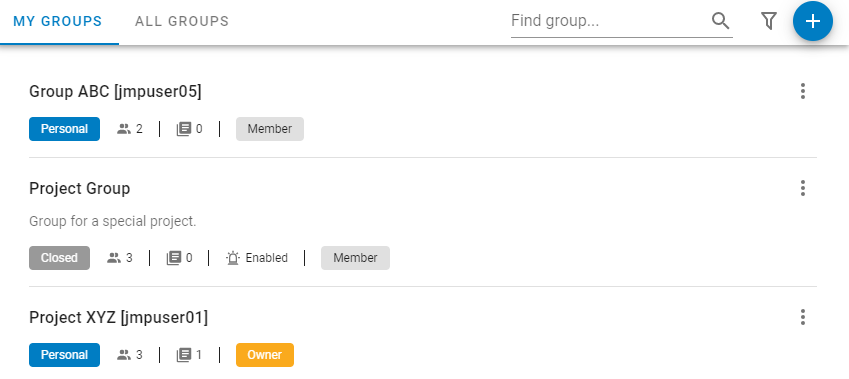
On the Groups page, you see My Groups or All Groups:
|
•
|
My Groups: Shows all groups that you are a member of.
|
|
•
|
All Groups: Shows all groups that you are a member of and all open and closed groups that you can join or ask to join.
|
|
•
|
You can also find a group, filter by a group type, or create a new group.
|
Figure 1.19 My Groups Page
When you add someone to a group, they are added automatically. They can choose to leave the group by clicking More > Leave group.
Find out what you can do in JMP Live groups:
Create Groups
|
1.
|
Click Groups.
|
|
2.
|
At top, click Create
|
Figure 1.20 Create a New Group
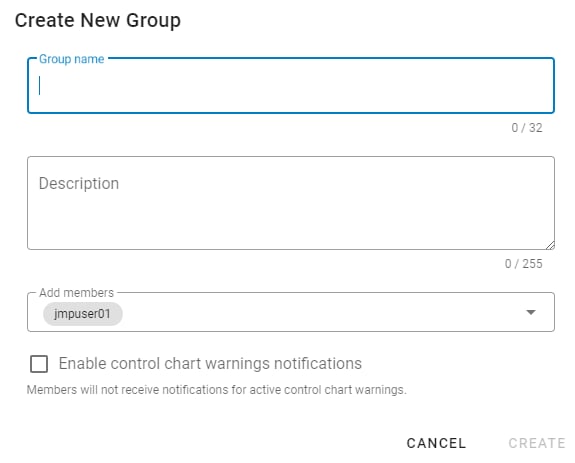
|
3.
|
Name the group.
|
|
4.
|
(Optional) Add a group description.
|
|
5.
|
Under Add members, click the down arrow and select user names. To find a user name, start entering it. Clickable suggestions appear as you type.
|
|
6.
|
(Optional) Choose whether members get notifications if there are active warnings in posts that contain control charts.
|
|
7.
|
Click Create.
|
|
8.
|
(Optional) To share posts with groups, see Share Posts.
|
Add Members
|
1.
|
Click Groups > My Groups.
|
|
2.
|
Next to a group, click More
|
|
3.
|
Click the down arrow and select user names. To find a user name, start entering it. Clickable suggestions appear as you type.
|
|
4.
|
Click Add.
|
Remove Members
|
1.
|
Click Groups > My Groups.
|
|
2.
|
Next to a group, click More
|
|
3.
|
Click Manage Group.
|
Note: You must be an administrator of the group to see this option and remove members.
|
4.
|
Select the box next to the name of the members that you want to remove.
|
|
5.
|
Click Delete
and click Confirm. |
Change Member Permissions
|
1.
|
Click Groups > My Groups.
|
|
2.
|
Next to a group, click More
|
Note: You must be an administrator of the group to see this option and manage members.
|
3.
|
Select the check boxes to set these permissions:
|
|
–
|
Can Publish: Member can publish posts to the group.
|
|
–
|
Can Remove Posts: Member can remove posts from the group. Removing a post makes the post visible to only its original owner, unless the post is shared with another group.
|
|
–
|
Group Admin: Member is a group administrator. Administrators can add or remove members, change member permissions, remove posts, or delete the group.
|
Edit Groups
|
1.
|
Click Groups > My Groups.
|
|
2.
|
Next to a group, click More
|
|
3.
|
Update the group name or description.
|
|
4.
|
Click Save.
|
Delete Groups
|
1.
|
Click Groups > My Groups.
|
|
2.
|
Next to a group, click More
|
|
3.
|
Click Confirm.
|
When you delete a group, posts shared with the group are not deleted:
|
•
|
If the post is shared with the deleted group only, it becomes private to the owner of the post.
|
|
•
|
If the post is shared with other active groups, it is removed only from the deleted group.
|
Manage Group Posts
For groups that you are a member of, you can move your JMP Live posts into group folders or you can remove your posts from groups.
Move your posts into group folders
If you are a member of a group and can publish to the group, you can move your JMP Live posts into a group folder.
|
1.
|
At the top right, click your user icon > My Profile.
|
|
2.
|
Hover over posts and click the check mark.
|
|
3.
|
Next to Move to folder, click the arrow and select a group folder.
|
|
4.
|
Click Move to folder
|
Note: If a folder containing your posts is removed from a group, your posts remain in the folder until you remove them. For details about how to remove posts from folders, see Move Posts.
Remove posts from groups
You can remove your own posts from a group that you are a member of. To remove others’ posts from a group, you need permission to remove posts from the group or you need to be a group administrator.
|
1.
|
Click Groups > My Groups.
|
|
2.
|
Click a group name.
|
|
3.
|
Hover over posts and click the check mark.
|
|
4.
|
Click Remove from group
|
Search for Posts, Users, or Groups
To search all of JMP Live, enter a keyword in the search box at top right. Click Posts, Users, or Groups to see specific types of results.
Figure 1.21 Search by Keyword

Here are some things that you can do from the search results:
Posts
|
•
|
To open a post, click the title or image.
|
|
•
|
To open the post author’s profile, click their user name.
|
|
•
|
To bookmark a post, click Bookmark
|
|
•
|
To flag a post as inappropriate, click More
|
|
•
|
To delete a post that you own, click More
|
Users
|
•
|
To follow a user, click Follow. If you follow someone, their posts appear on your dashboard.
|
|
•
|
To open a user’s profile, click their user name.
|
Groups
|
•
|
To join a group, click Join.
|
|
•
|
To leave a group, click More
|
|
•
|
If you are a group administrator, click More
|
|
–
|
Add or manage members
|
|
–
|
Enable or disable warnings on control charts shared with a group
|
|
–
|
Edit a group’s name and description
|
|
–
|
Delete a group
|
|
–
|
You can also click Groups in the top navigation bar and enter a group in Find group.
|
Use Filters
You can use filters to narrow your searches on posts or groups.
Filter Posts
|
1.
|
Click Home and click My Dashboard, Bookmarks, or All Posts, depending on where you want to search.
|
|
2.
|
At the top right, click Filters
|
Figure 1.22 Filter Options on Posts

|
3.
|
Enter any combination of keywords, user or group names, or dates.
|
|
4.
|
Click outside of the Filters pane to see the results.
|
|
5.
|
To stop filtering, click Clear Filters.
|
Filter Groups
|
1.
|
Click Groups and click My Groups or All Groups, depending on where you want to search.
|
|
2.
|
At the top right, click Filters
|
Figure 1.23 Filter Options on Groups

|
3.
|
Enter keywords in the group name. You can also select a group type.
|
|
4.
|
Click outside of the Filters pane to see the results.
|
|
5.
|
To stop filtering, click Clear Filters.
|
Edit Your Profile or Account
Edit your profile
|
1.
|
At the top right, click your user icon > My Profile.
|
|
2.
|
Click Edit
|
|
3.
|
Change your picture or display name.
|
|
4.
|
Click Save.
|
Verify your account details
|
1.
|
At the top right, click your user icon > Settings.
|
|
2.
|
Verify your login name or the email associated with your account.
|
|
3.
|
(Local authentication method only) Verify or change your password.
|
|
4.
|
Change your notification settings. See Change Notification Settings.
|
|
5.
|
To use JSL to create and publish JMP Live reports, you need an API key. Click Generate API Key and make a note of your key. For details, see Get an API Key.
|
Figure 1.24 Edit Your Account Settings

Manage Notifications on Posts
Notification Types
In JMP Live, depending on your notification settings, you might be notified when these things happen:
|
•
|
someone new starts following you
|
|
•
|
someone adds or replies to a comment on one of your posts
|
|
•
|
someone replies to or deletes a comment that you made
|
|
•
|
a request that you made to join a group is approved or denied, or you are added or removed from a group
|
|
•
|
someone requests to join a closed group that you are an administrator of
|
|
•
|
someone flags a post that you created or flags your user profile
|
|
•
|
an administrator deletes one of your posts, or a folder that includes one of your posts, or if one of your posts is removed from a group
|
|
•
|
a control chart that you published or that is shared with a group that you are a member of has warnings
|
Open or act on notifications
To see your notifications, click Notifications  . From here, you can perform the following actions:
|
•
|
Click a notification to take you to its source. For example, if someone comments on your post, the post opens so that you can see the comment.
|
|
•
|
Click More
|
|
•
|
Click Mark All as Read
|
|
•
|
Click Clear All
|
|
•
|
Click Settings
|
|
•
|
Click See All to see all notifications in a larger window.
|
Change Notification Settings
On the Notification Settings page, you can choose which types of notifications you want to receive and how often you want to get email notifications.
|
•
|
Stop receiving a notification: Under On JMP Live, click the switch to off (green).
|
|
•
|
Change how often you get email notifications: Under E-mail, choose a frequency.
|
Figure 1.25 Example of Notification Settings
