Create a Subset Data Table
You can produce a new JMP data table that is a subset of all rows and columns, only highlighted rows and columns, or randomly selected rows from the active JMP data table.
To create a subset
1. Select Tables > Subset.
Figure 6.2 The Subset Window
2. Specify the content that you want to subset. Select any combination of the following:
– Subset by (the levels within selected columns)
– Rows (all, selected, or random)
– Columns (all or selected)
In Figure 6.2, the sex column will be subset.
3. Customize your subset table further using the additional options.
4. Click OK to create the subset table.
Subset Options
Subset by
Subsets by the levels of a column. Select Subset by and then select the columns that you want to categorize for the subset.
Consider the fact that many new data tables might be created. A new data table appears for each level of the column that you specified in the Subset window.
All Rows
Creates a subset table that contains all rows from the active table.
Selected Rows
Creates a subset table that contains only the selected rows from the active table. Selected by default.
Random - sampling rate
Creates a subset table whose data is a random proportion of the active data table. Enter the proportion of the sample that you want in the text box. For example, if you want a random 50% of the data to be included in the new table, enter 0.5 in the text box.
Random - sample size
Creates a subset table whose data is a random sample of the active data table. Enter the size of the sample that you want in the text box. For example, if you want 16 random rows to be included in the new table, enter 16 into the text box.
If you select a random sample that is the entire source table, the result is a random shuffle of the rows of the data table. If you specify columns to stratify, the result is a random shuffle of each of the rows for each group. See Stratified Subsets.
All columns
Creates a subset table that contains all columns from the active table. Selected by default.
Selected columns
Creates a subset table that contains only the selected columns from the active table.
Keep by columns
Retains the column that you subsetted by in the output data tables.
Output table name
Specifies the name of the subset table.
Link to original data table
Links the subset table to the original table. When you change values in one table, the other table is updated.
Copy formula
Includes formulas from the original table in the output columns. Include all columns needed for the calculation of the formula. Selected by default.
Suppress formula evaluation
Prevents JMP from evaluating columns’ formulas when the new table is created. Selected by default.
Save Default Options
Saves your current settings.
Note: Save Default Options only saves the settings for Selected Rows, Selected Columns, Linked to original data table, Copy formula, and Suppress formula evaluation.
Keep dialog open
Keeps the Subset window open after you click OK.
Save Script to Source Table
Saves a script to the original data table that enables you to subset the data again using the same settings.
Auto Refresh
Automatically refreshes the table Preview. If the Preview takes too much time to complete, you can deselect this option and click the Refresh button  . Selected by default.
Preview with Random Subset
Select this option for very large tables that can cause delays as the Preview pane is refreshed. Deselected by default.
Stratified Subsets
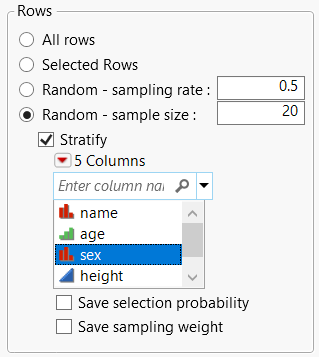
In the JMP Subset window, if you specify a sample size and add stratification columns, the sample size represents the size per stratum, rather than the size of the whole subset.
Figure 6.3 Stratified Subsets
For stratified random samples with a specified sample size, two columns can be saved: Selection Probability and Sampling Weight. Check the corresponding check box to save these columns.

