Tip: When you have completed the Factors outline, consider selecting Save Factors from the red triangle menu. This saves the factor names, roles, changes, and values in a data table that you can later reload.
Figure 4.18 Factors Outline
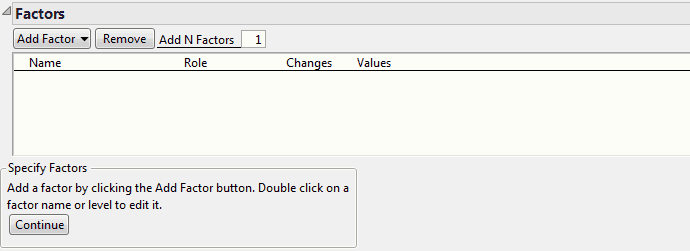
Adds multiple factors. Enter the number of factors to add, click Add Factor, and then select the factor type. Repeat Add N Factors to add multiple factors of different types.
The name of the factor. When added, a factor is given a default name of X1, X2, and so on. To change this name, double-click it and enter the desired name.
Indicates whether the factor levels are Easy, Hard, or Very Hard to change. Click on the default value of Easy to change it. When you specify factors as Hard or Very Hard to change, your design reflects these restrictions on randomization. A factor cannot be designated as Very Hard unless the Factors list contains a factor designated as Hard. The Factor Changes column property is saved to the data table. For more details, see Changes and Random Blocks.
|
•
|
To remove a factor level, click the value, click Delete, and click outside the text box.
|
|
•
|
To modify the entry under Changes, click the value in the Changes column and select the appropriate entry.
|
|
•
|
To edit a value, click the value in the Values column.
|
To choose a factor type, click Add Factor in Custom Design.
The default values for a discrete numeric factor with k levels, where k > 2, are the integers 1, 2, ..., k. The default values for a discrete numeric factor with k = 2 levels are -1 and 1. Replace the default values with the settings that you plan to use in your experiment.
In the assumed model, the effects for a discrete numeric factor with k levels include polynomial terms in that effect through order k-1. For k greater than 6, powers up to the 5th level are included. The Estimability for polynomial effects (powers of two or higher) is set to If Possible. This allows the algorithm to use the multiple levels as permitted by the run size. If the polynomial terms are not included, then a main effects only design is created. For more details about how discrete numeric factors are treated in the assumed model, see Model.
Either numeric or character data types. The values of a covariate factor are measurements on experimental units that are known in advance of an experiment. Covariate values are selected to ensure the optimality of the resulting design relative to the optimality criterion. See Changes and Random Blocks and Covariates with Hard-to-Change Levels.
JMP obtains the covariate factors and their values from a data table that contains the measured covariates for the available experimental units. Make this data table your current data table. When you select Covariate, a list of columns in the current data table opens, and you select the columns containing covariates from this list. When you make your design, the design table includes a Covariate Row Index column to indicate the row from the covariate table that corresponds to each experimental run.
Continuous factors that represent ingredients in a mixture. The values for a mixture factor must sum to a constant. By default, the values for all mixture factors sum to one. To set the sum of the mixture components to some other positive value, select Advanced Options > Mixture Sum from the red triangle menu. The Mixture column property is saved to the data table.
For designs with Hard or Very Hard to change factors, Custom Design strives to find a design that is optimal, given your specified optimality criterion. See Optimality Criteria. For details about the methodology used to generate split-plot designs, see Jones and Goos (2007). For details relating to designs with hard-to-change covariates, see Jones and Goos (2015).
Figure 4.19 shows a split-split-plot scenario, using the factors from the Cheese Factors.jmp sample data table (located in the Design Experiment folder).

If you assign Changes as Hard for one or more factors, but no factors are assigned Changes that are Very Hard, a categorical factor called Whole Plots is added to the design. This situation results in a split-plot design:
|
•
|
Each level of Whole Plots corresponds to a block of constant settings of the hard-to-change factors.
|
|
•
|
|
•
|
The factor Whole Plots is assigned the Design Role column property with a value of Random Block.
|
When you designate Changes as both Hard and Very Hard, categorical factors called Subplots and Whole Plots are added to the design. This situation results in a split-split-plot design:
|
•
|
Each level of Subplots corresponds to a block of constant settings of the hard-to-change factors.
|
|
•
|
Each level of Whole Plots corresponds to a block of constant settings of the very-hard-to-change factors.
|
|
•
|
The Model script in the design table applies the Random Effect attribute to the Whole Plots and Subplots effects.
|
|
•
|
In the design table, both of the factors Whole Plots and Subplots are assigned the Design Role column property with a value of Random Block.
|
To construct a two-way split-plot design, select the Hard to change factors can vary independently of Very Hard to change factors option under Design Generation. The option crosses the levels of the hard-to-change factor with the levels of the very-hard-to-change factor. See Two-Way Split-Plot Designs.
Use the Number of Whole Plots and Number of Subplots text boxes to specify values for the numbers of whole plots or subplots. These boxes are initialized to suggested numbers of whole plots and subplots. For information about how these values are obtained, see Numbers of Whole Plots and Subplots.
For more details and scenarios that illustrate random block split-plot, split-split-plot, and two-way split-plot designs, see Designs with Randomization Restrictions. For details about designs with hard-to-change covariates, see Covariates with Hard-to-Change Levels.
For each factor, various column properties are saved to the data table. You can find details about these column properties and related examples in Column Properties.
Each factor is given the Design Role column property. The Role that you specify in defining the factor determines the value of its Design Role column property. When you add a random block under Design Generation, that factor is assigned the Random Block value. The Design Role property reflects how the factor is intended to be used in modeling the experimental data. Design Role values are used in the Augment Design platform. For details, see Design Role in Column Properties.
Each factor is assigned the Factor Changes column property. The value that you specify under Changes determines the value of its Factor Changes column property. The Factor Changes property reflects how the factor is used in modeling the experimental data. Factor Changes values are used in the Augment Design and Evaluate Design platforms. For details, see Factor Changes in Column Properties.
If the Role is Continuous, Discrete Numeric, a continuous Covariate, or Uncontrolled, the Coding column property for the factor is saved. This property transforms the factor values so that the low and high values correspond to –1 and +1, respectively. For details, see Coding in Column Properties.
If the Role is Categorical or Blocking, the Value Ordering column property for the factor is saved. This property determines the order in which levels of the factor appear. For details, see Value Ordering in Column Properties.