|
1.
|
Select File > New > Database Query, connect to the database, and select the SQBTest schema. (See Connect to a Database for details.)
|
|
3.
|
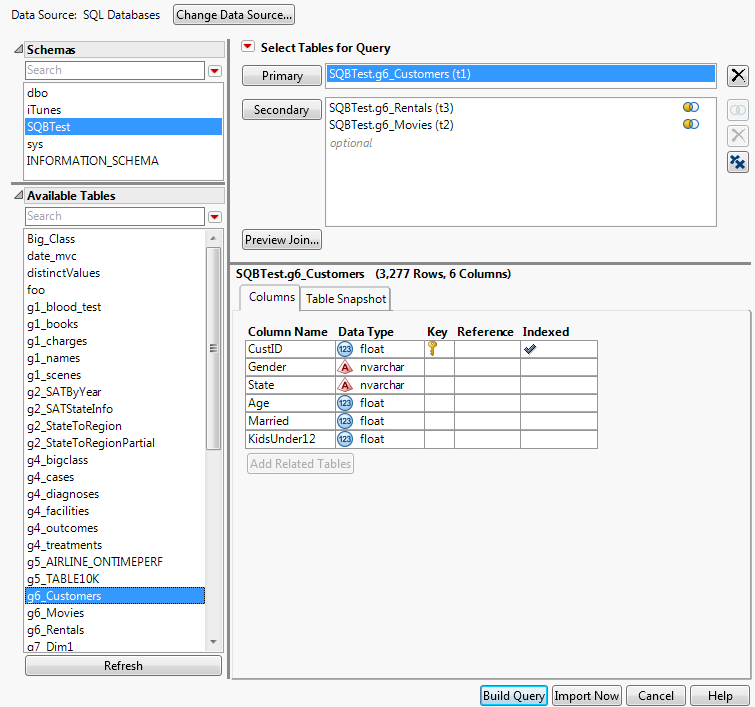
In the Select Tables for Query window, select g6_Customers from the Available Tables list, and then click Primary.
|
The Columns tab shows that CustID is the primary key. The data is indexed, which speeds up the query.
|
4.
|
The Left Join icon  indicates that the tables were automatically joined (Figure 2.30). CustID is the primary key in g6_Customers and matches a foreign key in one of the other tables.
indicates that the tables were automatically joined (Figure 2.30). CustID is the primary key in g6_Customers and matches a foreign key in one of the other tables.
Tip: After you add a primary or secondary table, click Add Related Tables to add tables that have matching columns. The button is unavailable when no related tables are found or when a primary or secondary table is not selected.
Figure 2.30 shows the completed window.
Figure 2.30 Selecting Primary and Secondary Tables
|
5.
|
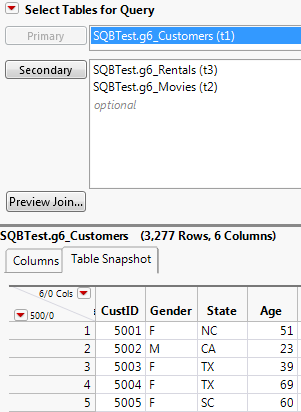
Figure 2.31 Table Snapshot Tab
|
6.
|
Below the primary and secondary tables, click Preview Join to see a preview of the table that was created from the specified joins.
|
|
•
|
The
 icon next to a secondary table indicates that the table is not joined in the query. Click the Edit Join button icon next to a secondary table indicates that the table is not joined in the query. Click the Edit Join button  to specify the columns to join. If you cannot find columns to join, click the Remove button to specify the columns to join. If you cannot find columns to join, click the Remove button  to remove the table. See Edit the Conditions for Joining Tables for details. to remove the table. See Edit the Conditions for Joining Tables for details. |
|
•
|
Click Change Data Source to query a different schema or database.
|
|
•
|
|
•
|
If you try to query a Microsoft Excel file that has more than 255 columns, only 255 columns are imported. Instead, select File > Open to open the Excel file in the Excel Import Wizard, and save the file as a data table.
|
If there are no keys, or when column names do not match, click Edit Join to specify the columns to join.
to specify the columns to join.|
1.
|
Select File > New > Database Query, connect to the database, and select the SQBTest schema. (See Connect to a Database for details.)
|
|
2.
|
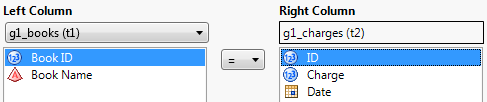
In the Select Tables for Query window, select g1_books as the Primary table and g1_charges as the Secondary table.
|
|
3.
|
|
4.
|
In the Left Column list, select g1_books.
|
|
5.
|
Select Book ID from the Left Column box.
|
|
6.
|
Select ID from the Right Column box.
|
Figure 2.32 The Edit Condition Window
|
8.
|
Click Next.
|
To do a full join and import all rows, you would select Include non-matching rows from g1_charges. If only one of the non-matching options is available, the database does not support full joins.
|
9.
|
Click OK.
|
|
•
|
Deselect Auto join Database Tables from the Select Tables for Query red triangle menu above the primary table.
|
|
•
|
If you frequently query large databases, deselect Automatically join tables added to a query in Preferences > Query Builder to prevent memory issues.
|