Transpose Rows and Columns
You can create a new JMP table that is a transposed version of the active data table. The columns of the active table are the rows of the new table, and its rows are the new table’s columns.
When you transpose columns, you do the following:
• Select the columns to be transposed.
• Specify a “label” column, from which the new columns get their names (optional).
• Specify “by” columns, which tells JMP to transpose data within groups (optional).
Note: Columns that you want to transpose must have the same data type. Also, if columns contain value labels, transposing uses the actual data values, not the value labels. (See Value Labels.)
To transpose rows and columns, follow these steps:
1. Open a data table that contains the rows and columns that you want to transpose.
2. Select Tables > Transpose.
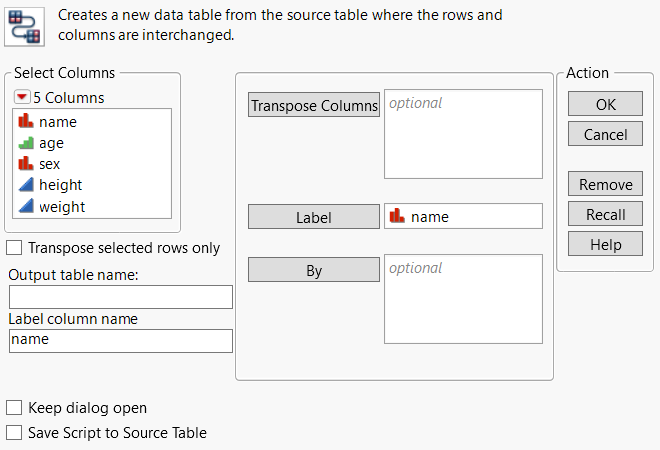
Figure 6.15 Transpose Window
3. Highlight the column name(s) you want to transpose in the Select Columns box on the left.
4. Click Transpose Columns.
5. (Optional) Customize your transposed table further using the additional options.
6. Click OK.
Transpose Options
Select Columns Filter Menu
Contains options to search and filter through columns. See Column Filter Menu.
Transpose selected rows only
Transposes only rows that are currently highlighted in the active table.
Output table name
(Optional) Specifies the name of the subset table.
Label column name
(Applicable only if you have specified a Label column.) Specifies an alternative name for the Label column. Otherwise, the default column name is Label.
Keep dialog open
Keeps the Transpose window open after you click OK.
Save Script to Source Table
Saves a script to the original data table that enables you to transpose the data again using the same settings.
Transpose Columns
Adds the columns that you want to transpose.
Label
Uses the data from a column in the original table as the column names in the new table. Follow these steps:
1. Highlight a column from the Select Columns box on the left.
2. Click Label. The column name appears in the Label box.
The default column name is Label. You can specify an alternative name for the column using the Label column name option. Only one column is created for each distinct value in the label column. Therefore, if there are duplicate values in the label column, JMP creates only one column for the duplicated value using the value from the last duplicated row.
By
Organizes the transposed columns into groups based on the columns that you put into the By box. Follow these steps:
1. Highlight the column name(s) in the Select Columns box whose values you want to see as a group.
2. Click By.
Table 6.1 describes the rules that apply to transposing.
If | Then |
|---|---|
The original table has columns but no rows | The new table contains one column that lists those column names. |
The original table has one column and it is assigned to Label | Its values become the column names in the transposed table. |
The original table has multiple columns and contains a label column | JMP automatically inserts the label column into the Label box when the window appears. You can remove this column if you do not want it to appear. |
There is no label column in the original table | The column names in the transposed table are Row 1, Row 2, …, Row n where n is the number of rows in the original table. |
