To begin, select DOE > Screening Design, or click the Screening Design button on the JMP Starter DOE page. Then, see the following sections for each step to create a screening design:
|
‒
|
Display and Modify Design, if you choose a standard design from the Design Table
|
|
‒
|
Design Generation, if you choose to generate a main effects screening design
|
Most of the red triangle options for the screening platform are described in Custom Design Options in Custom Designs. Three options are specific to screening designs:
|
1.
|
To enter one response at a time, click and then select a goal type. Possible goal types are Maximize, Match Target, Minimize, or None.
|

Tip: To quickly enter multiple responses, click the Number of Responses button and enter the number of responses that you want.
The following description explains the relationship between the goal type (step 3 in Entering Responses) and the lower and upper limits (step 4 in Entering Responses):
|
•
|
For responses such as strength or yield, the best value is usually the largest possible. A goal of Maximize supports this objective.
|
|
•
|
The Minimize goal supports an objective of having the smallest value be the most desirable, such as when the response is impurity or defects.
|
|
•
|
The Match Target goal supports the objective when the best value for a response is a specific target value, such as dimensions of a manufactured part. The default target value is assumed to be midway between the lower and upper limits.
|
When computing overall desirability, JMP uses the value that you enter as the importance weight (step 4 in Entering Responses) to weight each response. If there is only one response, then specifying importance is unnecessary. With two responses, you can give greater weight to one response by assigning it a higher importance value.
|
1.
|
To enter a continuous factor, click the Continuous button. To enter a Discrete Numeric or a Categorical factor, select the appropriate number of levels for the factor from the list.
|
|
2.
|
To enter several of one type of factor, enter the number of factors in the box next to Add N Factors. Then select the type of factor for which you want to add the specified number of factors.
|
|
3.
|

The default values for a discrete numeric factor with k levels, where  , are the integers
  . The default values for a discrete numeric factor with
  levels are -1 and 1. Replace the default values with the settings that you plan to use in your experiment.
Enables you to select from a list of designs. This option is the default. For details, see Choose from a List of Fractional Factorial Designs.
Opens the Design Generation outline where you can specify the number of runs in the near-orthogonal design. For details about near-orthogonal designs, see Near-Orthogonal Designs.
When you select this option, the Design List report opens. (See Design List. Once you select a design, click Continue to see the Display and Modify Design report. See Display and Modify Design.

A full factorial design has runs for all combinations of the levels of the factors. The samples size is the product of the levels of the factors. For two-level designs, this is 2k where k is the number of factors. This can be expensive if the number of factors is greater than 3 or 4.
These designs are orthogonal. This means that the estimates of the effects are uncorrelated. If you remove an effect in the analysis, the values of the other estimates remain the same. Their p-values change slightly, because the estimate of the error variance and the degrees of freedom are different.
Full factorial designs allow the estimation of interactions of all orders up to the number of factors. Most empirical modeling involves first- or second-order approximations to the true functional relationship between the factors and the responses. The figure to the left in Representation of Full Factorial (Left) and Two-Level Fractional Factorial (Right) Designs is a geometric representation of a two-level full factorial design with three factors.
A regular fractional factorial design also has a sample size that is a power of two. If k is the number of factors, the number of runs in a regular fractional factorial design is 2k – p where p < k. The fraction of the full factorial is 2-p. Like the full factorial, regular fractional factorial designs are orthogonal.
The trade-off in screening designs is between the number of runs and the resolution of the design. If price is no object, you can run several replicates of all possible combinations of m factor levels. This provides a good estimate of everything, including interaction effects to the mth degree. But because running experiments costs time and money, you typically only run a fraction of all possible levels. This causes some of the higher-order effects in a model to become nonestimable. An effect is nonestimable when it is confounded with another effect, meaning that the effects cannot be distinguished from each other. In fact, fractional factorials are designed by deciding in advance which interaction effects are confounded with the other interaction effects.
Experiments can therefore be classified by resolution number into three groups:
A minimum aberration design is one in which there are a minimum number of confoundings for a given resolution. For DOE experts, the minimum aberration design of a given resolution minimizes the number of words in the defining relation that are of minimum length.
The figure on the right in Representation of Full Factorial (Left) and Two-Level Fractional Factorial (Right) Designs is a geometric representation of a two-level fractional factorial design with three factors.

In cases of effect sparsity, a stepwise regression approach can allow for removing some insignificant main effects while adding highly significant and only somewhat correlated two-factor interactions. The Screening platform in JMP, Analyze > Modeling > Screening, is a streamlined approach for looking at sparse data. This platform can accept multiple responses and multiple factors, then automatically fits a two-level design and shows significant effects with plots and statistics. See The Screening Platform section for details.
The Design List provides fractional factorial designs for pure three-level factorials with up to 13 factors. For mixed two-level and three-level designs, the Design list includes the complete factorials and specialized orthogonal-array designs listed in Table of Mixed-Level Designs.
Cotter designs are easy to set up. For k factors, there are 2k + 2 runs. The design is similar to the “vary one factor at a time” approach many books call inefficient and naive.
A Cotter design begins with a run having all factors at their high level. Then follow k runs each with one factor in turn at its low level, and the others high. The next run sets all factors at their low level and sequences through k more runs with one factor high and the rest low. This completes the Cotter design, subject to randomizing the runs.
When you use JMP to generate a Cotter design, the design also includes a set of extra columns to use as regressors. These are of the form factorOdd and factorEven where factor is a factor name. They are constructed by adding up all the odd and even interaction terms for each factor. For example, if you have three factors, A, B, and C:
By default, JMP does not include a Cotter design in the list of available screening designs (Choosing a Type of Screening Design). However, if you want to make a Cotter design:
|
1.
|
Immediately after entering responses and factors (and before clicking Continue), click the red triangle icon in the Screening Design title bar.
|
|
2.
|
Deselect Suppress Cotter Designs. (The option is initially selected.)
|
Changing the setting via the red triangle menu applies only to the current design. To alter the setting for all screening designs:
|
1.
|
Select File > Preferences.
|
|
2.
|
Click the Platforms icon.
|
|
3.
|
Click DOE to highlight it.
|
|
4.
|
Uncheck the box beside Suppress Cotter Designs.
|


For example, a full factorial with five factors requires 25 = 32 runs. Eight runs can only accommodate a full factorial with three two-level factors. It is necessary to construct the two additional factors in terms of the first three factors.
In the example above, the values for Temperature are the product of the values for Feed Rate and Concentration. This means that you cannot tell the difference of the effect of Temperature and the synergistic (interactive) effect of Feed Rate and Concentration.
In the example shown in Generating Rules and Aliasing of Effects Panel, all the main effects are confounded with two-factor interactions. This is an example of a resolution-three design.
|
2.
|

|
4.
|
Click OK.
|
The Third Level Alias for the Five-Factor Reactor Example shows the third order aliasing for the five-factor reactor example. The effect names begin with C (Constant) and are shown by their order number in the design. Thus, Temperature appears as “4”, with second order aliasing as “1 5” (Feed Rate and Concentration), and third order confounding as “1 2 3” (Feed Rate, Catalyst, and Stir Rate).

In the Coded Design panel, each row represents a run. Plus signs designate high levels and minus signs represent low levels. As shown in Default Coded Designs, rows for the first three columns of the coded design, which represent Feed Rate, Catalyst, and Stir Rate are all combinations of high and low values (a full factorial design). The fourth column (Temperature) of the coded design is the element-by-element product of the first three columns. Similarly, the last column (Concentration) is the product of the second and third columns.

In the Change Generating Rules panel, changing the check marks and clicking Apply changes the coded design; it changes the choice of different fractional factorial designs for a given number of factors. The Coded Design table in Default Coded Designs shows how the last two columns are constructed in terms of the first three columns. The check marks in the Change Generating Rules table shown in Modified Coded Designs and Generating Rules for Temperature now show it is a function of Feed Rate, and Catalyst. The check marks for Concentration show it is a function of Feed Rate and Stir Rate.
If you check the options as shown in Modified Coded Designs and Generating Rules and click Apply, the Coded Design panel changes. The first three columns of the coded design remain a full factorial for the first three factors (Feed Rate, Catalyst, and Stir Rate). Temperature is now the product of Feed Rate and Catalyst, so the fourth column of the coded design is the element by element product of the first two columns. Concentration is a function of Feed Rate and Stir Rate.

The Design Generation report appears when you select the option Generate orthogonal or near orthogonal designs for main effects only or when there are no standard designs for your experimental situation. You can specify a number of runs in the panel, accept the default number, or select the minimum required number. An orthogonal or near-orthogonal design is constructed. Click Make Design to see the generated design.
A near-orthogonal design is a design with good balance properties as described by a Chi-square criterion. See Chi2 Efficiency. Such designs have desirable statistical properties for main effect models.
Specify the maximum number of seconds spent searching for a design. The default search time is 15 seconds. You can set a preference for Design Search Time (File > Preferences > Platforms > DOE).
|
•
|
|
•
|


The maximum possible value of χ2, denoted  , is obtained. The Chi2 Efficiency of a design is defined as follows:
Chi2 Efficiency indicates how close χ2 is to 0 relative to a design in which pairs of levels show extreme lack of balance.
Use the Output Options panel to specify how you want the output data table to appear. When you have finished, click Make Table to construct a data table for the design. Select the Output Options shows the Output Options panel for a standard design. For a main effects screening design, only Run Order is available.

Keep the Same The rows (runs) in the output table appear as they do in the Coded Design panel.
Sort Left to Right The rows (runs) in the output table appear sorted from left to right.
Randomize The rows (runs) in the output table appear in a random order.
Sort Right to Left The rows (runs) in the output table appear sorted from right to left.
Randomize within Blocks The rows (runs) in the output table appear in random order within the blocks that you specify.
Specifies how many additional runs to add as center points to the design. A center point is a run where every continuous factor is set at the center of the factor’s range. This option is not available if you select Generate orthogonal or near orthogonal designs for main effects only.
For designs from the Design List, specifies the number of times to replicate the entire design, including center points. Enter the number of times you want to replicate the design in the associated text box. One replicate doubles the number of runs. This option is not available if you select Generate orthogonal or near orthogonal designs for main effects only.
Click Make Table to create a data table that contains the runs for your experiment. In the table, the high and low values that you specified are displayed for each run.
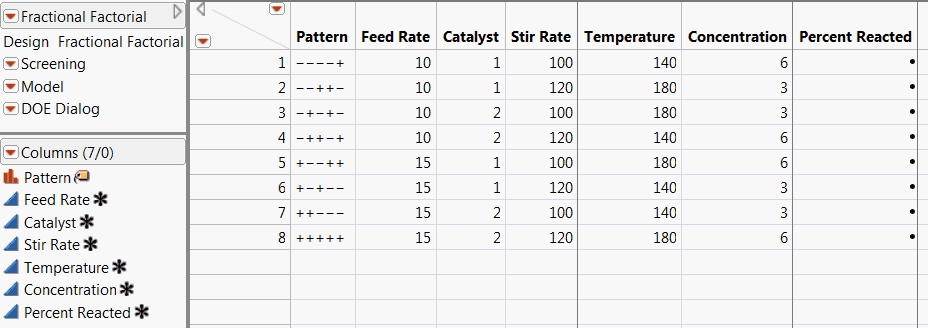
The name of the table is the design type that generated it. Run the Screening script to screen for active effects. The column called Pattern shows the pattern of low values denoted “–” and high values denoted “+”. Pattern is especially useful as a label variable in plots.