Data Grid
The data grid is the main part of the data table that contains your data. Figure 2.10 illustrates how to interact with the data grid. See also Select Rows in the Enter and Edit Data section.
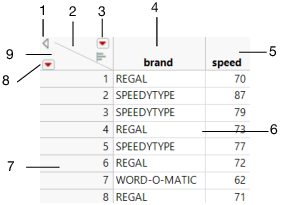
Figure 2.10 Interacting with the Data Grid
No. | Description |
|---|---|
1 | Hides or shows the data table panels. |
2 | Click to deselect any selected columns. To select all columns, hold down the Shift key and click. Double-click to add multiple columns. |
3 | The red triangle shows the columns menu. The histogram shows histograms in the column header row. |
4 | Click to select the column. Double-click to view the Column Info window. See About the Column Info Window. Right-click for column options. See Pop-Up Menu for Columns. |
5 | Double-click the column name to edit it in the Column Info window, or select the column name and press Enter. |
6 | Click and drag to change a column width. To change several column widths, select the columns, press Alt, then click and drag. |
7 | Click to select the row. Double-click to open the Row Editor. See Use the Row Editor to Edit Cells in a Row in the Enter and Edit Data section. Right-click for row options. See Pop-Up Menu for Rows. |
8 | Shows the rows menu. |
9 | Click to deselect all selected rows. To select all rows, hold down the Shift key and click. Double-click to add rows. |
Pop-Up Menu for Columns
Right-clicking in a column heading shows these options:
Column Info
Opens the Column Info window. See About the Column Info Window.
Standardize Attributes
Copies attributes (data types, modeling types, numeric formats, and so on) or properties (formulas, notes, list and range checks, and so on) from one column to other columns. Also deletes selected attributes or properties from columns. See Standardize Attributes and Properties Across Columns in the The Column Info Window section.
Column Properties
Contains a list of column properties. Select one to open the Column Info window and apply it to the column. This list is also available from the Column Info window. See Column Properties in the The Column Info Window section.
Formula
Opens the Formula Editor. See Formula Editor.
Recode
Enables you to change all of the values in a column at once. See Recode Data in the Enter and Edit Data section.
New Formula Column
Creates a formula column. See Make a New Formula Column in the Enter and Edit Data section.
Insert Columns
Inserts one or more columns before the selected column or columns.
Delete Columns
Deletes all selected columns.
Label/Unlabel
Labels or unlabels selected columns in all plots. See Label Rows and Columns in the Enter and Edit Data section.
Link ID
Used in virtually joined data tables to mark a column in the auxiliary data table as the ID column. That is, the rows of the data table are uniquely identified by the values of the ID column. The Link ID column property checkbox is selected if the column is the ID column for the data table. See Virtual Join Properties in the The Column Info Window section.
Link Reference
Used in virtually joined data tables to map a column in the main data table to the ID column in the auxiliary data table. The Link Reference column property specifies the path name of the auxiliary data table. See Virtual Join Properties in the The Column Info Window section.
Sort
Sorts all of the rows in the table by the values in the selected column. You can choose to sort the rows in ascending or descending order. See Sort Data Tables in the Reshape Data section.
Copy Column Properties
Copies the script to recreate the columns. It copies all the attributes and properties. If there are selected rows, the data are also included in the script.
Paste Column Properties
Pastes column properties as a single Add Column Properties script.
Copy Columns
Copies the column attributes without including data. For multiple columns, a list of New Column commands combined inside an Add Columns command are pasted. If there are selected rows, it copies the data of the selected rows.
Paste Columns
Creates new columns from the script generated by Copy Columns. The column will be placed after the selected column. If no column is selected, the new columns are placed at the end of the data table. The new columns populate (in the destination table) as many rows as there are data in the script.
Pop-Up Menu for Rows
Right-clicking in a row heading shows these options:
Hide and Exclude
Hides the selected rows in all plots and graphs and excludes them from analyses. See Hide and Exclude Rows in the Enter and Edit Data section.
Exclude/Unexclude
Excludes or includes selected rows from analyses. See Exclude Rows in the Enter and Edit Data section.
Hide/Unhide
Hides or shows selected rows in all plots and graphs. See Hide Rows in the Enter and Edit Data section.
Label/Unlabel
Labels or unlabels selected rows in all plots. See Label Rows and Columns in the Enter and Edit Data section.
Colors
Provides a color palette. Select a color to apply it to the selected rows. The color is used in plots and graphs. See Assign a Color to Rows in the Enter and Edit Data section.
Markers
Provides a palette of markers or symbols. Select a marker to apply it to the selected rows. The marker is used in plots and graphs instead of points. See Add Markers to Rows in the Enter and Edit Data section.
Color Rows by Row State
Colors the row the same as the current row state color. See Assign Colors or Markers to Rows Based on Column Values in the Enter and Edit Data section.
Select Matching Cells
Selects rows in the active data table with values that match the selected row(s). See Resize Rows and Columns in the Enter and Edit Data section
Invert Selection
Selects all previously deselected rows, and deselects all currently selected rows.
Clear Row States
Clears all active row states in the data table. All rows become included, visible, unlabeled, and show in plots as black dots. It does not affect row states saved in row state columns. See Delete Row Characteristics in the Enter and Edit Data section.
Add Rows
Adds the specified number of rows to the data table. See Add Rows in the Enter and Edit Data section.
Delete Rows
Removes all selected rows from the data table. Use the Undo command on the Edit menu to undo an accidental deletion. See Delete Rows and Columns in the Enter and Edit Data section.
Cursor Forms
The cursor takes different forms, depending on its location in the data grid.
Arrow Cursor 
The standard arrow cursor appears in the following locations:
– In the panels area to the left of the data table
– In the triangular rows and columns area, located in the upper left corner of the data grid
You can perform the following actions with the arrow cursor:
– To select a column using the arrow cursor, click its name in the Columns panel.
– Double-click a column name in the Columns panel to edit it.
– Click the triangular areas in the upper left corner of the data grid to deselect rows and columns.
Selection (Large Plus) Cursor 
When the cursor is at the top of a column heading, or in a row number area, it becomes a large plus, indicating that you can select rows or columns. When you click, that row or column is selected and highlighted. Click and drag to select multiple rows or columns, and hold down the Control key and click to select discontiguous rows or columns.
– Double-click a column heading area to see the Column Info window for that column.
– Select a column to change the column name. The column highlights. Begin typing (if it is not in a locked column or locked data table).
– Double-click the row number area to edit the rows using the Row Editor.
I-beam Cursor 
When you select editable text, the cursor becomes a standard I-beam. To edit text, position the I‑beam within highlighted text. Click to mark an insertion point, or drag to select text for replacement.
Double Arrow Cursor 
The cursor changes to a double arrow when it is on a column or a panel boundary. Drag this cursor left or right to change the width of a column or panel. Changing the width of a column does not affect the column field width specified in the Column Info window (accessed by double-clicking a column name).
Tip: You can adjust widths of all selected columns at once by pressing the Alt key as you drag the double arrow cursor on any of the selected column boundaries.
List Check Cursor 
The cursor changes form when you move the mouse over values in columns that have data validation in effect. It becomes a small, downward-pointing arrow on a column with list checking. When you click, the value is highlighted and the cursor becomes the I-beam. Enter or edit data as usual with any values defined as valid text or valid numbers. See List Check in the The Column Info Window section.
Pointer Cursor 
The cursor changes to a pointer over these objects:
– Red triangle menus for options
– Triangular disclosure icons  that open or close panels
– Table script titles for opening
– Modeling type icons for changing